Two-Color Block Printing - How To Do It
By now you are probably curious about how you can make a woodblock print
with more than one color.
- You could put more than one color on the same block.
- You could make a reduction print, where you cut away some wood, print
the block, then cut away some more wood and print it again with a different
color. Because you are using the same block over and over, it is fairly
easy to register it. However, you may need a separate registration block.
- You could cut a different block (the same size) for each color and
use a separate registration block to register the colors.
- You could "eyeball" the color registration.
Examples of woodblock prints which use multiple blocks are elsewhere
on this web site. Briefly, here's how to do it.
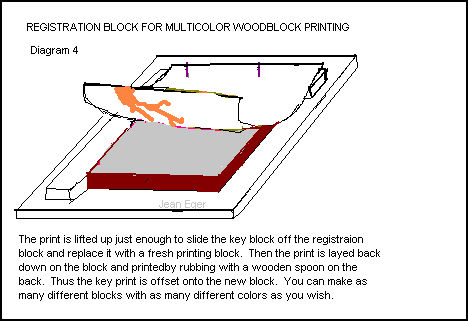
- 1. You will have to make a registration block from a piece of plywood
several inches larger than your printing block, and two pieces of wood
the same thickness as your printing block. Nail two nails into one strip
of wood so that the nails stick out the under side. Turn the strip over
and fasten it at the top of the plywood, either by nailing it or by gluing
it. Then fasten another strip of wood along the side, so that it makes
right angle with the top piece.

- 2. Slide the first block you have already cut (the key block) up into
the corner made by the two strips ( A and B in the picture).

- 3. I am still working on this page.

4.I am still working on this page.
4.I am still working on this page.
email: jeaneger@lanminds.com
Return to Jean Eger's
Printmaking Page, Main Menu.