Belling or Flanging Dies
Homebuilders, both of airplanes and race cars, often want to put
holes in things, both to lighten, and when properly used, to stiffen
aluminum structures. The stiffer part is often overlooked in
discussions of lightening holes. "Properly" in this context means
putting a flange around the hole.
There are several ways of doing this, starting with a "Bodo" or
"Bob" stick, a hardwood or aluminum stick with a slot cut in it, that
is used to bend the flange around the hole - tweak, shift, tweak,
shift, round and round, about 3 times. There are
patent
tools that use roller bearings to somewhat automate the same
drill. You can buy commercial "belling dies" in
steel
for big $. You need lots of different sizes, so that runs some money.
The Sonex people sell some nice molded plastic jobs; see their
web site. Or you
can make your own dies.
The following is my dialogue with my Sensei on the subject.
Sensei said:
I'm still messing with the flanging trick, which I've dubbed The
Duble. (i.e., do-able) The neatest part is that you aren't limited to
circles. Make up your optimum triangulated shape, zip it out with a
router and then use the routing mask to cast a die using a
high-strength metal-filled polyester resin. Tests with Bondo did
pretty well but there are some limitations; you must figure the
amount of stress in the corner; Bondo craps out pretty quickly with
thicker stock. Then you must figure out how to press the whole thing
at once. If you just try hammering it cocks and fractures the cast
punch. But pressed into place it works great.
Lots tricks in keeping things accurate; I'm using #6 nails &
5/64" drills to make my tooling holes. Little trick on forming the
base of the flange -- you gotta route a groove to act as a
foundation; it fills with the casting compound. Without it, the
flange feathers off to a thin edge and shatters in use.
Right now most guys don't bother to punch & flange their ribs
& formers because it's too much work. Router with an SCR
controller makes short work of aluminum, so long as you have a
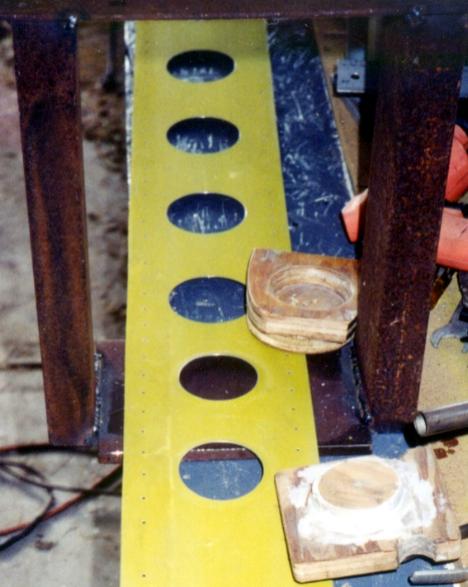
properly made pattern. All 24 ribs took less than five minutes to cut
out, including the holes. (That's a stack about 3/8" high; router ran
kinda slow but it will do up to 1/2"). Making a punch & die to
produce a perfect flange takes about 15 minutes and the only
'machining' is to router a radius on the hole in the pattern. (That's
another area of investigation. Bigger the hole, the deeper the
required flange, according to my 'stiffness' tests. Quarter inch
flange does fine up to about 1.5" diameter. Big holes, 5" and larger,
need a full half-inch. Everything else does fine with 3/8ths)
Beginners Mind Replied:
<<Doesn't the polyester (Bondo) exotherm a lot too? >>
Yes! But the shrinkage is part of what makes it work. I can
usually pop the formed punch out of the waxed 'die' while it is still
in the near-plastic stage, allowing me to use an air blast to cool it
off. The epoxy tends to start smoking & locks up long before it
is rigid enough to push out of the form.
<< But I wonder if aluminum paste from AS&S and cheap
polyester resin from the hardware store would work just as good...
>>
Maybe. I'm still experimenting. Today's test was to take a Bondo
die, grind away the curved part and REMOLD it using metal-filled
epoxy, needing only a fraction of an ounce to do a 2" die. Haven't
tested it (cutting wood, other chores) but I'm hoping it will not
break up the way Bondo does when flanging .040.
<< Are you forming the whole punch out of the goo? Somehow I
pictured just a veneer of thermoset over a wood armature...would save
a lot of goo, and reduce the exotherm problems by reducing the mass
of material.>>
For the small holes, yes. And for most of the radiused corners. I
shot some sheet metal screws into the punch-plate to give the Bondo a
bit more tooth. For big, round holes I screwed a plug into the
hole-space, leaving about 1/4" all around. You can't leave the gap
much narrower or you can't be sure of filling the curve. I prod it
down with the mixing stick, trim it with my pocketknife when it goes
plastic, and start pressing it out when it goes solid.
On another day, we got to talking:
For small flanges -- anything up to about 1-1/2", I use sockets.
All the way down to tiny 1/4" drive stuff. Just drill a suitable hole
in a block of wood, line things up and give the socket a tap with a
hammer.
Sockets come flanged both ways. 3/4" drive, the drive-end is
usually smaller, fairs into the socket-body with a neat angle. Make
the hole to match, find a bolt to fit the socket, turn her over and
whale away.
Going the other direction, just use an extension you don't
especially like as your driver. Or hit the socket itself. Most small
sockets have lovely cambered curves instead of sharp angles, plus a
nice chrome finish that doesn't mar the aluminum.
Do a panel -- something like one of the curved bulkhead pieces --
it always comes out not-flat. Various tricks to flatten it out... or
none at all, if it's not going to be see. One trick is to use the
sockets again. Bigger ones, so they'll fit down over the flange. Lay
the part on a solid surface, flanges pointing up, use the socket to
gently tap down the area around the flange. Masking tape on the edge
of the socket prevents doing any damage.
Sounds like a hoo-rah solution but once the part is riveted in
place, all nicely painted up, nobody gives a hoot how it got its
shape.
On yet another day, we got talking again:
> I'm making tooling these recent evenings, last night I
finished the fluting tool, I'll post a picture of it soon, and
drilled an aluminum ruler for a rivet pitch gauge. Next up are rudder
templates, and lightening hole flange dies. How many, and what sizes
do you recommend?
I donno. I make them as I need them... if I really need them. For
the wings, it makes pretty good sense to make them as part of your
form blocks. For the bulkhead sides I'd probably use the arbor press
and an individual die. Then again, I might make them as rectangular
openings, mebbe 1x2. The work is being done in the flanges. Bulkheads
should be mostly empty space. Those enormous flat panels aren't doing
anything but providing some tensile strength and adding weight. Since
there isn't much of a load in tension across the bulkheads, you could
get rid of most of it.
On yet another day, we got talking YET again:
> I'm just about ready to slather Bondo onto my first trial
flanging die, and I'm wondering about the radii. I used my smallest
roundoff router bit (1/8R), and I'm wondering if I should go a size
bigger. The tiny radius I have on there now means a pretty shallow
flange, liable to trip in buckling.
Okay, STOP. Grab a pencil and make a quick sketch of a 90-degree
corner. Inside your 90, sketch in a uniform radius... size doesn't
really matter. Now LOOK at the drawing. The HOLE is represented by
the sharp corner of the 90. Guesstimate the ARC and swing it over to
your uniform radius... and make sure you remember it's going to
spring back by as much as 10 degrees.
I'm guilty of leading you down the wrong path here because
flanging dies with rounded edges work best on THICK stock.
Does your router bits include a 45-degree? Howzabout a dovetail
routing bit (ie, 60 degree)?
I've found that any metal thinner than .032 flanges best using the
sharp corner provided by the 45. The reason has to do with the amount
of flange you need to get the required stiffness. The first sketch
will show you the mathematical relationship between the arc and the
resulting depth of the flange, and as you're about to discover you
need at least a 3/8" radius (3/4" rounding bit) to give you enough
depth... that is, to form a flange (taking into account its
spring-back) that bends over far enough to give you the stiffness
you're trying to achieve. To calculate the flange depth with the 45,
just use trig. Depth should be something like .7 the base.
(Springback reduces it from the .707, etc)
OK, enough words, show me some pictures!
Here's a die set for a 3/4 inch hole. The female die is tapered
to fit between rib flanges, and the face of the female portion is
wide as I can make and still fit, to give enough strength to avoid
splitting the die when it get pressed. The female die got radiused on
the inner diameter, then finished with Delft Clear Wood Finish, which
is lacquer with a little wax in it.
<![if !vml]>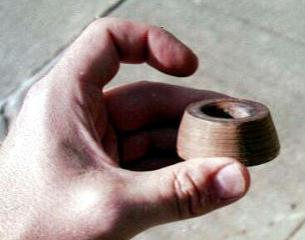 <![endif]>I've used a
hardwood dowel for the centering portion of the male punch. The dowel
is glued and screwed into a close fitting blind hole, which is in
turn surrounded by a routed recess, as indicated above, to avoid a
feather edge on the <![if !vml]>
<![endif]>I've used a
hardwood dowel for the centering portion of the male punch. The dowel
is glued and screwed into a close fitting blind hole, which is in
turn surrounded by a routed recess, as indicated above, to avoid a
feather edge on the <![if !vml]>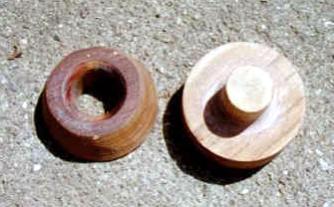 <![endif]>generic auto body
filler is used on this die.
<![endif]>generic auto body
filler is used on this die.
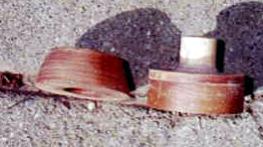
Put the Bondo on the "corner" area of the male punch, slap them
together in a sexually suggestive manner, wait until the remaining
Bondo still on your mixing palette starts to "cheese" off, then
separate them, and start trimming it up with a razor blade. Wait 2-3
days before trying your first forming operation.
I haven't tried it yet, but my next experiment is using aluminum
or stainless steel powder from
Douglas and
Sturgess mixed with polyester resin instead of talc-filled Bondo.
I use a big vise to squeeze these things; I also have a ChinCom
arbor press (cheap as dirt, and VERY useful, just treat it like a kit
of parts, I had to file, scrap, and adjust mine a bit till it worked
to my satisfaction).
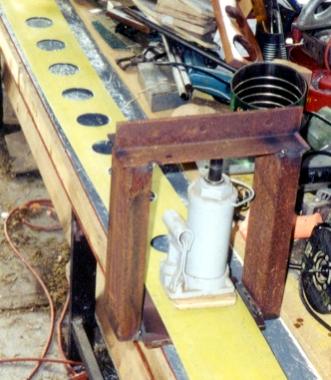
Sensei adds:
Somewhere over the rainbow... or perhaps out in one of the
sheds... I have a hydraulic press-frame I made to do ball joints
using a bottle jack. This was back before I had a floor-type
hydraulic press. So I'm pounding the shit out of the outer panel spar
webs, forming the flanges, mostly on the right side, and June comes
out to ask what all the pounding is about. Just me. But what if the
builder lives in an apartment house, barracks or dormitory? And
besides, my knees were giving me hell. So I kicked around under the
bench, found a small bottle jack, some 1/2" HRS plate, an old table
leg and a piece of angle iron two feet long. Less than 30 minutes
later I had a very compact pressing frame. Slide the shear web
through it, position the flanging blocks, sit the bottle jack on top
of the sandwich and do what comes naturally. Nine strokes of the
lever later I got a perfectly formed flanged. Did the four small
diameter holes in about five minutes. I've made a new flanging die
for the 3" holes, still waiting for the filler to harden. I'll have
to redesign it (the press frame) so folks can make it out of 2x4's
but it's just too handy to ignore.

The big bench vise is faster for ribs and the like, and with the
Acme thread and a 24" cheater, it's probably about as strong as the
little bottle jack (odd rating... 8.5 tons) Using soft copper, I did
a crush-test with the vise shortly after I bought it and got
something like 20,000 psi for the area of the copper slug (about .5
square inch). You don't get that for the entire area of the jaw, of
course but it does a fine job squeezing flanges into .020 stock.
I've found on the larger dies, especially where the Bondo forms
the outer rim of the male punch, you need to put some draft (taper)
on the female portion to be able to break the stiction between the
two pieces when you moosh them together.
E-mail
me
Go
Back to Ryan's Home Page