Carving your own prop
Why Bother ?
There are lots of craftsmen out there who, for from $250 to $700,
will carve you the prop you think you need. They all do nice work,
chose one if you're not up for doing your own.
But it may take you a few whacks at the pitch and diameter to get
the performance you want from your engine/airframe, and that can run
some money. So, the ability to carve your own, and modify them, if
need be, is useful.
Another point: It's FUN! It's pretty rewarding to see the shape,
which is rather complex (sexy even), emerging from the blank.
Finally, it's an excellent excuse to buy new tools!
The first tool I suggest is a book. "Propeller Making For the
Amateur" by Eric Clutton is the best book on the subject, and
likely would be even if it wasn't the ONLY book on the subject. You
can buy it from the
author,
or
online.
Next, you need a spokeshave, the widest chisel you can lay your
hands on (at least 2 inches, more is nearly impossible to find), and
a new, sharp rasp, perhaps a Farriers Rasp, with 4 cutting surfaces,
coarse and fine, flat and convex. The chisel and rasp should be
available at any well stocked home improvement place, the spokeshave
you may have to hunt for. Lee
Valley Tools has an unusually fine variety of them to chose from.
A flat sole Record is a good place to start. You may consider a
drawknife as well, if you do, make sure it is wider than your desired
blank.
Once you've got all your edged tools, sharpen them to the keenest
edge you can muster.
But rather than me telling the story, draw up your chair and
listen - errr, read a dialogue on the subject. My Sensei and I will
lead you along.
Sensei Said:
How would you like to become the Unoffical Propeller Maker for the
group? I'll help you set up a profile cutter. Your task will be to
make up the blanks, rough-saw the plan-form profile, lock the blank
in the profiler and shove the arm back & forth for about an hour.
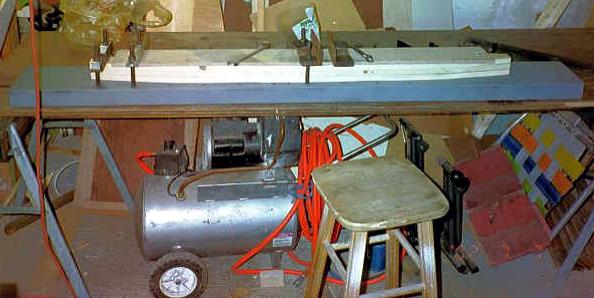
Profiler is about two feet wide, three feet long and a foot thick
with the router removed. The carriage comes off and the whole thing
can hang on a wall somewhere when not in use. It needs to be clamped
to a table when you're cutting.
Wood dust isn't toxic; it's the sort of thing you can do around
kids. By hanging a bit of anechoic material around the roof &
walls, and putting down those sponge rubber interlocking floor tiles
on the deck, you can generally work in a residential neighborhood
without disturbing anyone. Power consumption is low... as is
production speed :-)
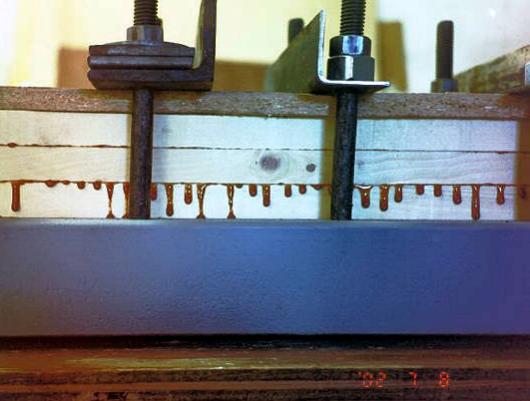
You need a clamping press for your blanks, which I'll weld up for
you. It's just a strong-back; a hunka C-channel works fine. 1/2"
foundation J-bolts do for the studs, with cross pieces & blocks
made of maple.
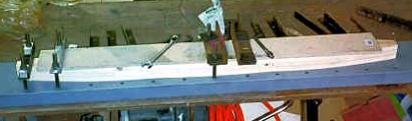
I ended up making it myself, here's a few views of
it:
Gee, a piece of 8 inch wide channel iron 6 feet long is about all
I can lift. It's so heavy I'm not sure my cheap Delta drill press
table will support is as I drill about 20 1/2 inch holes in it for
the J-bolts.
Your drill press doesn't have to support it. And probably
shouldn't. The value of a drill press is in the drill and the press,
not the table.
Put the drill press on the floor. Put the piece of channel on a
couple of blocks. Move either the drill press OR the channel. Or,
if you want to keep the drill press on the bench... and if the bench
is long enough... rig your support blocks there.
The only reason for using steel is because of the gluing pressure
required with hardwoods and resorcinol glue. With softwoods you
don't need as much pressure.
Nor is it absolutely necessary to drill a hole for the J-bolts...
they may be welded to the sides of the strong back.
Long after the fact, Student muses:
I don't weld, so I drilled. In retropsect, welding the bolts on
the sides would have been preferable in many ways. It would have
allowed the use of a wider blank. The shortest J-bolts I could find
at Home Repo were a shade long, and I had to pack the nuts out with
washers - welding them on the side of the channel, I could have
effectively shortened them.
If you standardize your design you can tailor the blank to match that
particular profile. That means you cut away all of the waste BEFORE
you glue up the blank. Reduces the cost going in and shortens the
time to produce the rough-carved prop.
You need a drill guide for the hub, which I can make for you. You
also need a piloted Fostner bit for the 2" dia recess on the rear
face. A band saw is a big help but only if it's a BIG bandsaw.
Otherwise, a sabre saw and pocketful of blades will do.
Total time to produce a profiled prop is about two hours (!) Then
comes the FINISHING, which can take up to four hours even with power
tools.
So price yourself at $10 an hour, your tools at the same and sell
UNFINISHED carved props for $120. (With power tools, using mahogany,
finishing takes only about two hours. Add an hour for birch or
beech. Add as long as it takes for maple.)
Just about any hardwood will serve. You should have one piece
that runs the full length but you can laminate two of the inner plys.
I'm assuming you'll buy finished hardwood, 3/4" thick, and use four
plys. Weldwood 'Resorcinol' glue is inexpensive, non-toxic and has a
wide temperature-cure range. Only disadvantage when compared to more
modern adhesives, all of which are dramatically more expensive (and
most are toxic as well), is the need for a minimum clamping pressure
of 70 psi... which is easily achieved with the strong-back described
above. <see this digression
about glue>
The reason I mention all this is two-fold: Firstly, once you have
the equipment and have made a few, carving props is like finding an
extra couple of hundred bucks each month. The fact you can float it
below the income-tax horizon leverages it even more. But the main
reason is the fact that our props will be rotating opposite to
everyone else's. And our engines will be bit more powerful. We're
going to have to carve our own props whether we want to or not.
Student Replies:
> Do I have to carve the blank by hand? (better get me a
spokeshave, he says, knowing full well the answer)
If you mean your masters, yes. But it's a lot easier than you
think. The profile master can be of any material. Pine works okay
so long as its sealed & sanded with epoxy. You keep it waxed,
don't put a lot of pressure on the follower, it won't wear out for at
least a hundred blades... by which time you will have figured out you
can cast your masters in epoxy... or solid cast aluminum(!!)... or
just made yourself a handful of maple masters.
Ruff finished (good name? Ruff Props :-) ...ruff finished, the
prop has a little tit on the end of each blade and a slightly wavy
surface, reflecting the the cutter, usually a half-round cove bit
but it can also be a ball-end milling cutter. The trick to getting a
good finish on such a surface is to NOT use coarse sand paper, which
will cut down the ridges and keep right on cutting. You use a medium
grit on a HARD rubber block, which may be on your regular orbital
sander (you just glue on a different foot). That knocks down the
ridges in a hurry but the cutting action slows as you approach a
plane surface, at which time you shift to a finer grit and softer
foot on the sander (ie, more compliant).
Harbor Freight sells a profiler. It will only handle material up
to 28" long and has no provision for centering a prop, but may be
easily modified. I've drawn up a profiler I meant to build. A lot
sturdier than the HF thingee. The frame should be welded since
vibration is a problem but it could be assembled with bolts (and a
lot of luck).
Are you going to send me profiles to make templates
out of, or is that "an exercise for the reader"? Either way works,
so long as I know what base airfoil to use.
You can have what I've got but it isn't very sexy. Clark-Y is
mostly just an inclined plane with a rounded top.
Everything you've ever heard about propeller airfoils is 99% hype.
I used to make the clamping rings for Bernard Warnke, the guy who
made ground-adjustable wooden props. (Dead now but I think his wife
is still making props.) Bernie worked with NASA and several
universities making special props, including that humungous 70-foot
long single-bladed monstrosity on an experimental wind-generator that
was on the cover of Popular Science.
Bernie could hold the surface of his composite-finished props to
better than .01mm/meter, which is what all the engineers said was
necessary if the blades were attached to a jet engine (They were
flying a DC-9 around with a set of Bernie's blades on the engine,
trying to figure out how the Russians did it :-)
One of his boys was helping him in the test cell and mistakenly
bolted up an unfinished prop, a thing Bernie had been using as a test
club for running in engines. Bernie ran it throught he full set of
tests and was disappointed that the numbers were so poor, about EIGHT
PERCENT off the predicted values.
When he saw what was on there he couldn't believe it, spent about
a month completely auditing his test cell, which checked out. After
that he started bolted all sorts of stuff to the drive -- unfinished
props, imbalanced props (ie, blades at different angles) and so
forth.
Do the best you can, it won't make a lot of difference BELOW THE
SPEED OF SOUND. The worst prop in the world will do to within a
couple of percentage points of the best thing he could produce.
Which isn't to say a couple of percentage points isn't
significant... if it's on an R-2800 and you're trying to make a
living. Or if it's an air turbine that produces 28hp in an 18 knot
breeze. But for a Volkswagen you're already so far down the curve
that the difference between a sooper-dooper ultra-accurate perfectly
finished prop and that thing on the wall with a clock in it... is too
small to notice.
So don't worry about the air foil. DO worry about the balance,
symmetry and weather-proof finish.
I've gone back to my original method of gluing patterns to wood:
Finish the wood with some form of sizing or sealer then soak the
patterns in varnish and stick them to the wood. I've been going
through every possible combination of aligning the typewriter-size
pattern pieces, gluing them to all sorts of substrait with spray
adhesive, which tends not to work very well if your goal is to
produce a sturdy WOODEN pattern. Works fine for one-offs, where you
glue the pattern to the metal and cut it out with a pair of dutch
snips.
Interesting reference I stumbled upon.
http://www.hq.nasa.gov/office/pao/History/SP-445/ch4-2.htm#fig30
A Clark Y seems to be well approximated by a NACA 6412. On props,
towards the root at least, the airfoil is not truly a Clark Y - the
thickness bulks up pretty fast. Thus my interest in finding a NACA
profile that more or less matches - I can use a 6412 where
appropriate, and a 6426 in close to the hub.
In the article described, the airfoil thickness ranges from 12.5
to 4 - way too thin for wood.
Still, the notion that airfoil profile has much to do with prop
performance seems to have little merit.
Hubs don't matter.
Tips matter.
The outer third of the blade produces 71% of the thrust and the
distribution of thrust within that ring is equally skewed, with 71
(or 70.7%) being produced by the outer third of the outer third.
Buncha assumptions: Tip speed never exceeds 880 fps (standard
atmosphere/standard day, etc).
Hubs don't matter because they're only a small percentage of the
prop's blade and are moving at too low a speed to make significant
contribution to thrust. Covering the center portion of a propeller
will usually improve its overall efficiency, especially with regard
to engine cooling. How much do you cover? Up to 25% for small
diameter, high speed props; less for larger, slower turning props.
I can't cite references; too long ago. Jets have pretty much
pushed prop people out of the picture, at least in the military.
Thinking about my post in which I mentioned thickness, I think I
gave the wrong impression about chord/thickness ratio. It's
supposed to INCREASE toward the tip. Starts at about 11%, ends up
about 15%. Reason has to do with rigidity as the blade tapers. Too
thin, it either flutters or warps.
The warping is one reason for having two plys all the way to the
tip, even if you have to mill down a couple of pieces to get the
right plank thickness. This has largely been ignored since the
advent of fiberglas sheath as a means of finishing.
That's ass-backwards from the aerodynamic theory,
which advocates thick sections at the root (26% in one citation) to
deal with the lower velocity and disturbed flow (thick sections have
much more tolerance for off-design angles of attack)near the hub, and
thin sections at the tip for lower drag in high speed flow. I assume
that your statement reflects the realities of wooden blades.
Yes, it is ass-backwards. And yes, it reflects the realities of
carving a wooden prop. For example, the calculated tip chord comes
out to something like 1.25" for which the optimum thickness is about
8%. But try carving an airfoil an inch and a quarter wide with a
maximum camber of a tenth of an inch and you'll see why most end up
more on the order of 3/16" to 1/4" thick (ie 15% to 20%)
Ready to start carving props?
Why don't you go down and find some clear pine or hemlock 1x6,
about 15 feet of it. cut it to 60", put a 1/4" hole in the
middle-middle of each board, sand them good, wipe them down with a
damp rag, mix up some Weldwood 'Plastic Resin' (5:2 by volume), put a
smooth shanked 1/4" bolt in the hole thensmear on the glue using a
fine-tooth trowel. Plop on board #2 and repeat the smearing. Plop
on #3 and get busy with your C-clamps. You'll need at least 18. Put
down packing strips so the clamps won't mar the wood. Bring the
clamps up snug then go wash up your tools. Use hot water & soap.
(I've used the same glue brush & spreader for more than 20 years
:-)
Here we go:
Once your tools are cleaned up, go back and tighten down the
clamps. You NEED to do it this way or you'll get voids in the glue
line; the excess glue needs time to ooze out of the lamintations.
It's a hell of a mess but after the glue gels you can scrape off most
of the excess.
Leave the thing a full 24 hours before taking off the clamps.
You'll end up with a balk of timber 5-1/2" wide by 2-1/4" thick,
which is enough for a low power (ie, flat pitch) VW prop.
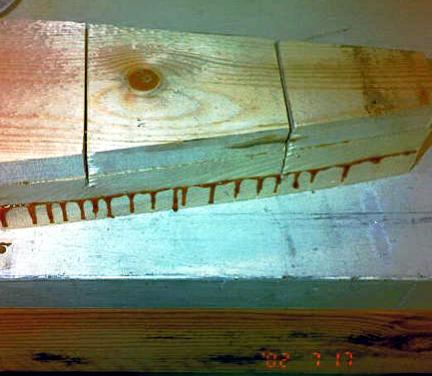
If you've got a BIG bandsaw with a 4 tooth-to-the inch blade, you
can draw your side profile onto the blank and cut it out. Make up a
pattern for the plan-form profile and draw it onto the top of the
blank and run that through the saw.
If you don't have a bandsaw do it the other way 'round: Draw the
plan-form profile and cut it out with a sabre saw, then use a back
saw to notch down to the side-view profile and chunk it off with a
wood chisel.
About like this:
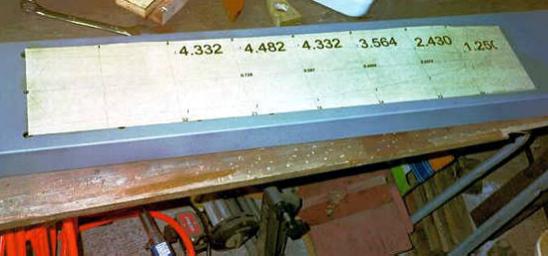
When you get it down to a rectalinear plank having the plan-form
shape on the top and the side-view taper on the side you will be left
with two three angle cuts on each blade, two for the cambered surface
and one for the lower surface. Since you'll be using the lower
surface as your reference, do it first. Use the same procedure as
above; a back saw to cut notches NEAR the line of the angle then a
WIDE wood chisel to chunk it off. (If you use a narrow wood chisel
it's liable to start a splinter. Go over to Harbor Freight and get a
cheap wood chisel with a blade at least 2" wide. Then sharpen it to
within an inch of its life.)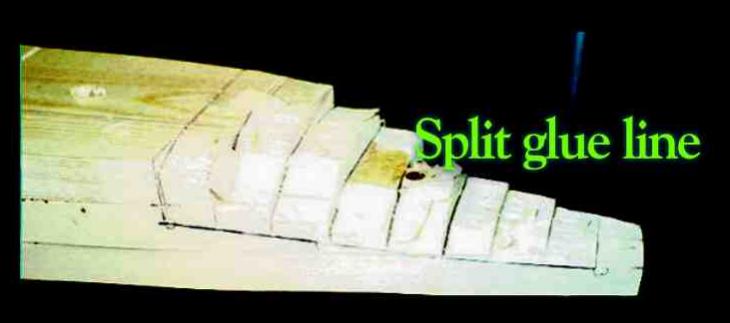
Got a spoke shave? How about a draw knife? Okay, how about a
portable 7" disk sander with a #36 grit disk? What you want to do
now is to fair the lower surface into a true surface. You'll need a
protractor jig and some means of telling where you're at on the
blade. Use the center hole as a guide and the top of you work bench
(or a nice straight grained 2x8) as your true surface. You can use
the computer to print up the angles you'll need. Glue them to scraps
of plywood, cut NEAR the line then sand them to the line.
Put your station marks on the BENCH, not the prop. A bit of chalk
on the protractor/guides will tell you if your angle is high or low
and on which side of the center line.
Once you have one blade with a uniformly twisted lower surface,
make the other blade match. Once both blades have the same lower
surface you can start shaping the camber. You'll need your airfoil
station profiles for this.
A few illustrative photos:
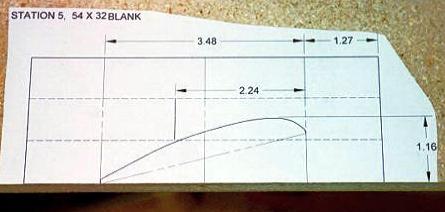
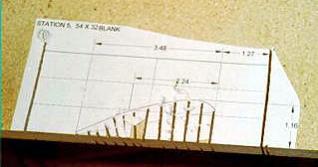
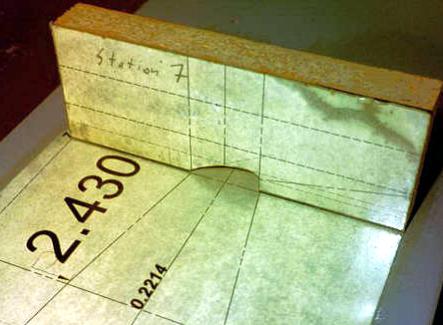
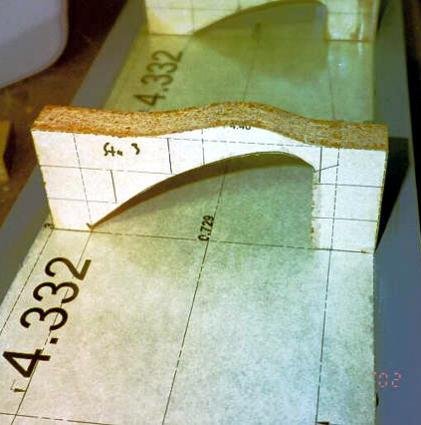
More after the fact musings - I did these profiles backward,
thickness whise. I should have made the top, airfoil profiles thin,
.090 alumimum for example, and the lower profile angle gages fat
enough to smudge with chalk.
Use your coarse-work tools to get close to the profile then start
smoothing things up. If you make a mistake, go over and make the
same mistake on the other blade :-)
You need a 2" diameter Fostner bit for the center recess, and a
drilling plate for the mounting holes. I can send you a drilling
plate but if you have a prop hub, use that. Don't drill through the
hub, use a transfer punch that fills the hole. Drill that hole
(always with the drill press) then putthe hub back in place with a
bolt through the hole you've drilled and transfer the other holes.
The tricky bit here is centering, which is why you use the Fostner
bit. It should match the central rim on the prop hub. If you're
just using a drill-plate (ie, flat steel with a center hole) you'll
need to make the center holes match.
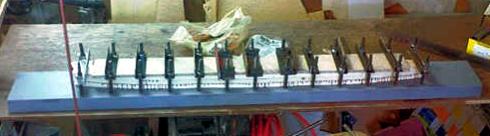
Do your first rough balance before you do any finishing. You can
make a suitable balancing jig using a pair of joiner blades and stock
lumber sizes.
Use a piece of 1/4" drill rod for you balance pivot. On a pair of
sharp joiner blades it should be more than sensitive enough.
Although removing material from the tips has a more immediate
effect in balancing, try to get a zero-zero balance in the unfinished
blank byremoving wood from the hub area, where it's least important.
After you've applied a finish to the prop do the fine balancing
using PAINT.You'll have to let it dry. Just put on more than you
think you'll need, let it cure, then SAND OFF THE PAINT, or as much
of it as you need to achieve a good balance.
A good prop should be flat black on the back-side and have white
tips. If the wood is pretty you can leave the finish clear but if
you've got lots of pin-knots or an ugly glue line (or even some dobs
of filler down around the hub), then paint it so as no to scare
everyone :-)
Your first prop is liable to be a mess. In fact, your first half
dozenprops are liable to be messes. So make them out of pine
shelving. Or old fence posts. Or whatever. (I've made (and flown
behind!) props carved out of mahogany dunnage.)
Given the cost and the mess and the time, you probably won't pay a
lot of attention to my mention of pine shelving props. But each one
of your 'learner' props is worth between $50 and $100, especially if
you give it a soaking of Walnut stain before doing any finishing.
(Make sure your stainis compatible with your finish. Most stains are
oil based, require finishing with varnish. If you want to finish
with resin & fiberglas you need one of the water or alcohol based
stains.)
What makes them worth that much money? Mostly, it's the $2.75
clock you stick in the middle :-) (American Science & Surplus,
p/n 33311 "Quartz clock works," $2.75 ea.) You simply route the
face of the prop to accept the clock movement & bezel. (This
also serves to render the prop unusable for an airplane.) Usual
outlet is the local swap meet but putting up a notice on the bulletin
board at the local grocery store is surprisingly effective.
One thing you quickly realize when carving a prop is that carving ONE
blade is dead simple. The trick is getting the other blade to match
:-)...which is why profilers are so popular. Carving a master is
easy, especially if you're working in pine... or foam (!)
Using a router, you can make a profiler out of surprisingly
unsophisticated materials and still turn out perfectly acceptable
props. In Japan we made one out of plywood with chair casters for
the carriage and a piece of water pipe and some U-bolts for the cross
bar.
You were right about the first prop not being worth a
shit! It is pretty rewarding to work the wood though, and make
something that looks like a prop. The thickness tapers are roughed
out. Next come the back bevels.
Others things the next clock will get different:
A wider drawknife! The one I bought doesn't span the width of the
blank. It's therefore useless except at the tip.
Don't cut the blank down before gluing it up. I didn't do it very
accurately, figuring why bother? It's gonna slip around anyway.
It's making it hard to mark and cut the thickness taper, and it means
I've gotta clean it up anyway before I work the templates. The
reason I did it - my jig wasn't wide enough to accommodate the full
6" width. Fine, but cut the damn blank narrower, but square prior to
glueing - the BACK of the blade is going to be flat until the rough
shaping, so the planform can be cut AFTER the thickness taper.
Wish I had a band saw. Would've taken me about a minute to cut
the thickness taper, instead of nearly 4 hours. Even better would be
a shipsaw, then I could cut the constantly changing back bevels!
http://www.scmaritime.org/DSCN1483.JPG
in the background, the table is fixed, the saw tilts.
I was seduced into not sanding by the translations from the French
of the RSA material, which also advised against sanding before
gluing. And I'm also wondering if the glue line WAS warm enough. I
was alarmed by how little squeeze out I got, but it looks to me, from
examining the glue line, that wasn't the problem.
I did NOT sand or scrape the surfaces before clamping up.
Whoops.
If you did nothing to the mill surface then you put the glue down
atop a layer of water-soluable WAX that is used to lubricate the
milling machinery.
Milled surfaces must be 'broken' or 'scuffed' at the very least.
I sand the shit out of them, get them nice & furry using about
#80. Then I wipe them down with a damp cloth and apply a LIBERAL
coating of glue, usually to BOTH faces. (If you do it to only one,
they will align better; do it to both, they tend to 'float' or skid
around as you're clamping-up.) I judge the quality of the glue-up by
the amount & distribution of the squeeze-out. Glue is cheap,
relative to airplanes. And the glue job has to be a life-time sort
of thing.
FPL <Foresst Products Labratory - RRY> sez to NOT glue a
sanded surface; that the sanding will clog the pores of the wood and
prevent penetration of the adhesive. I say it depends on the texture
of the wood and the coarseness of the sand paper.
Another thing you should do anytime you use glue is to make up
three test blocks. You bust one of them after 24 hours, another
after 72. The third one you write the data on, varnish it and keep
it forever. Or until the wing falls off. (Drill a hole thru one
end, wire it onto a necklace of other test blocks).
Your construction notes sez what you used that particular batch of
glue for.
If the wood does not shear, you rip out the work done with that
batch of glue and do it over. (Glue block is typically 3/4 x 3/4 x
3". The glued area is typically 1" long. To test, you clamp the
bottom part in the vise, hit the top part with a hammer. Good is
when the wood shears. Bad is when the glue shears.)
Why am I building a prop?
It seems out of sequence for the project. My rationalization is
that I need the practice and to prove out my tooling before carving a
prop good enough to fly behind.
Were you ever exposed to the Critical Path Method, or the
statistical version, PERT? It's a way of managing projects. You
build the frame before you hang the door, but you have to buy the oak
sill before you do either, and the lead time is 5 days, so if you
want to start on Tuesday, you won't be done, no matter what you do,
until next Friday. And there may be parallel paths. The Critical
Path is the one that laid end-to-end defines the length of the
overall project. Put another way, the Critical Path is the
irreducible mean.
Hahahahahahaha :-)
I was one of Grace Hopper's 'Young Turks.' She used to audit my
lectures at the Navy Yard. (I had no idea who she was.) I never
worked with Rickover -- Hymie didn't care for Chiefs -- but I was one
of the people who automated his Program Evaluation & Routing
Technique... and added a host of Management Indicators to it, allow
the more timely allocation of managerial resources when it became
obvious a required step was going to impact the central path.
Carving a prop when I don't have a spar, let alone a
fuselage or an engine, does not, at first glance, look like it's on
the Critical Path. And I want to finish before I turn 50 in 7 years.
You can't fly without a prop. Order a prop and all they want to
know is what diameter & pitch. Props from different makes having
'identical' diameter & pitch may have as much as a 300 rpm
difference in static run-up.
It will probably take us three props to find the best one for our
particular configuration. A good prop costs about $300. By carving
our own we have the ability to achieve the best match at the least
cost, and the cost will be a pittance compared to shopping around in
hopes of finding something that works.
With two of us to work on the project it's obvious there must be
some division of labor. Props are a downstream Event that is going
to lump our cost & time if we don't have the ability to make them
ourselves. Coming up to speed on their fabrication at this time will
serve to flatten that lump when it occurs, since we will probably
need only two iterations instead of three to arrive an acceptable
'first flight' propeller.
My recent conclusion is that I'm not carving a flight
prop right now, I am, in effect, buying the sill so later I can hang
the door. And therefore, this "out of sequence" task may accelerate
the schedule.
If you've never carved a prop... or danced the Tango, free-dived
to 60' and swam with sharks... you have to start somewhere. Props
are actually kind of easy. But as with anything, the devil is in the
details. They are in fact a rather messy, detail-oriented procedure;
the easy part begins once you've convinced yourself of that fact,
which can't happen until you actually carve a couple of props.
So we've begun. I've danced the Foxtrot (wouldn't
mind doing it again, come to think of it), free-dove to 30 feet, seen
a few sharks....soon, there will be a prop to hang on my parents
wall.
I have concluded I'm wrapped way too tight. Once I plotted out
the prop planform full size, it became very obvious the distance
between hole centers on the gluing jig <after drilling 20 big
holes in fairly thick steel, I though the prop wouldn't fit between
the j-bolts> , my freak-out for yesterday, is a non-issue, at
least for our props.
Generally, I agree. But I can't trust my email perceptions.
In this matter, I think you can ;-)
It IS only an airplane. And a prop. And an engine. If it looks
even moderately LIKE an airplane, the silly sonofabitch will probably
fly, assuming it isn't made out of lead. If the prop is properly
glued together to start with, it won't fall apart when it's spun up.
And if it can be spun, it WILL generate some thrust. Even a bone
stock engine provides enough thrust to fly the <>, and enough
durability for at least a hundred hours in the air.
All else -- resolving the confusion in the plans, optimizing
strength-to-weight, carving a prop that's more than about 60%
efficient, building an engine capable of producing twice the stock
thrust yet lasting a thousand hours -- all of those things are
quibbles; pimples on the ass of homebuilt reality. We could have
been flying months ago if we took <>'s slap-dash approach.
So, I cemented the pattern on some door skin, to make
another pattern for positioning on my boards to try and avoid the
worst of the knots. Got one blank cut out. Plotted all the stations
full scale too, next I'll cut top and bottom "gages" that have an
edge to reference the base of the workbench or gluing jig. I might
have my dad's clock done by Father's day, although I doubt it.
<It's now nearly Christmas, it MAY get done in time.>
As for my progress, the pine propeller clock blank is glued up, and I
also started making gauges for shaping the propeller.
On the propeller, I'm a little sketchy about how to keep a
reference line, or plane. Right now the blank is roughly cut to the
profile, but soon there won't be a single straight line on it, or a
flat plane.
The "gauge" blocks are being cut with some care, to a uniform
width, so that perhaps a reference plane could be established BESIDE
the prop as it sit on the bench. The other thought is to cut to the
finished profile very, very carefully, and let the profile itself act
at the constant reference. The final thought was to use a laser or a
taut wire to establish a centerline for getting the "gauge" blocks
lined up.
Maybe I should just get Clutton's book....
The only accuracy needed is in the flat lower surface. The
airfoil templates simply hang over the leading & trailing edges
Most of the 'hobby' propeller methods keep the trailing edge flat.
The calculated loss of efficiency ranges from three to eight per
cent, depending on rpm & diameter. In actual use, you would have
to compare the 'hobby' prop to a polished metal prop for any loss to
become apparent.
But when the blade is truly twisted along its span and the center
remains in the center of the stick, the usual method is to keep the
hub bolted to your bench or jig (which only has to be half the prop.
diameter to work) and measure from the surface of the jig or bench.
In fact, the same set of lower-surface templates may be used but they
must be raised above the plain of the bench/jig according to the
station being gaged. However, if you'll think about the geometry
involved here you will see that an adjustable protractor is all that
is needed. Pick the angle from the drawing, adjust the protractor to
match and adjust the notch at that particular station until the angle
matches the protractor, less your working allowance (typically 1/16"
or so). You then flip the thing over, chunk out the material between
the station notches and smooth things up, working from limb to limb,
until you have a nice even surface on both sides. If you go astray,
make sure the other side errs equally.
It goes VERY fast with spruce or pine. Main thing to watch out
for is creating flat spots with overly aggresive sanding.
I've used #36 grit for maple, after chunking out with an interval
of about 3/4", the 'chunking out' kerfs down with whatever was handy
-- back saw usually but even the band saw for a paddle-bladed prop.
Then you hit it with the sanding disk. Or belt. Or whatever. And
end up with a scratched,grooved, furry looking blank that is within a
sixteenth to one-eighth of the desired shape. That's when you change
grit. Initially, you simply try to remove the sanding marks from the
previous grit. Once you've done that (using about #80) the thing
will be almost good enough to use. More importantly, it will be good
enough for the camber templates to made sense.Use chalk or soot (the
old fashioned way) to find the high spots and simply work them down.
Traditionally, after chunking-out they used a draw knife to
approach the final size then switched to a spoke-shave. You may make
the edge of your spokeshave blade any shape you wish, exactly as with
the blade of a plane. A perfectly flat blade will give you a series
of little flats that you must fair. A slightly concave blade isn't
much more difficult to sharpen and will give you a little better
'stripe.' That won't make any sense now. When you get to that stage
pat some chalk on the surface and do a few trial cuts with your
spokeshave. All will be revealed.
I shouldn't have to say this but your cutting tools must be dead
sharp. Once you get them that way, keep them that way by frequent
touching-up. I used to use an India stone but #1200 wet&dry
sandpaper works fairly well. Just a quick touch or two then wipe away
all the oil, clean the blade with lacquer thinner and set your depth.
I use Japanese water stones to good effect for
sharpening.
Personally, I've found abrasives to be much less trouble than edge
tools for prop carving.
The final surface is achieved with about #120 grit using an
orbital sander.I literally used up several Rockwell 'block' sanders.
Now I use a Makita. It holds up fairly well but your hand will not
:-) I glue 1/8" foam to the stock pad and glue the sand paper
directly to it. Otherwise, there is considerable lost motion between
the sanding block and the paper; enough to more than double your
finishing time. To change paper I simply rip it off and replace both
the foam and the paper. As with most block-type sanders,one sheet of
inch-size sanding paper will give you four sander-sized sheets. But
be careful here. There is metric sized sanding paper out there -- and
metric sized sanders. You can end up wasting a lot of sand paper.
Started chunking the back of the prop. Cut the bevel
wrong on the tip first try, so chopped the tip off, started with a
shorter blank.
Very gratifying to see the prop emerge from the blank.
After smoothing your prop you'll be anxious to put on a coat of
vanish or whatever, eager to see it shine.
Don't.
Instead, fill it first. At a microscopic level there is no such
thing as smooth wood. If you want a smooth surface using vanish it
must be repeated sanded & re-varnished, causing the varnish to
serve as the filler. So get a jump on it and apply a more practical
filler first. Thin coats, please. Then sand it off with fine grit
paper. Do it mebbe twice, you'll be ready for varnish. Point is, you
need to fill the grain, even if the grain is invisible. Once it's
filled, the varnish will be going onto a dense, uniform surface. It
will go on smoother and you can use thinner coats.
The procurement clerk bought some Minwax sanding
sealer. Lacquer with talc...also a big-ass chisel (my widest was
about 1-1/2"). I've got the front and back of one blade chunked out,
I'm going to start working the airfoils. I worked up a considerable
sweat bossing that drawknife and spokeshave around.
E-mail Ryan