 Skinning a Taiko

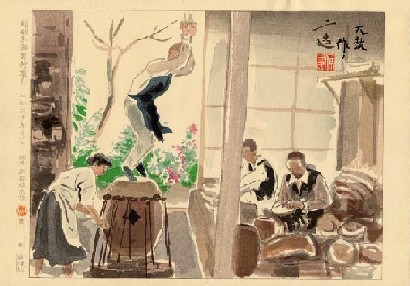
(Picture from Kawada Taiko Factory's Web
Site)
First, a few recommendations on materials. To skin a taiko drum correctly you
need to find a source for large pieces of raw leather. It may be difficult to
find a wholesaler who can sell you large pieces of cowhide. The hides need to be
heavy weight, and should not have any imperfections such as brands, holes, etc.
You will also need some heavy tacks with large heads (cheap upholstery tacks
will not work because they are not strong enough). Some tacks with a decorative
color/design will enhance the look of your taiko.
There are two methods you can use to skin a drum. The method I am describing here I'll call the
"traditional" method. This is accomplished without the help of modern technology
(well sort of). The second, which I'll call the "modern" method, uses hydraulic
jacks. Some rainy day, I'll try to write a description for that method of
skinning.

(
Using hydraulic jacks)
The "Traditional" Method
A shopping list of things you will need:
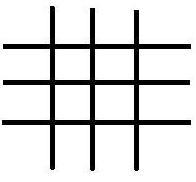
6 - 4x4's 8 ft in length, formed into a tic-tac-toe like grid
a long strong rope (75 to 100 feet long, at least 1/2" to 5/8" thick)
8 large bachi, or 16" long by 1" thick wooden dowels
a hammer (& a wooden mallet if possible)
some small pieces of 2x4 about 6" long
a compass and ruler
a tape measure, or a tailor's tape measure
a large piece of thick cardboard
8 - lag bolts, or better yet 8 dowels (6" long by 5/8" thick)
a large square, or round piece of 1/2" to 3/4" thick plywood that is slightly wider than your taiko (at the rim)
a sharp razor knife
Preparation
1. Before you can start skinning, you need to make a grid out of 6 - 4x4's, 8 feet long each (for
big drums). This grid is like a tic-tac-toe grid with an extra board in the
middle. You should cut notches so the boards lock together (like Lincoln
Logs).
2. You need a long strong rope (at least 75 feet, 5/8" thick is best), 8 big bachi (1" thick and about 16"
long), 8 - 1/2" or 5/8" lag bolts (or hardwood dowels) that are 6 1/2" to 7" long. A piece of strong
plywood (1/2" or 3/4" thick) a little bigger than your drum head size. The
plywood should either be cut square or round so it fits over the center of your
grid. It must also be slightly larger than the diameter of your taiko at the rim.
3. You need the tacks for the skin, a hammer, some scrap pieces of
2x4 you can hit with the hammer (to tighten the skin).
4. You need to make a pattern for the skin out of a piece of cardboard. This pattern is
important. The width should be the width of the drum head, plus 6" on both sides
(total 12" bigger than the drum head) for the "mimi" (the place you nail the
tacks).
Once you have cut the cardboard into a circular shape, measure 32
marks around the circumference, equally spaced. You can use a compass to help
you with the measurements. This is where you cut the skin to put the lag bolts
in that will stretch the skin. These marks should be 2.5" in from the outside edge
of the cardboard. Next, make 32 marks 5" in from the outside edge. They should
be on the same line from the center of the pattern (like a dart board). This
done so you can fold the skin over where the lag bolts are placed, for more
strength.
5. Now, poke holes through the pattern at your marks. This will
show you where to cut the hide. You will place the pattern on top of the hide to
cut the circumference, and push a pen through the holes to mark the lag
bolts.
Skinning
1. Soak your cowhide for 24 to 36 hours in a bathtub. Put something heavy on it to keep it submerged in the water. Once it is
really soaked, you're ready to skin the taiko. Place your pattern on top of the
skin. Cut around the pattern (avoid brands, holes, & other weird
imperfections on the skin). Take your skin with the pattern on top, push a pen
through the 2 rows of 32 holes you made to mark the lag bolt/dowel holes.
2. Remove the pattern, cut at the marks you made (2.5" & 5" from the edge). These
cuts should be big enough to push the lag bolt through. Next, fold the edge all
the way around and line up the holes. Push a lag bolt through the bottom &
out the top of the first 2 holes, then push it through the next 2 holes the same
way. You should have enough bolt/dowel so that you can wrap a rope around the 2 ends (don't make them too short). Repeat with another lag bolt. Do this
all the way around the skin so that the edge is folded over all the way around,
and the lag bolts/dowels are firmly in place.
3. Next, piece your grid together on a level floor. Put your plywood on the grid, put your drum on the plywood.
Center the drum & try to square everything as much as possible. Place your
skin on the top of the drum. Center it on the top of the drum. Tie the rope to
one of the corners of the grid (the end of one of the 4x4's). Weave the rope up
& around one of the lag bolt/dowel ends. Moving clockwise, wrap the rope around
the other end of the lag bolt/dowel & down the next 4x4 end of your grid (it will
look like a roller coaster: up & down). Go all the way around the drum. Make
sure to take out the slack. Make sure the skin stays centered on the
drum!
4. Tie off the end of the rope once you have gone all the way
around the drum. Take your 8 bachi and weave them between the rope coming off
between adjacent lag bolts/dowels (an "up" rope and a "down" rope - like the roller
coaster). Twist the bachi so the rope tightens (have 2 people opposite each
other do this at the same time). Be sure to do the same number of turns, about 2
full twists.
5. Take a hammer or wood mallet, and a block of wood (a 2x4
about 6" long will do) and pound on top of the lag bolts/dowels to stretch the skin
over the drum. (Note: if you use a hammer, you should wrap the head in a towel
to avoid damaging your drum & skin). Take your hand and push hard in the
middle of the skin. Some people even stand on top of the skin to stretch it.
6. Repeat step 5. Twisting the bachi maybe 1-2 full twists.
7. Wait about 10 minutes. Repeat step 5. Don't try to tighten too much.
Remember, when the skin dries it will tighten by itself.
8. Once you have the skin pretty tight, measure around the outside edge and mark your tack holes.
You can use a tape measure, or tailor's measuring tape to do this. Calculate how
many tacks you will need to form an evenly spaced band around the drum (the
number will vary depending on the drum size, and the size of your tack heads).
If you want 2 bands, repeat the measurements slightly below the first
row.
9. Before nailing, I recommend using a drill to start your holes. It
will avoid bending and wasting tacks. Drill & tack around the
head.
10. After tacking, wait about 10 minutes, inspect everything,
especially your tacks. Remove the bachi from the rope. If you want to skin the
other side, put a towel under the new skin when you turn it over so it won't get
damaged.
11. Wait at least 4 days before playing, at first the drum may sound
tinny & ring. Just play the hell out of the new skins for about a week &
they'll sound better.
ENJOY!
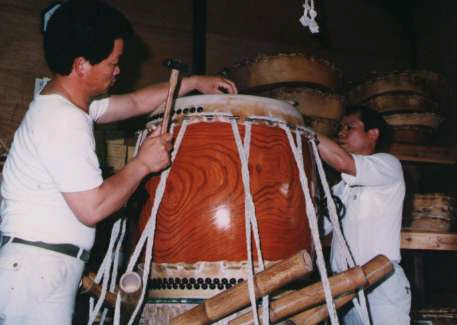
Skinning a taiko at Kawada Taiko's factory
 Go to Kawada
Taiko's Web Site
Go to Kawada
Taiko's Web Site
 Return to DIY Taiko Menu
 Purchase Taiko Making Supplies
 Return to Tatsumaki Taiko's Homepage