|
|
GREG'S NIGHTHAWK S PAGE |
|
|
What's Right My Bike Common Problems This Bikes's Problems Gallery More Photos Links Cargo Carrying Box Plans After The Crash Nighthawk ST Philosophy Modern Bike Rant |
|
|
(This page not finished!)
A couple of people have asked me to post some plans for my hard bags. Here's a brief discussion on how well they work, then on how to make 'em. Though far from perfect, these things have been amazingly useful. For more pix of these and other wooden furniture I've added, see the Cargo Carrying page. This design is crude but effective, plywood making construction and maintenance/customization fairly easy. They've also proved to be pretty tough, I've dropped the bike at walking speed several times without trouble, and had one major crash where a box survived mostly intact, much to my surprise. But it's worth mentioning that bags may diminish the otherwise-excellent crashworthiness of the Nighthawk S, by changing the ground contact points. Not sure. Top-loading is a mixed blessing. When there's nothing above the box, in the way, loading/unloading from the top is as easy as it gets. Flip the latch, raise the lid, and you've got excellent access. But if there's something in the way, like a wide load bungeed to the seat, or a cable lock through the grab rail, you have to finess it a bit. And weatherproofing is problematic. But overall, top-loading seems to work well, being simple, strong, and foolproof. There are a number of other problems with this design, foremost for me being the lack of weather-worthiness. Getting these boys waterproof will be very difficult. (Though oddly, I've only been in one day of rain with the boxes, despite months of touring.) Bagging up the contents with plastic grocery bags might be an answer, in fact this would probably work pretty well. See below for some specifics to help in this area. Another problem is maintenance. Plywood will need to be repainted or otherwise treated periodically to keep rot at bay. In fact, wooden boxes are a little like a wooden boat. If you don't have a bunch of time to throw at these puppies, you probably won't like them. Since I love working with wood, this doesn't bother me much. What did bother me was the build time, several days (at least!) for each box including painting and mounting. The pointy corners can also cause problems. particularly for the passenger. Rounding the offensive corners (and leading edge) helps quite a bit. Another alternative would be to mount the boxes a little lower, but then you'll have to modify the plans accordingly, because of the turn signals.
You'll also need a gaggle of other items:
BUILDING THE SUCKERS Okay, here's a little narrative on building these bad boys. All screw holes should be drilled and countersunk. Be careful not to allow and screw tips to protrude, tape over any that do. First, cut the sides, front and backs out of 1/4" plywood. (Hold off on the bottom and lid.) Sand the parts before attaching. Attach the sides to the front, using 1/2" trim (see illustration above) as "ribs". All screws go through the plywood into the ribs, hopefully without the screw tip protruding. This method of attachment is very slow, but strong, and allows you to bevel the edges of the box. Suing some kind of jig might help line up the ribs with the sides. You'll want to attach ribs to the "front" piece first, then attach the sides to the front. Then do all three back pieces. Measure the bottom opening, cut the bottom, and sand to fit if necessary. The bottom goes completely inside the sides/front/back. Measure and cut the ribs (not full length, because of the vertical ribs) and attach the bottom. You now have the box, minus the lid. Measure and cut the lid. The lid needs to be flush or to overhang very slightly, because you'll want to attach a "skirt" of some kind on the three sides that allow it. The skirt makes for positive closing, and should help with rain also. The back, where the latch and lock is, needs special care, see below. NOTES SIze issues and clearance Waterproofing Strength and crashworthiness Top-loading Carrying a passenger The mounting bracket
Home |
What's Right |
My Bike |
Common Problems |
This Bike's Problems
|
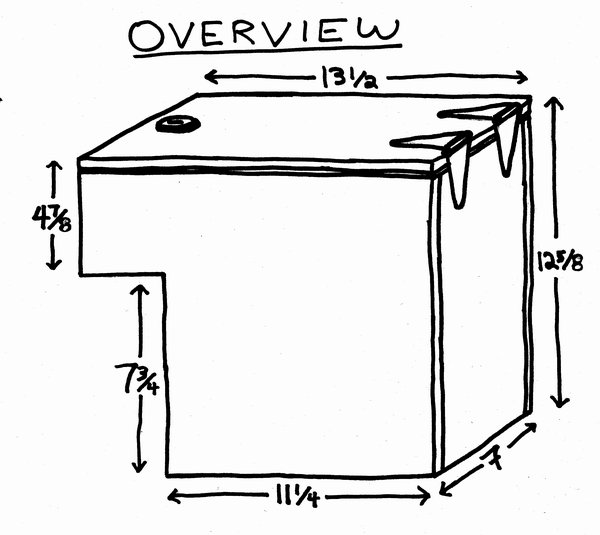 The right-side box, the left side is identical until you drill the holes to mount it. The cuttout is to get around the turn signal, some other possible ways to deal with this are discussed below.
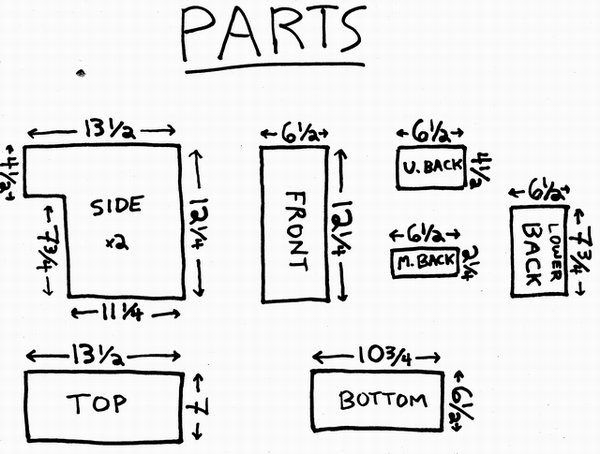 The main wooden parts of the puzzle. Cut the bottom after you've assembled the sides, then cut the top last. Try to get the pieces exact, for me the 6-1/2"s often ended up being more like 6-3/8". I'm hoping that exact cuts will allow a full 6-1/2".
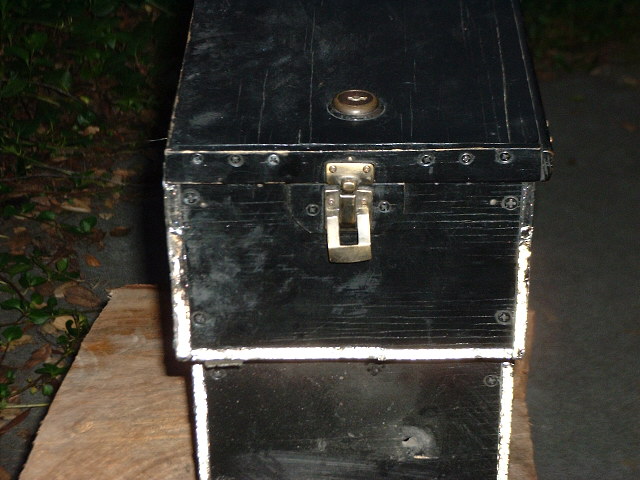
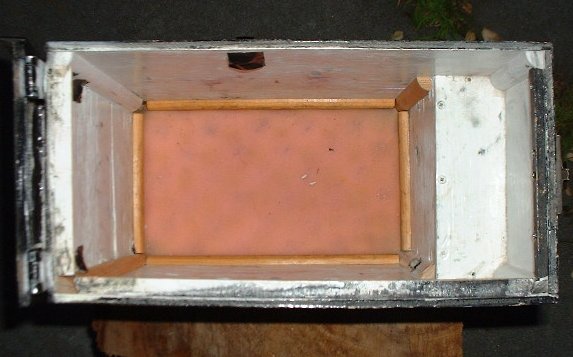 This shows the "ribs", 1/2" round trim used to attach the walls of the box. Screws come in from the outside, into the ribs, providing a surprisingly strong structure. The bottom ribs in this picture look a little wrong, because what you're seeing is actually the parts I used to tie together the extension with the original, shorter boxes. If anyone else builds a set, they'll skip that whole step and build them full height from the get-go. Hopefully. Also, that's open-cell foam in the bottom, to keep things from bouncing around.