Monday, December 21, 2009

Dream logic

Last nights dream was one of those I can't seem to get out of, even by waking up. I kept drifting out of the this dream to wakefulness, and then, yawn, I was back in it.

I was at a Navy airbase, allegedly to get refresher training in an airplane that the Coast Guard (whom I work for, but am not IN) never flew, and even the Navy has retired (an A-7 Corsair II if you want to know, nickname "SLUF" ("Short Little Ugly Fucker")). It was all a big mistake, and then it was "resolved": I was to "transition" to this airplane. Fine, but as I pointed out, I'm a Private Pilot, with NO jet experience, not even any "complex" experience (retractable gear, etc). I was mildly terrified of having to carrier qualify an airplane with no conceivable use in my service. A REAL Coast Guard Officer shows up; I explain my problem, and we take a physics test with a bunch of Navy guys, and smoke their asses; we were done with perfect scores before the Squids had their pencils sharpened. I tell the Coast Guard Officer I want to go over to his side of the base and quit wasting the government's time, "I'll just wash airplanes or something."

I woke up for the final time, and went to work. In my tuxedo - it was the office Christmas party today, and I am the Master of Ceremonies For Life for the Gift Exchange/Back Stabbing, in my James Bond/Jack Sparrow/Dorothy Parker hybrid personality. The party was held in the Terrace Room of a resident hotel for gay and lesbian senior citizens - I am NOT kidding you (the food was excellent, BTW). I got out of there with a 2 foot long christmas themed penguin pen, which I consider a minor indignity compared to some of the gifs - certain scented candles and a nasty plastic snack set have been "re-gifted" 5-6 years in a row. At least a ball point pen the size and shape of a blue dildo will be easy to find on the mess my desk has become.

It only seems like I live in a Pynchon novel.

Labels: ,

Tuesday, October 28, 2008

Mal's Law

Mal Raff is a flight instructor with California Airways in Hayward, California. I've flown out of this FBO for about 5 years, never flown before Saturday with Mal. I've flown with some pretty good pilots, some good instructors, but Mal gave me one of the best lessons I've had in a small plane.

I've learned that instructors have teaching styles, and they may differ markedly from the student's learning style. The secret is to getting the most out of a given experience is to adapt - your learning style needs to yield, in the moment. After the flight, evaluate, and change if change is needed, but in the air, deal. Plus, it's always a crap shoot with a new flight instructor, as the cockpit is the world's worst classroom to begin with - noisy, high stress - and pilots tend to have egos, and instructors, since they know ever so much more than you do - you get the picture. Plus I'm nearly 50, and Mal has a good 15 year lead on me. We rassled a little at first, on pre-flight procedures, but I agreed to listen to his points, and I made mine.

My intention - and I had one for this lesson - was to dial in my flare at landings, which as Mal reminded me, is the END of a chain of events that started, in this training scenario, when I advanced the throttle for the first takeoff.


MAL'S LAW: You cannot (consistently) make good landings from bad approaches

First Corollary: You can certainly make a bad landing from a good approach.

Before we turned on the Master, Mal made this little sketch. Let me walk you through it. Upwind is up, final is on the bottom. The assumptions are a Cessna 15X/17X, and the winds are light.

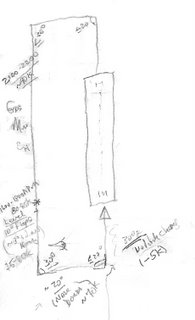
We've lifted off at about 55, and either released what LITTLE back pressure we might have been holding, or pushed the nose down a little, for as the plane accelerates, it tends to pitch up, and we want to climb out at about 75 kts. The turn from upwind to crosswind is made at least 200 ft AGL, and is SHALLOW, less than or equal to 20 degrees. Steep turns suck lift out of climb, and we'd prefer to gain altitude at this point rather than keep a super tight pattern.

Turn to Downwind may be a little steeper, as we are soon at Pattern Altitude, but less than 30 degreees. When we reach pattern altitude, we reduce power, to 2100-2200 RPM. Mal uses the G-M-C mnemonic, Gas (reach down and check the gas selector, should be BOTH for a Cessna), Mixture (full rich, push the center of the knob for a Cessna), and Carb heat (pull). You should be level, about 90 kts.

Abeam the numbers, time to reduce power again, to 1700-1800 RPM, and let the speed bleed off a little before lowering the flaps, AND putting the nose about 3 degrees below the horizon. 75 - 80 kts and descending should be the result. Approaching 45 degrees from the end of the runway, look out the left window and chose a spot on the horizon (or at least far enough away to reduce parallax to a minimum) 90 degrees from the downwind leg.

Turn to base should be spot on 30 degrees. You want to get it done, but not generate an accelerated stall. 30 degrees, watch your speed. Your "spot" will appear in the windscreen, roll out. On base, drop more flaps, to 20 degrees. Watch your speed. Start a shallow, less than or at most, equal to 20 degree bank to bring you to final. Once on the centerline, drop more flaps, WITHOUT CHANGING PITCH, and you should slow right down to 65 kts. Assess your glide path, and reduce the throttle to suit, closing it completely when you have the runway made. KEEP YOUR HAND ON THE THROTTLE: shit happens.

Ideally, the roundoff and flare should be a continuous function, starting sometime before reaching the runway threshold. In practice, it's more of a step function; increase back pressure, wait and see, pull a little more, wait, pull a little more, until you kiss the runway with the yoke all the way back, and a few little chirps of the tires. KEEP THE BACK PRESSURE ON until the nose wheel drops of it's own accord. DO NOT try and look over the nose, watch the edges of the runway with your peripheral vision.

I hadn't flown in 5 months, and have flown less than 20 hours in the last 3 years. After an hour on the Hobbs, following this mantra, and with a little coaching, I was earning the praise of a man from whom praise meant something.

None of this should be new to anyone who has read Stick and Rudder, still the best book on the actual motor skills and conceptual processing of flying. "Spotting" the base turn was an Ah Ha moment for me, and reminded me of learning to pirouette in ballet class about 25 years ago.

Labels:

Saturday, October 13, 2007

Prop Hubs for VW AeroConversions

A recent kerfluffle on the Sonex newsgroup compels me to take up this matter again.

This post:

VW Cranks (Was Re: Sonex Incident - 9/29/2007)

Frank,
I have sat back too and read this thread on the
VW problems ....part of me just said to keep
quiet .....but the other parts says to share what
you know .....I am no expert but 20+ years of aero
vw use has taught me some stuff ......so here goes;

You hit the nail on the head here. However the VW
with a stock crank and shrink-fit hub works very
well on engines up to 1915cc .....I know because
I have flown behind them for 20+ years, the added
torque of the 2180 increases the risk of failure,
and many of the guys I call experts agree.

I have an Aerovee 2180, I like the looks of it and
I like the package as a whole. When I bought mine
I knew I was going to discard the AeroVee crankshaft
and shrink-fit prop hub!

I immediately sent the block to Steve at Great Plains
and had the block machined for the Force One Prop Hub,
I also purchased his aircraft purpose-built 82mm forged SCAT
crankshaft. It was designed to have the extra
metal in the area of failure, and they have never
had one fail to date. They use it on 2300cc VW's.

There is nothing wrong with the VW, but building a
2180cc engine begins to exceed the strength of the base
engine it's built from. My last 2180cc VW engine had over
1400 hours on it when I sold it ....and it was built by me
from parts I purchased from CB Peformance with the
exception of the crankshaft and prop hub, these came
from GreatPlains!

All my VW engined planes to date were single seat aircraft,
but my SONEX will carry passengers (wife and children) so I
spent the extra money to insure my engine stays together.

Nothing against Sonex / Aerovee, but the VW engine was NOT
designed by them, so they are NOT the last word on anything
VW. They put together a nice package and it's a really
nice engine, but they know of the possible issues with
the VW crankshaft design with a shrink-fit prop hub, they
are aware ....that's why they stress correct prop hub installation,
the Aerovee is not their first use of the aero-vw engine!

Even when installed correctly as per Aerovee, the design is
marginal ...NOT bad ...but marginal! There is room for error
that can cause failure. One of the established installation
procedures and setup is the have the front 2 cylinders at
TDC ....(pistons out towards the cylinder heads) and install
the prop in a horizontal postion, plus insure the prop
tacks true. This will increase the survival rate of the
prop hub. Also it has been found that keeping the prop
length 55" and below is safer. These are just common VW
engine practices by others ......the big practice is to
use wooden props only! This one is obvious but I felt it
needed said as not everyone here will buy a prop from Sonex.

While on the subject there is a SERVICE Bulletin on
all VW Supercases, the #4 bearing oil feed has been found
to be improperly sized / installed on 1 out of every 4 new
cases. The #4 bearing is the small bearing behind the
prop hub .....this has not been attributed to the prop
hub / crankshaft failures but needs resolved for long
engine service. Contact Steve Bennett at GreatPlains if you
want a better explanation.

It's a simple fix, can be done with the engine in the plane. You
drill out an oil plug, internally remove the restrictor
plug and install a screw in plug. Steve at Great Plains
reminded me of this .....and "my Aerovee block" was one of the
defective ones. He fixed it while he had it in his shop.

While I love my Sonex and the Aerovee, it's NOT a perfect
powerplant as received from Sonex. The Aerovee 2180 is just
assembled from off-the-shelf components internally. The
Aerovee specific stuff is outside of the engine, all the
pretty red anodized parts, the Aerovee Carb and there sort
of neat ignition system .......all nice stuff!

I have flown behind VW engines for a long time, and I have
lost a prop hub on an early Monnett engine (before Aerovee)!
I don't plan to loose another ....of anybodys manufacture!!!

I don't worry about warranty, there really is none once
the engine is flying ....I am currently NOT using the AeroCarb
either, I use an EFI system from SDS (Simple Digital Systems).
I don't have cooling problems and have never had any, the
EFI precisely controls the mixture .....it starts on the
second rotation of the prop, even at 20 degrees .....I have
run it on Ethanol ...just a programming change to switch
between fuels. Yes, EFI is more complicated, yes it has an
electric fuel pump ..(I use redundant pairs)...but it is as
reliable as anything out there, I have been using this system on
some other aero engines as well as the VW for 4 years .....
the SDS system is aircraft quality ...and is not cheap, but
I prefer EFI!

Not going to argue any of this, just sharing what I know
on the subject! You have a question I'll be glad to answer
it ....just too old to debate stuff that I have learned the
hard way!

My 2 cents!

Les
Sonex #1094


Generated this response:

Hello again Sonextalk Group-

As promised, we wanted to address some of the comments made the past couple
of days on the AeroVee Design. We feel these comments need to be responded
to, especially those that are misleading and provide limited background
information. We provided our responses after the quoted text excerpts from
these postings.

>You hit the nail on the head here. However the VW
>with a stock crank and shrink-fit hub works very
>well on engines up to 1915cc .....I know because
>I have flown behind them for 20+ years, the added
>torque of the 2180 increases the risk of failure,
>and many of the guys I call experts agree.
=As addressed in the past, there is very little "stock" about an AeroVee
Engine Core. Nearly 100% of the component parts are aftermarket component
parts. The Crankshaft is forged -and Nitrtrided- 4340 Steel. A common
misunderstanding (even from those that claim to be vw experts) are the real
loads that need to be addressed in designing conversion components for the
VW Core. The Modern AeroVee Conversion exists today because of the many
shortcomings of the existing conversions that were offered by other
manufacturers in the late 1990's. The AeroVee has been challenged in
rigorous flight testing under the highest stress flight
situations...including Aerobatics. Most pilots do not engage in this kind of
flying. We insist on testing our installations in these most rigorous
conditions.

>All my VW engined planes to date were single seat aircraft,
>but my SONEX will carry passengers (wife and children) so I
>spent the extra money to insure my engine stays together.
=There have been many thousands of rides given in AeroVee Powered Aircraft
of all types. There is no need to speculate that the AeroVee Prop Hub design
somehow makes the aircraft unsafe. This is an irresponsible comment and an
irrational concern not based on fact, but purely speculation and opinion. An
AeroVee Shrink Fit Prop Hub installed and maintained properly yields the
highest strength and simplest installation on any VW Engine Conversion.

>While on the subject there is a SERVICE Bulletin on
>all VW Supercases, the #4 bearing oil feed has been found
>to be improperly sized / installed on 1 out of every 4 new
>cases.
=This Service Bulletin on the #4 Bearing is many years old. We have not
encountered any cases in the many hundreds that have come through our
factory that have this issue. If this was a true service issue, there would
be many vw vehicles stuck on the side of the road that you would be passing
on a routine basis.

>While I love my Sonex and the Aerovee, it's NOT a perfect
>powerplant as received from Sonex.
=There is no manufactured product or Aircraft Conversion that does represent
the perfect powerplant or the perfect product. However, the great success of
the AeroVee can be attributed to its combination of simplicity,
reliability,and light weight in an extremely robust and well proven package.
It's the pursuit of perfection that most distinctly separates
AeroConversions and Sonex products from the competition. We promise that as
opportunities present themselves, we will continue to improve and expand
our product lines as any reputable and successful aircraft manufacturer
would.

> about warranty, there really is none once
>the engine is flying
=I'm not sure where the information about a warranty expiring once an
AeroVee Flies was obtained. This is completely false. If a part is found to
be defective in an AeroVee whether it is flying or not, there most
certainly is warranty coverage. Obviously, if you modify the component parts
or if the builder is found to be the one that caused the problem, then the
replacement cost on parts are your responsibility.

Spending $1500+ on a Fuel Injection System for your AeroVee makes absolutely
no sense to us whatsoever....especially if it's put on a Sonex, Waiex, or
Xenos set up for Gravity Feed. We have many thousands of hours flying with a
smooth running, low fuel burn, no carb heat, no mixture problems and no
overheating using the standard AeroCarb. For our factory aircraft located in
Oshkosh, WI we make two carb adjustments per year. One approx. 1/4 turn
needle adjustment in the spring as it warms up and one 1/4 turn needle
adjustment in the fall as the air becomes cooler and denser... without the
complication of vapor-lock prone fuel pumps, which do have a tendency to
fail even if they are run in a redundant configuration. Gravity hasn't
failed us yet...it if does, we certainly have bigger things to worry about.

The reason the AeroVee is sold as a kit is that we back the system as a
whole. If a builder makes modifications to the engine (i.e. Prop hub,
induction system, etc), unfortunately the AeroVee Name is still on the
engine package. If and when an individual has a failure and these
modifications are not revealed on an accident report, then its the AeroVee
Name that loses credibility. This is the same reason that AeroVee
Components are not sold individually to be used on hodge-podge engine
conversions usually done by individuals who have no flight or design
experience with auto conversion engines.

We look forward to continuing to hear flight success stories and supporting
all of our customers in completing their dreams of building and flying their
own aircraft.

As always, please feel free to contact Betty, Heather, Mark, Kerry, John,
Jason, Kristy or myself at the numbers or e-mail below with questions or
comments.

Regards,
-jeremy
--
Jeremy Monnett
CEO
Sonex Aircraft, LLC
www.sonexaircraft.com


Notice carefully the selective quoting of the original post, and the essential failure to address the key issue, the reliability of the shrink fit hub, and the exactitude it requires.

R.S. Hoover , known to a generation of Volkswagen enthusiasts as Veeduber@, has put together this little history of putting props on VW engines. The Aerovee hub is, in Mr. Hoover's lexicon, Thick (or heavy) Walled Shrink Fit hub. I believe it is long, per his example figure 9. Mr Hoover suggests some possible failure modes. I'd like to suggest another.

Using this calculator, and a lot of assumptions and estimates, I found that the allowable fit tolerance between the nose of the crank and the ID of the hub was uncomfortably small. The new tolerance on the nose of the crank, from VW back in the day was about 9 ten thousandths of an inch, I.E. the #4 bearing journal could be as small as 1.5739 inch or as big as 1.5748. For the shrink fit to work, the frictional forces between the hub and the shaft have to be high enough to withstand the torque to be transmitted, AND the hoop stresses induced have to be low enough to keep the hub from failing due to fatique. Again, using fishy dimensions I SWAG'd from pictures of the Aerovee hub, known dimensions of VW cranks, allowable stresses for common grades of steel, I found that the allowable tolerance on the fit was LESS than the tolerance on the crank itself. And aftermarket VW parts are not known for holding close tolerances.

I encourage others, particularly someone with an AeroVee hub handy to measure to an accuracy of .0001", to work through the calculations themselves, and report the results to the rest of us. An undergraduate education in mechanical engineering MAY help in deciphering the calculations, but those not burdened by such can probably puzzle their way through it ;-)

To wrap it up, I believe the AeroVee long and thick shrink fit hub CAN work IF the crank and the hub are measured and matched to a high degree of accuracy. There are at least 100 AeroVees that ARE flying, some with hundreds of hours. I've chosen to drive my prop from the flywheel end of my engine. It's not flown yet, and there are very few converted VW engines of this configuration that have.

Labels:

Friday, August 17, 2007

VW Powered Homebuilt Aircraft Accidents

Partisans of various brands of VW aeroengines like the throw stones at each other about the service experience of The Other Team. NTSB reports tell the truth, so here are links to every one I could find mentioning "VW" "Volkswagen" "Aero Vee" "Aerovee" "Great Plains" "Revmaster" "HAPI" "Mosler" "TEC" "Limbach" since 1962 in the NTSB database that seemed to engine related.

Great Plains Powered Mini Imp, sloppy mechanic-ing.


Incredibly sloppy installation.

Revmaster spit a pushrod.

2180 KR-2, apparently quit in flight, who knows why? May have been a Great Plains - HAPI didn't believe in strokers.

Aerovee powered Sonex, shrink fit hub let loose.

Apparently a Revmaster, bad fuel system installation.

??? Chris-Teena engine failed in flight.

Owner overhauled engine failed in less than 25 hours, scored piston walls.

Unknown engine type "...fitted with a guillotine slide type carburetor" failed when throttle closed.

Unknown engine type WAY too lean.

First and last flight of an underpowered VP-1

Dragonfly + a poorly performing carb = one quadraplegic and a pile of junk.See also this site for more on this plane, crash, and the pilot's new life.

Jack Lockamy's Type IV Sonex, prop hub separated from GPASC/SCAT crank.

Ignition wire failure.

First flight of the first completed Noon Patrol Nieuport, loose distributor clamp. A short between the earlobes.

Ellison TMI and bad gas/neglect.

Rear oil seal failed. HAPI? NOTE: this is a lesson to all: follow the Official VW handbook procedure to install the rear seal! NO RTV! Use the (cheap) special tool to seat it, not a block of wood and a hammer!

Loose throttle cable.

Sloppy hub installation.

No end play = seized engine.

VP-1 engine failed on takeoff.

Bad magneto coil downs Vp-1.

Carb ice on a slide body - they said it couldn't be done. Note: Carb ice was NOT PROVEN; this was the explanation offered by the accident pilot.

??? lost power, crashed. The date and the airframe suggest the previous generation of Aerovee, but that's FAR from proven.

Revmaster unknown power loss, carb ice mentioned as a possibility. There is that impossible slide valve carb ice again, although to be fair, there is no suggestion this airplane has a Revmaster carb, and it WAS fitted with carb heat, which WAS on. Revmaster idea of carb heat however is to pull warm air off the bottom of the case...you come to your own conclusions.

Revmaster almost certainly carb ice. Take a look at the carb heat for a Revmaster. Now, you just took off, in the rain. Think the case will be warm enough to heat the intake air enough to melt the ice?

Loose carburetor jet on a Mosler (formerly HAPI) engine. HAPI Super Carb?

Carb ice on a Mosler, even with carb heat on. POSA (slide valve) carb is likely, but NOT PROVEN.

HAPI engine run too lean, died with the man who built it.

====== CONCLUSIONS ======

I have long thought, based on physics and very little actual evidence, that running a slide valve carb without TRUE carb heat (from at least two exhaust pipes) is insane. I was a little surprised these reports seem to confirm my THEORETICAL presumption.

There are black marks against ALL vendors, but the is not enough data here to make a call between them. Most of these reports don't identify the conversion vendor.

Most faults seem to be behind the eyeballs of the pilots/builders, and ignition and fuel systems problems are manifestations the bulk of those. Careful attention to Firewall Forward
would have saved a lot of these crashes and pilots. Every word of that book is written in blood.

Labels: ,

Sunday, August 12, 2007

More Progress On Exhaust System

Initial try, wood block represented the (theoretical) cross section of the carb heat stove.
Unfortunately I forgot to account for the pushrod tubes. So the carb heat stove had to get substantially slimmer, and the the 180 degree bends got "clocked" vis-a-vis the exhaust flanges a little bit. I'm using hot melt to hold the bends to the exhaust flanges. It works great, it holds securely enough to get everything jigged up, and breaks lose if you make a boo-boo (the oil on the tubing helps this).

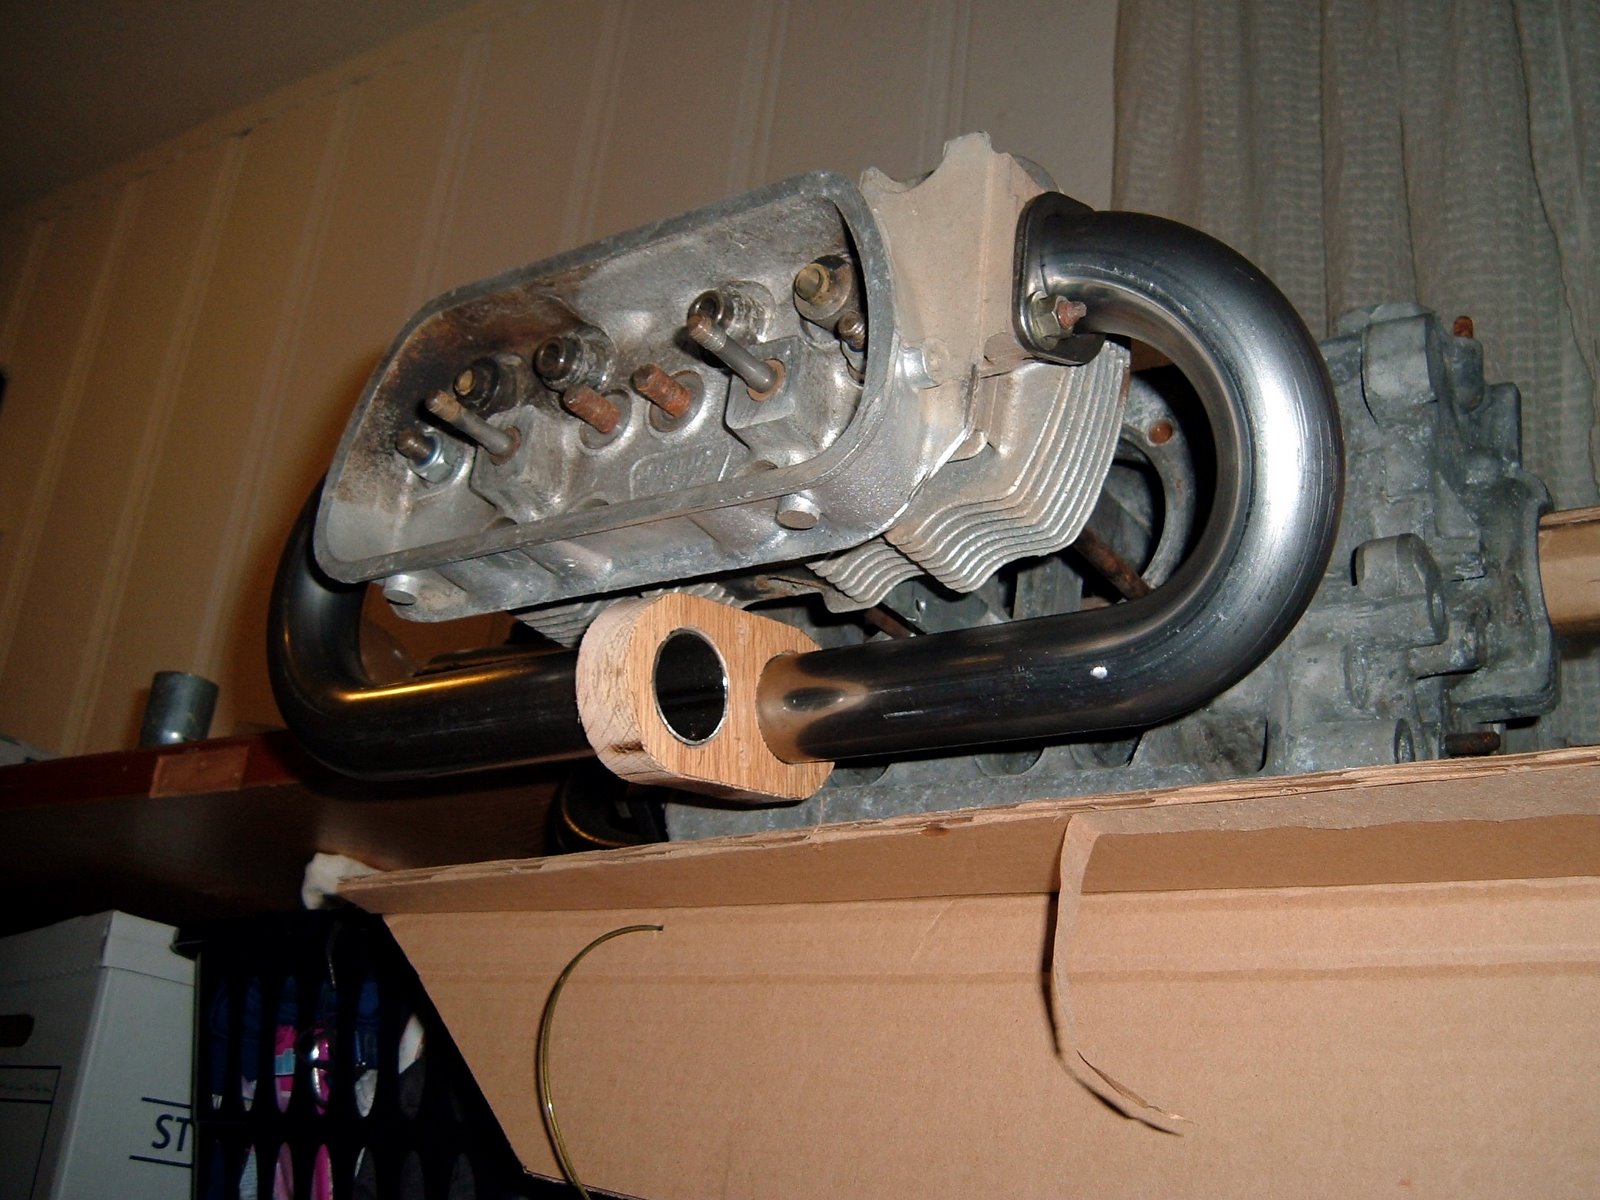
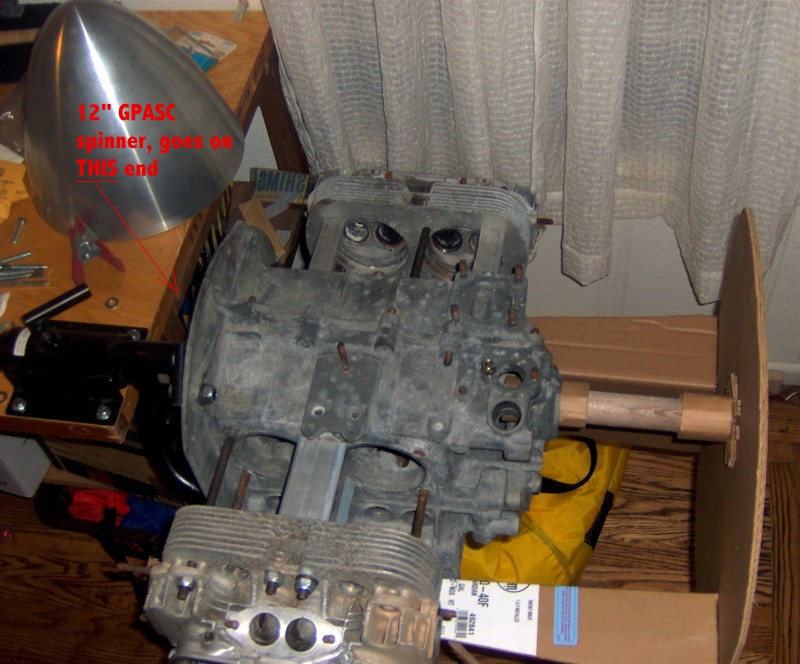
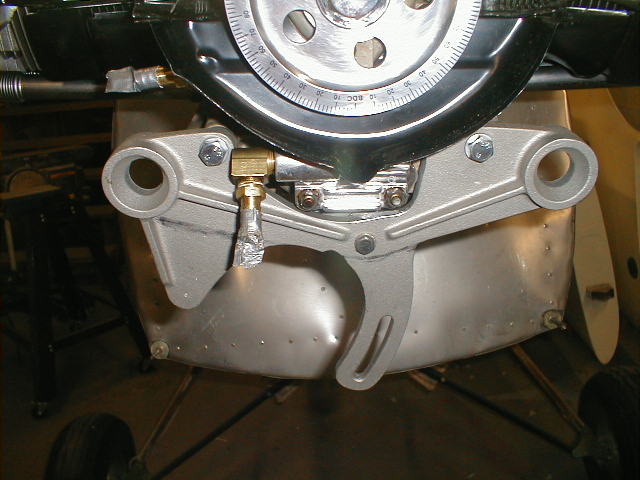
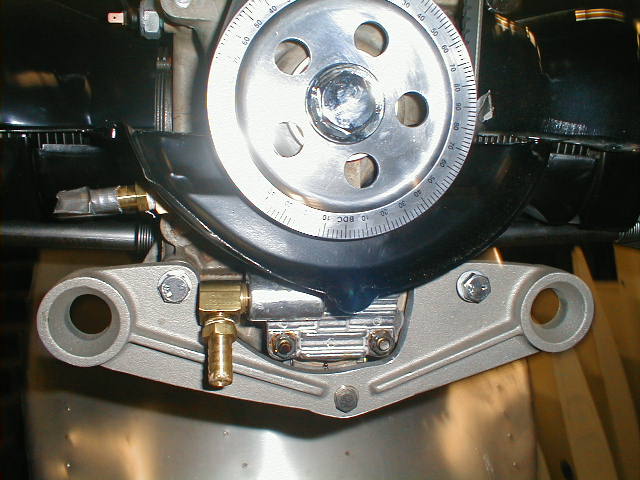
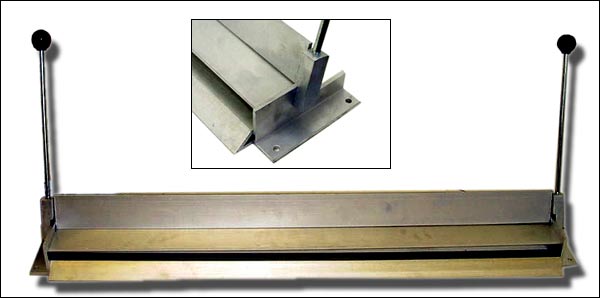
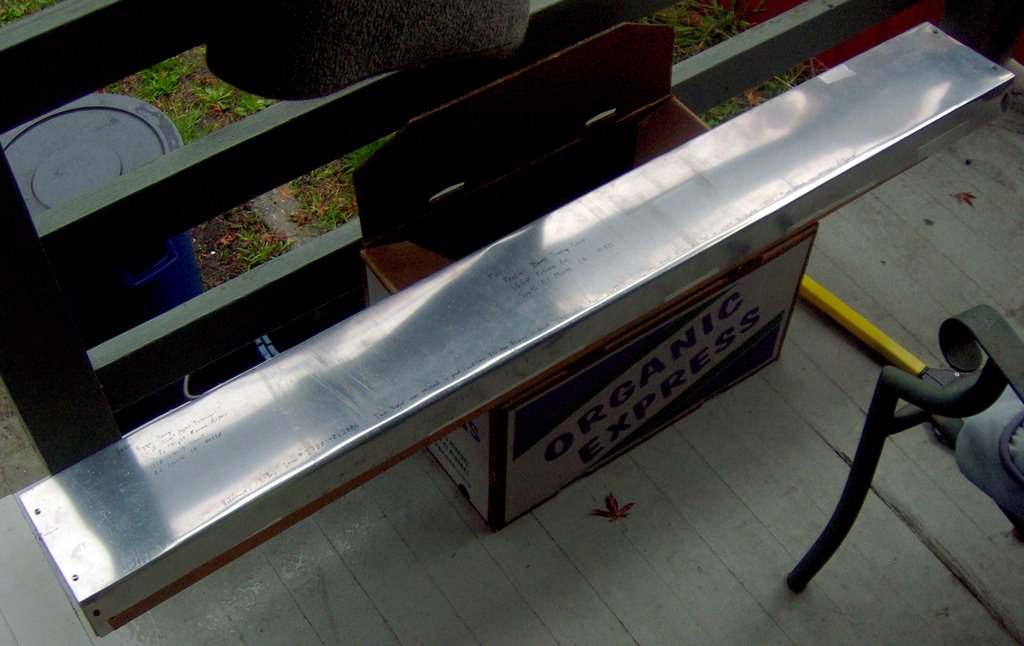
I forget where I stole this idea but it works great! The welder (not me, I'm not currently set up for it) can tack the butts in between the 3 coat hanger wires.

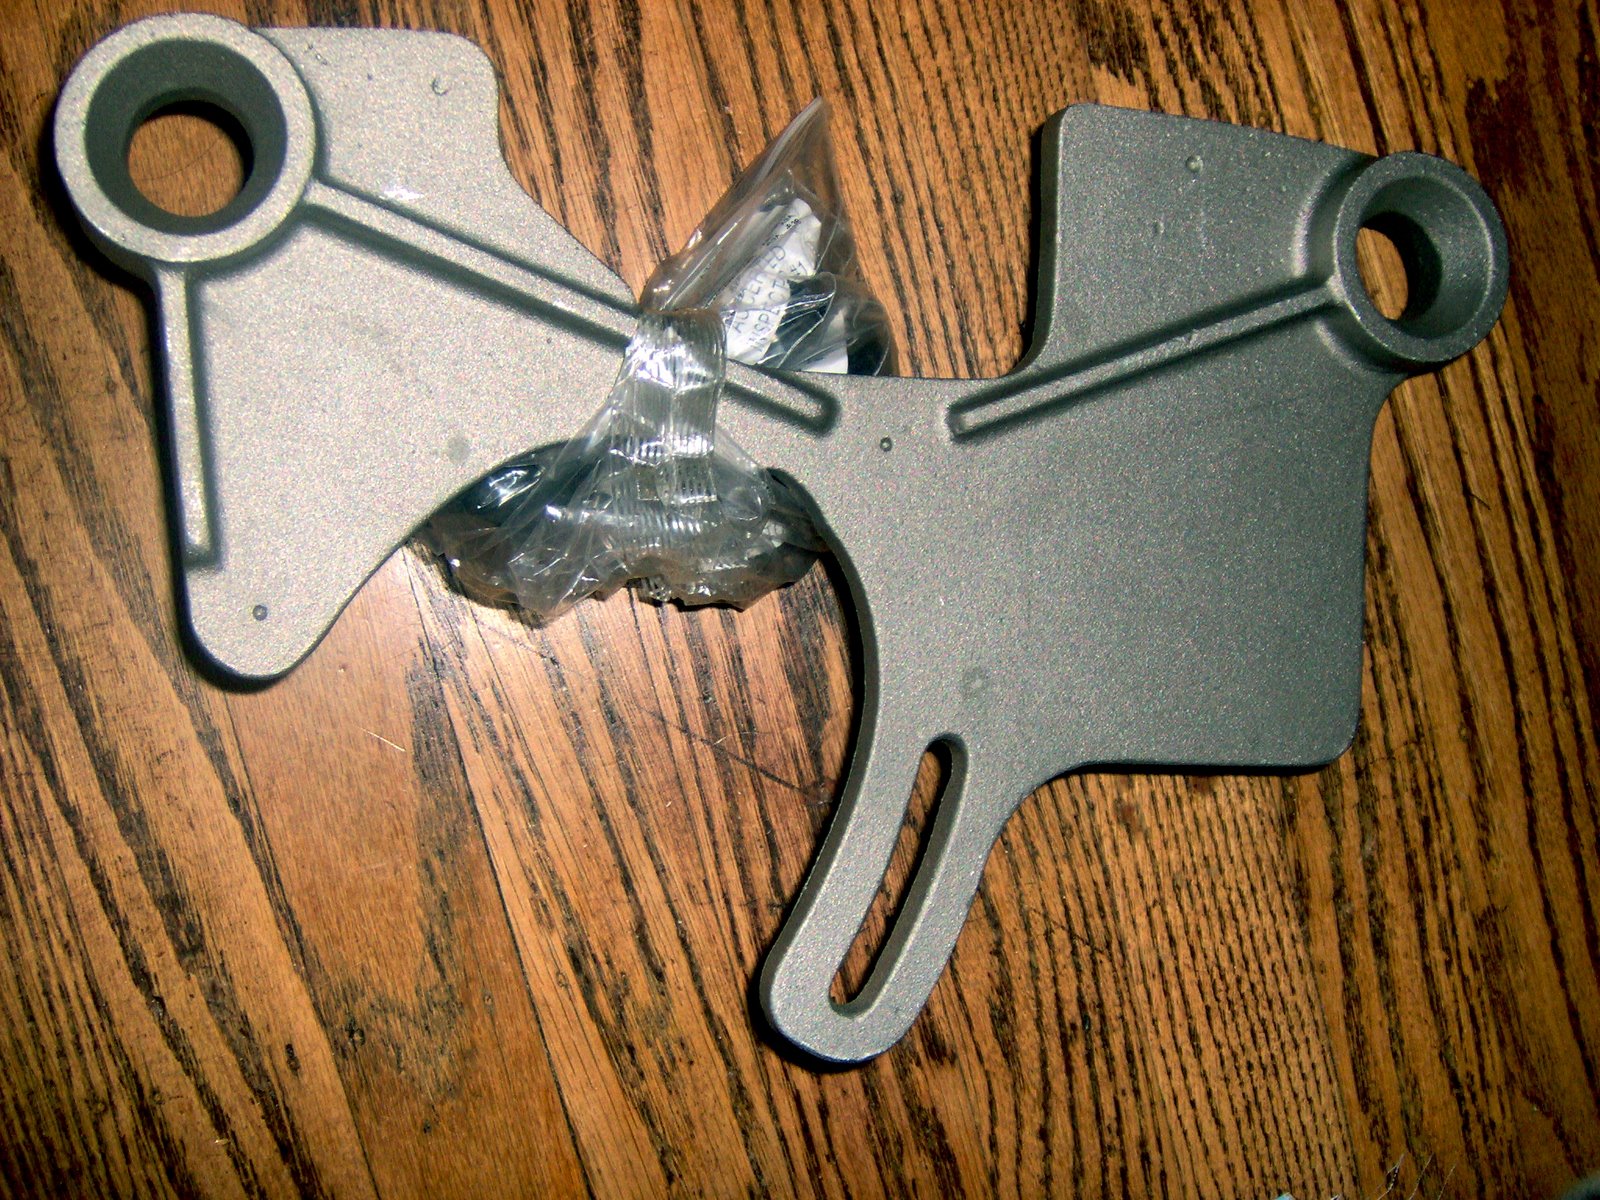
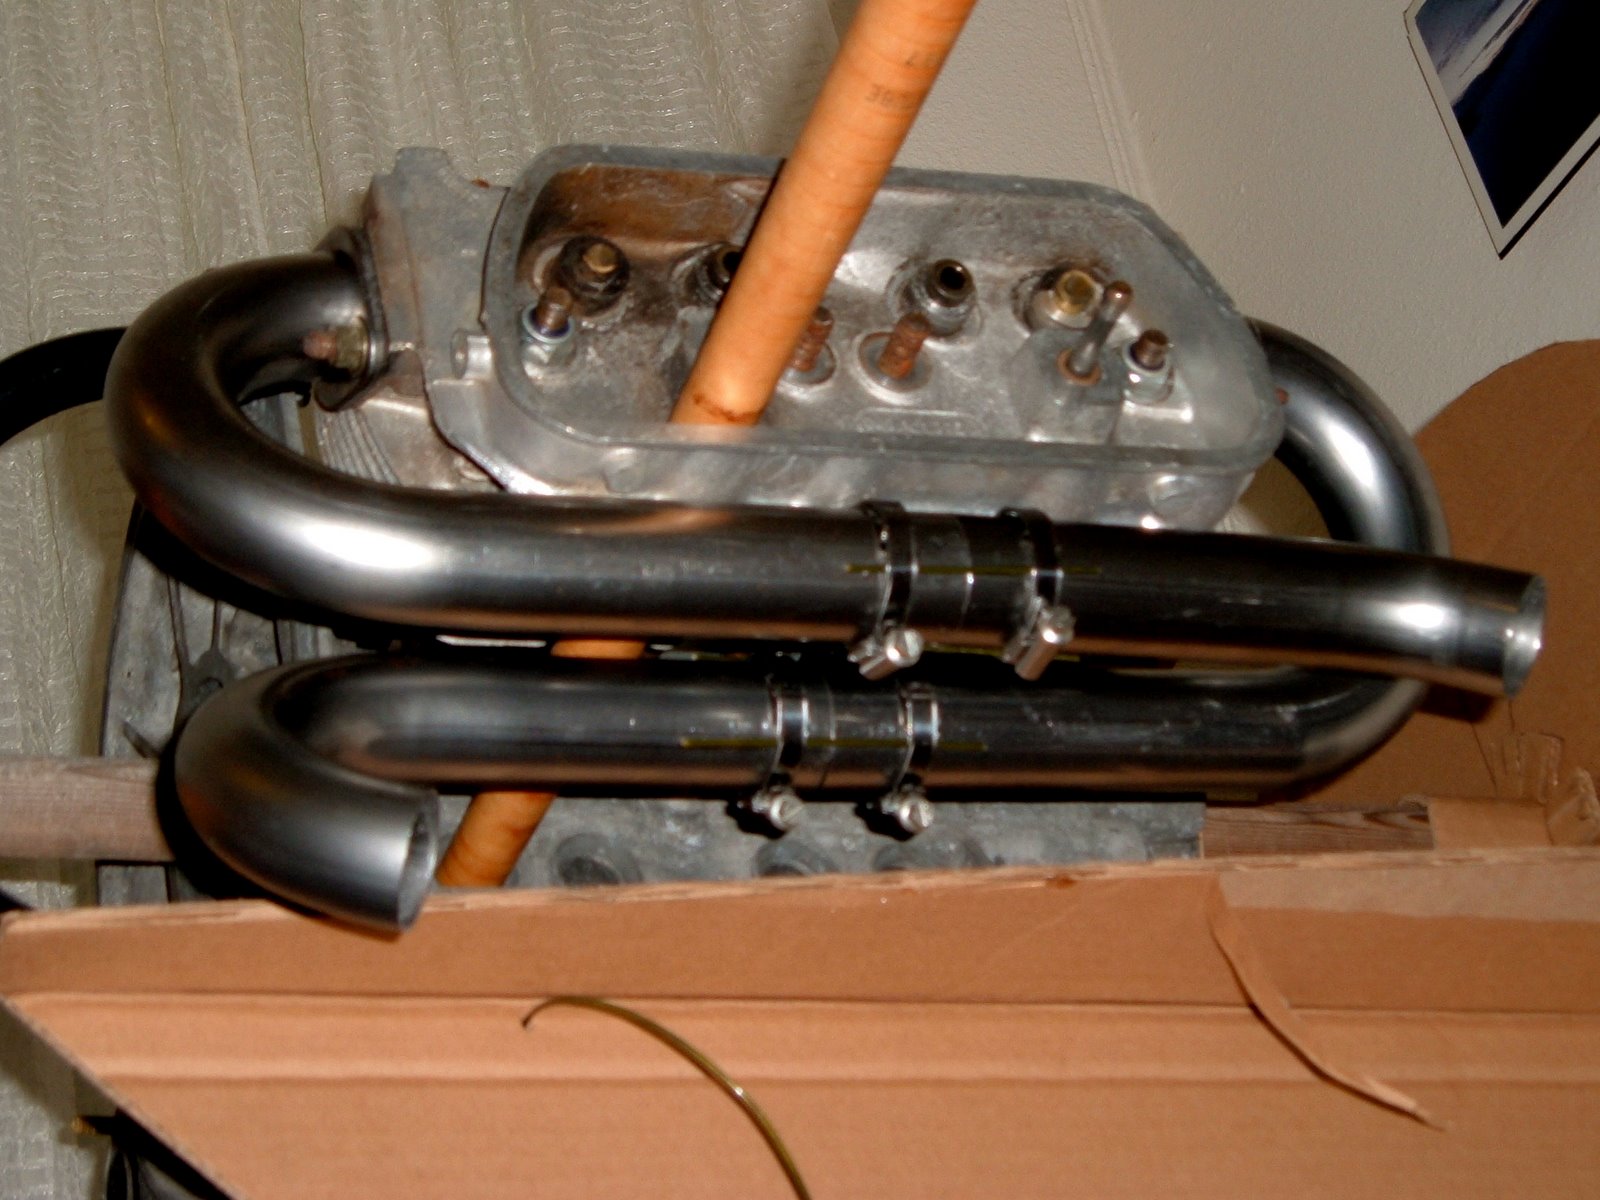
Ready to send to the welder.
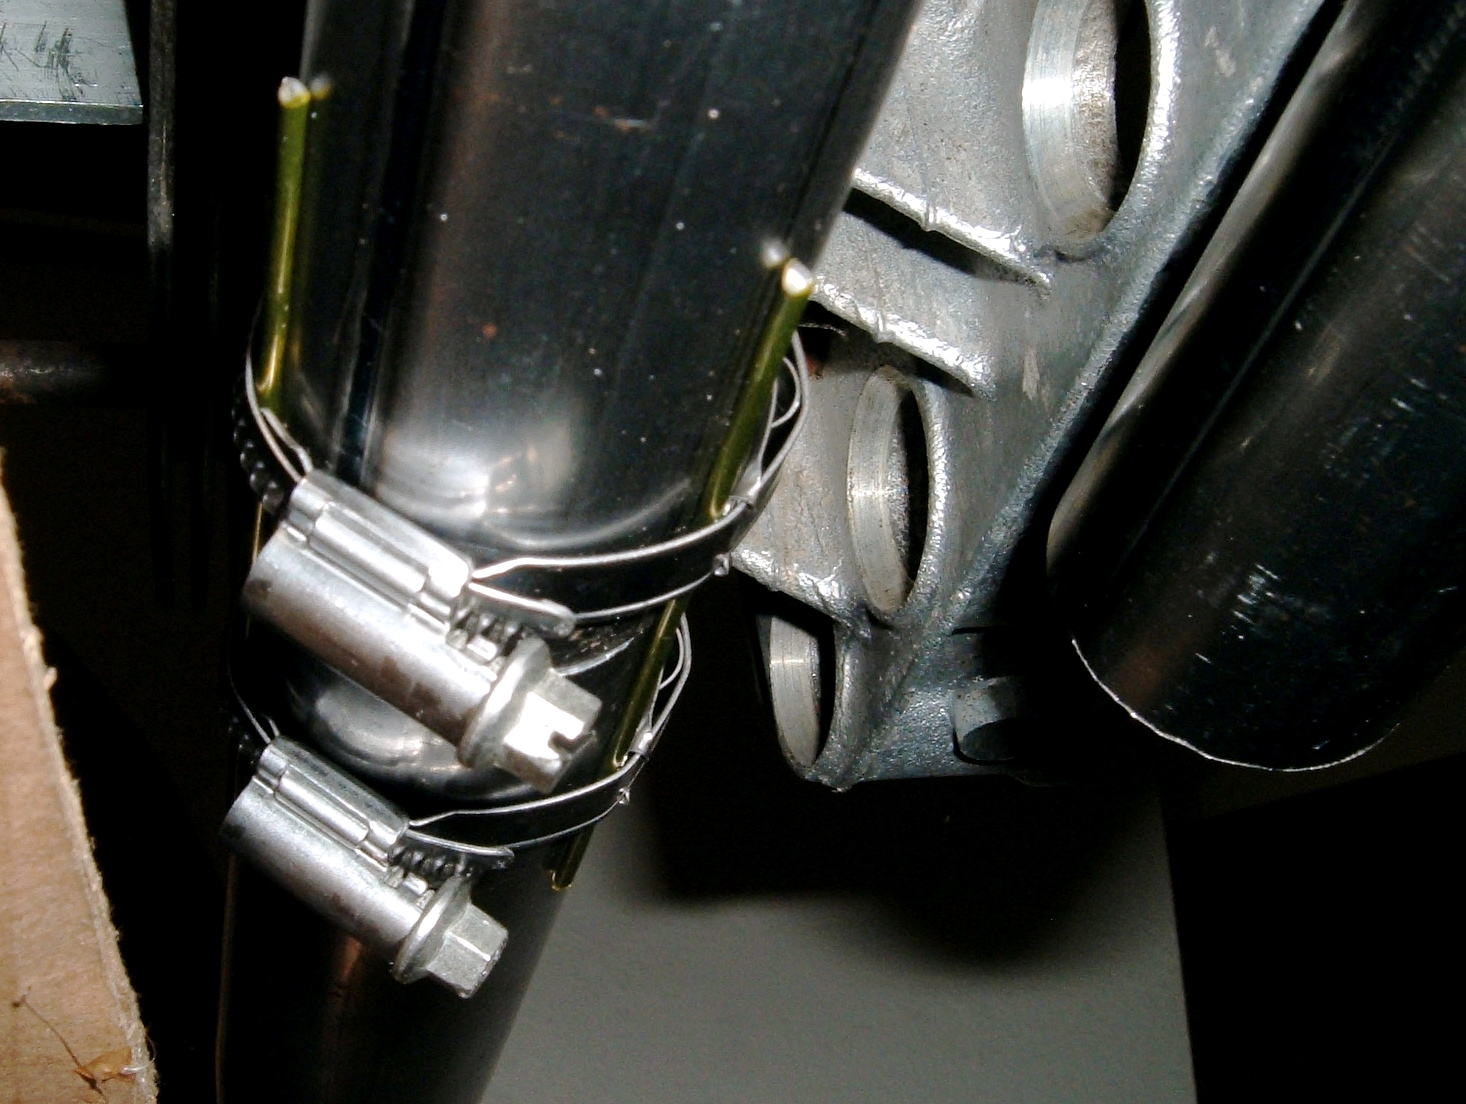
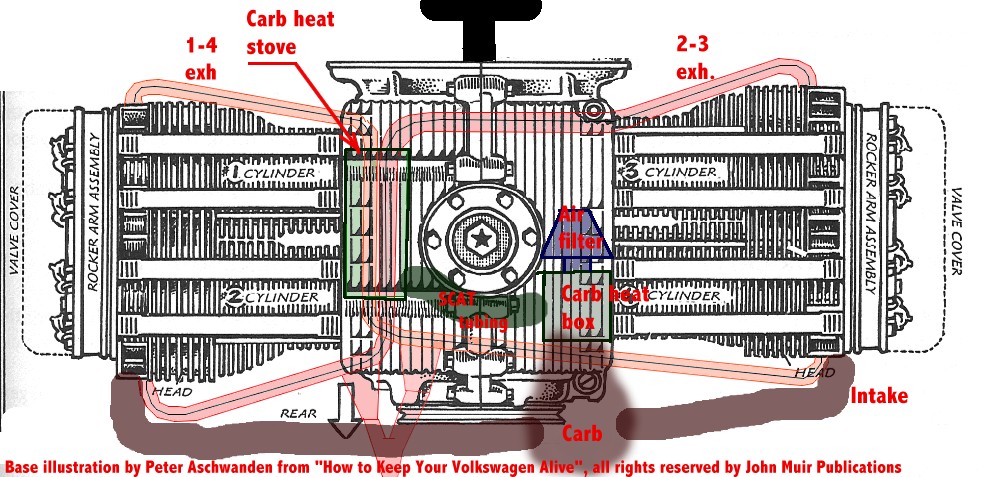
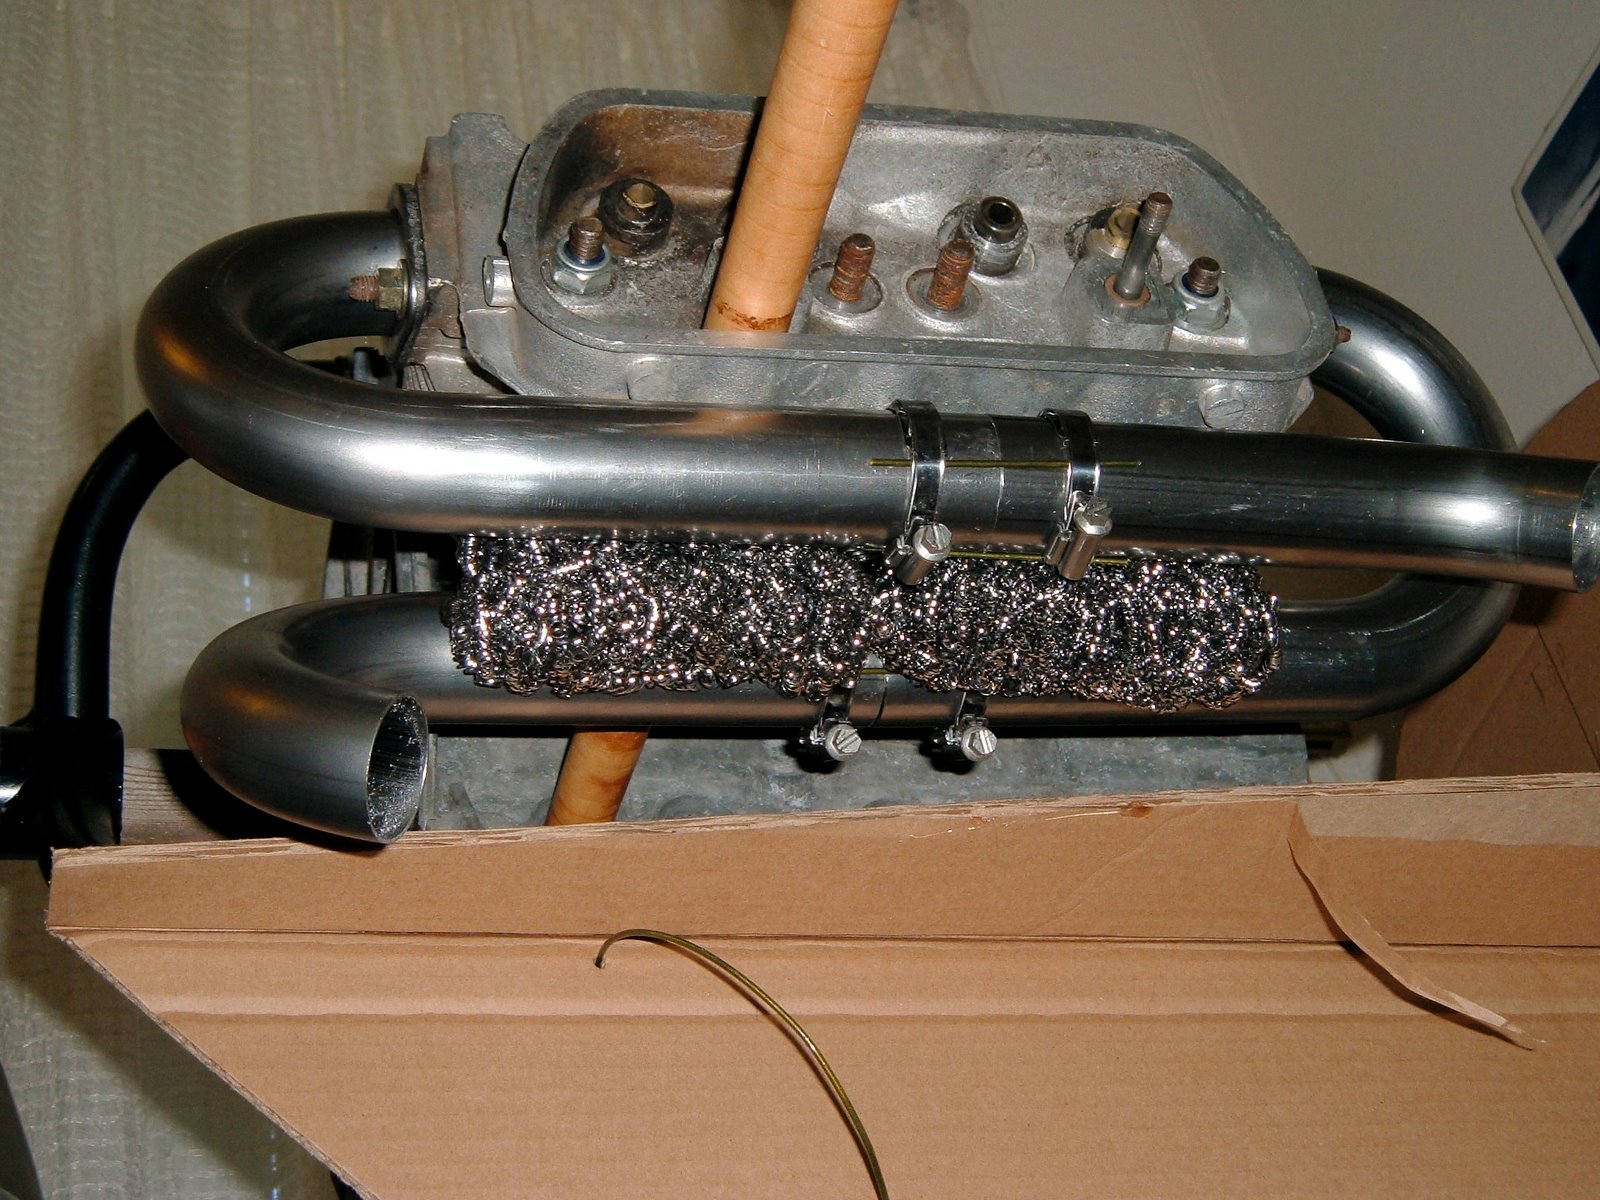
Note the stainless steel pot scrubbers to add heat transfer surface. This entire mess gets wrapped with aluminum sheet, with a flanged connection for the duct to the heat box. Not shown in any of these views is the solid aluminum spacer that gets clamped in between the pipes to hold everything nice and solid. I didn't like how the pipes were cantilevered off the exhaust flanges.

This was a pretty easy and satisfying project. I made all the tubing cuts with a hacksaw, cleaning them up with my disk sander.

The next question is whether to make the other side identical to this, or to go as simple/light as possible, or to join the pipes to facilitate a muffler. I've flipped the engine over in the stand, and I'll stare at it for a few weeks - something will come to me. Also, the plumbing of the hot air to the carb heat box is a little unclear. The bed mounts REALLY get in the way of where I'd like to route this tubing. Hopefully once the intake starts coming together that will be a little clearer

Labels: , ,

Sunday, June 10, 2007

More with the Firewall Forward Mockup


With a double wall cardboard box from the local recycling center, and some hot melt, the spatial relationships of the engine to the front of my fuselage are getting clearer. This design uses a "bed mount". The sides of the case are flattened, and aluminum angles are bolted through the walls of the case. Resilient "Barry Mounts" then bolt up to these "fingers, built up of extrusions and sheet. The reason I chose this airframe is that these mounting scheme doesn't care which way the flywheel faces. The prop hub on this airframe will be mounted on the flywheel end, the left in this image.


Some of the details. Hot melt glue is a great thing for this sort of quick and dirty assemblage.


The pole is centered on the #4 bearing with a cardboard "bushing". Nothing is glued to the pole, allowing it to be taken apart in a pretty tight space here in the corner of my front hall/workshop, and to position the engine relative to the airframe.


It's not too clear in this view, but most of the engine outboard of the case hangs out in the breeze in this design.

Now it's time to start playing around with the tubing bends, and seeing how it will all fit together, if it will.

Labels: , ,

Friday, June 08, 2007

VW Aero Engine Mockup


In order to work out the intake and exhaust, I've built a mockup out of a junk case, 2 junk heads, and some aluminum spacers. I've got it mounted to my engine stand, so I can flip it all around with relative ease. Below is my first cut at what the plumbing will look like:


Symmetry is the hobgoblin of the unimaginative. The objectives here were a crossover 4 into 2 into 1 exhaust, take carb heat off at least 2 cylinders, and have the sump accessible for oil changes. To save weight, the intakes will be fabricated out of aluminum bends from Burns Stainless, the exhaust will be mild steel, starting from a Great Plains U-Build kit, ceramic coated.

Update: I've decided I don't like the 1-4 exhaust running that close to the carb, so I'm going to try to run it in front of the intake.

Another Update: NONE of the exhaust scheme presented here worked at all, given the bed mount of my fuselage, so I've radically simplified the arrangement, so later posts.

Labels: , ,

Saturday, May 12, 2007

Engine, Alternator mounts for Flywheel Drive VW Aeroengines

Some of us believe the proper way to mount the prop to a VW engine is via the Flywheel end of the engine. Great Plains Aircraft Supply has some around to this way of thinking, and now supplies pieces to make this happen. They have not, as yet, posted very good pictures of the stuff, so I'm stepping in to give out some clues. R.S. Hoover, in the Chuggers and AirVW Yahoo groups, has posted some pictures of the flywheel end piece, and the spool prop extension. On my Hummel Ultracruiser Plus variant, I thought I would be able to use a belt drive to a Kubota/John Deere PM alternator, so I bought one of Steve Bennet's combined alternator/motor mounts.

This side faces the engine. Those little bosses at the top of the image get drilled to clear 8mm fasteners that tap into the existing bosses on the case itelf. The two big holes service conical shock mount bushings, with interface with a bed-type engine mount.

Similarly, this face gets drilled for the pivot point for the alternator, and another fastener to the case. The holes are nicely located, with a cast in "Center Punch".

Unfortunately, this part will NOT work on my fuselage, as the extensions of the forward fuselage that form form the the engine mounts on this design don't leave enough width for this dealy. Steve took it back with no questions.

This piece was designed to be part of the Great Plains Rear Drive System, which involves an outboard thrust/radial bearing, which the Flywheel Drive setup DOES NOT use. The casting Steve devised for this setup has similar conical bushing bosses cast in. Here is a picture of such an installation on Hal Hadaller's airplane:

The mount mounted. Note the tight clearance to the oil pump outlet.


Hal ended up with the alternator in a different place, so he cut off the arm for adjusting it from the mount.

Here's the whole RDS deal installed on the firewall:

Compare/Contrast to this Flywheel Drive setup on a Sonerai:

R.S. Hoover is one advocate of Flywheel drive, having flown several planes with it, and Chad Stenson is another, with airplanes flying using it. You can find R.S. Hoover via various Yahoo groups, and Chad via Sonerai.Net. I haven't flown this hardware, but I'm building such an engine right now.

Labels: , ,

Engine Mounts for Hummels

Hummel Aviation uses a rather unique method of mounting either a half or a full VW engine in their designs. Rather than the usual "Conical" mount (usually via an accessory case), they bolt a couple of aluminum angles to the sides of the oil sump, and work shock mounts from there.
It's a bit of a chore to do this accurately. Scott Casler, the Hummel Engines guy suggests using a belt sander. Not having one, I used a vixen file, and a lot of swearing.

Here we begin.

Notice the "sugary" surface is getting brighter and brighter.


I used prussian blue and a section of aluminum plate as a surface plate to keep the surface flat, getting there.

I think it's time to declare victory. This is a junk case I use for experimenting, by the way.

This is what the inside of the case looks like. The bolt heads (AN4) have to fit down in those cavities, which are not exactly flat. I'd love to spotface in that area, but it's a PITA, and the sump walls are only about .200 in thick, so you don't want to carve away too much meat.

The solution, as far as I'm concerned, is a clever little dealie called a Stat-o-Seal. It's an aluminum (and therefore deformable) washer, with an o-ring bonded to the ID.
Between the O-ring, and the crush washer, we should achieve a good mecanical connection, and a seal the oil in the case. The aluminum angles will get a coat of whatever case sealer my engine builder likes. Self locking nuts go on the outside.

Labels: , ,

Friday, December 08, 2006

Bang, Bang Rufus' Dead Blow Hammer

An update to my last post:

I splurged and bought a nice dead blow hammer. For this sort of work, I think you need to Go Big. A 3# hammer is a nice compromise between getting the job done and irritating my tender shoulder.

And the E-Bay vendor I bought the brake I found inadequate refunded my money. Life is good, my trust in Human Nature still largely intact.

Labels: ,

Sunday, November 26, 2006

Long bends for Scratch Builders of sheet metal airplanes

You may recall I was working on an "Amateur Folder" per Michel Columban, the French designer of the Cri-Cri. But I was stretching the limits, again. I need to bend stuff up to about 4 feet long, at least, substantially longer than the Prototype was designed for. To make a LONG story short, it didn't work when bending the 2219-T8 I have in abundance. So, I'd noticed what looked like a suitable brake on E-Bay, and I threw money at the problem.

Brake found on E-Bay

My heart fell when it was delivered - it's all out of aluminum. The forces involved in bending build up pretty quickly, and even though it was advertised is being capable of bending "14 gauge metal" (? steel? Aluminum? Copper? - 14 gauge's about .080", depending on the metal), it too failed at bending a mere .020" 2219-T8 about 2-1/2 feet long. The bending leaf visibly deflected as soon as I put some muscle into it. I can't recommend anyone buy one of these. Maybe if I was using 2024-T3, like I should be it would work, but I'm skeptical it's good for anything other than mild steel, annealed, or dead soft aluminum.

So, I need to send the damn thing back, and get it out of my shop, even though it's not clear the Seller will refund my money, and there is NO way I'm getting my shipping charges back. How to box it up so that it will get to South El Monte? I threw the original box away as soon as I opened it up, well before I actually tried it out - Doh!

Well, since I've got plenty of .020" 2219-T8....


The end caps are particle board scavenged from discarded IKEA furniture discarded by apartment dwellers in my neighborhood. A few sheet metal screws hold them in. The top is held on with 600 MPH tape and the aforementioned sheet metal screws at the ends.

The main body is a channel I bent using a technique I learned from Dave Thatcher, the CX4 guy, and therein lies the bulk of this tale. I got a DVD of him from another builder bending up an aileron at Sun and Fun using little more than a forum-issue folding table, a 2 X 4, a rubber mallet, and the real secret, a piece of 1/4" plywood.

I'd bent stuff by clamping it and hammering it before, but in thin aluminum, I've never been pleased with the "free" edge of the resulting part. The mallet blows stretch the metal rather unevenly, leading to a lot of ripple. Not much of a problem when a channel spar is riveted to a skin, as in tailfeathers, but a big problem for longerons, as used in the tailcone of various Hummel avias.

Let me cut to the chase: using a piece of plywood to distribute the blows makes it possible to make incredibly straight bends with bupkus for tooling. You still have to tightly clamp the sheet stock between two fairly rigid bars of something (Dave advocates an 8 ft long section of 3 X 3 inch or bigger STEEL angle, fastened to the front of your bench, level with the top), and you're limited by the throat depth of your C-clamps to how wide a flange you can throw, but I bent up the channel that forms the "box" above in pretty short order. Some pictures:


Notice in this setup, I'm able to clamp from the back. If you're clamping from the front, just periodically use the mallet to swing the clamps from side to side, the get the whole length of the bend uniformly bent. It has to be plywood, solid wood of comparable thickness with split to splinters in 2-3 blows.

Here is Your Author, in his Industrial Jammies (no heat in the shop, it may be California, but 50 degrees and raining hard is still 50 degrees), workin' it. Note: this process is Loud. Girlfriend was wearing my earmuffs while I wailed on this mutha. This is not something you can do late at night in a shop with 6 mil plastic walls.


So, the "failure" of both the "Amateur Bender" and the E-bay Cheap Chinese Junk lead to some learning. I was reluctant to try Dave's technique, and was thinking of building yet another bending device, probably this one from the www.ch601.org website, since it doesn't require any welding. And I still may do, but having tried this technique, on a project that didn't require Flight Hardware, I may not need to. Having a non-critical project to learn on is a really good way to teach yourself the skills you need to build an airplane from scratch, when you can't have a kindly A&P standing at your shoulder at all times, teaching you the ropes he learned from Donald Douglas Senior Back In The Day.

Labels: ,

Wednesday, October 04, 2006

Bending and Scraping Aluminum

The current infrastructure project is a "Amateur Folder", or bending brake, per Michel Columban, the designer of the Cri-Cri/Cricket and the Ban-Bi. Part of making it involves putting a fairly small radius on some aluminum bars. I do this by SCRAPING the metal, an operation not much used anymore, but a very handy one at times.

Think of a scraper as a file with but one tooth. In this case, I took an old, dead, saw blade, drilled a hole of the suitable RADIUS in it, ground out a notch to expose the 1/4 round radius I needed, and started drawing this improvised tool along the aluminum bar.

I hit upon this method by noticing that the radius gauges I'd made in this manner actually worked pretty good at removing metal. I'd used scrapers in woodworker, and was also aware of their use in metal working from various volumes sold by Lindsay Publications. DO NOT deburr the hole you drill - the sharp burr is part of your cutting edge.

If you've found your way here, and you think you need one of these, go make one, you'll learn more by doing than anything else I could tell you about making or using on of these.

Labels: ,

Sunday, August 06, 2006

Finally Making some parts

Finally working on the Mongrel Dog (my hybrid airplane, a mix of Hummel Ultracruiser Plus empennage and somewhat modified fuselage, and wings that are updated, lengthened Teenie Two planform) a little bit. I fabricated and riveted the little angle brackets that stiffen up the flanges in the bulkheads, and started working on the firewall, in preparation for hanging the bulkheads on the building beam, which was built nearly 2 years ago back in the old shop in Oakland.

I didn't like that the plans used aluminum for the firewall, so I substituted galvanized mild steel, and made the forms myself. I bought bulkheads B, D, E and F from Hummel Aviation, they were very cool about just selling me the ones I wanted, and didn't insist on selling me the whole set. Since my wing has a shorter chord than used on a "true" Ultracruiser Plus, I need to shorten up the fuselage in the cockpit area, since bulkhead C has to fasten to the rear spar of the wing. I later (after I built the building beam) figured out another way to manage the fuselage, but with the shorter chord wing, with a lower Clmax (it's also a thinner section), I probably don't need as much tail moment anyway.

Links to pictures:

Labels: ,

Wednesday, January 12, 2005

Riveted Aluminum Fuel Tanks

index
IMHO, this is the way ALL fuel tanks for homebuilts should be made. This web page also a good introduction to basic fabrication. Faster, easier, cheaper and cleaner than making a tank out of fiberglass. Less skill and equipment dependent than a welded tank. Forget about a soldered galvanized tank (Teenie Two spec), you cannot get the flux or the solder Calvin (may his memory be for a blessing, he died about a week ago) Parker used Back In The Day.

Labels: ,