Saturday, October 18, 2008

Fuel Systems, AN fittings, NPT fittings, and their discontents


Follow this link, and scroll down a bit within it to read about a Zenair 601 with Corvair Power and it's fuel system at www.FlyCorvair.com

I've purchased, read & digested William Wynne's books, both the Corvair conversion manual, and the relatively new ZenVair installation manual. He's made a pretty convincing case for the things he does by laying it down WHY he does things, and if you follow his site you can see the OTHER things he's tried.

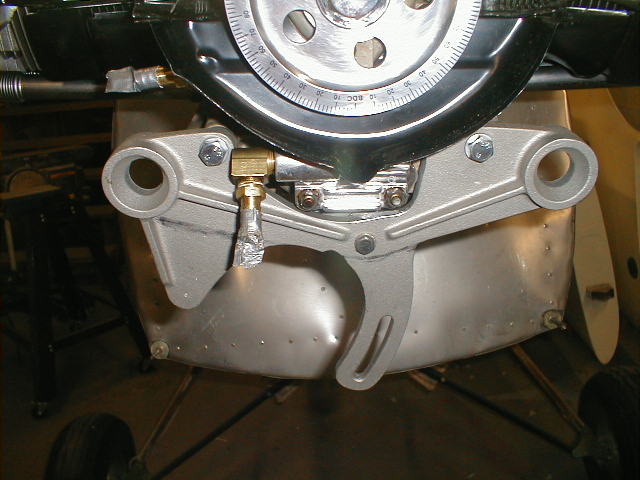
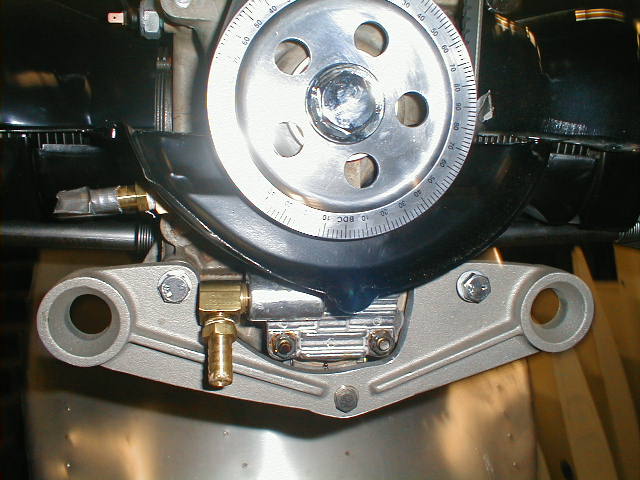
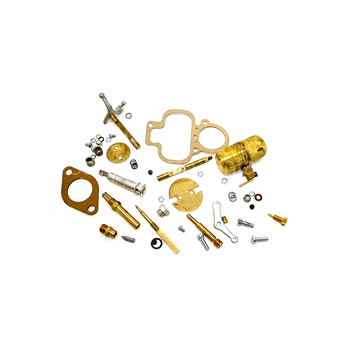
Please examine the adjacent image, from the same web pace linked above. This is one of the cleanest fuel systems I've ever seen on an experimental, and I'd like to emulate it if I can on my airplane.

Let's follow this scheme from the firewall out. The AN bulkhead elbow (light blue anodized, AN833-6) is attached to a hand made "outie belly button" piece that spaces the deal far enough away from the firewall to hang the gascolator nice, and link up with the inlet to the primary Facet fuel pump. Later versions use a welded "firwall pass through", and you can buy this part from http://flycorvair.com.

A female-to-female straight union attaches the Andair gascolator which has male AN-6 connections built in. A 90 deg union connects the first Facet pump FP-40108, which also has in-built male AN-6 connectors. Another straight union, another pump, and on to the carb via a fuel pressure sensor.

Now, I've got two pumps, but they are the much more common Facet FP-40105. Can I devise something that works as well with the parts I have in hand, and can pick up from my local, well stocked hardware store?

The short answer is "NO".

The LONG answer starts with these facts:

1) The fittings I'd really like don't exist in NPT (National Pipe Thread). This means using more fitting/joints, which means more potential for leaks, especially since:
2) NPT RELIES on sealant, as it is NOT inherently leak free by design. No matter how tight you graunch down on it, there is always a spiral leak path around the threads.
3) NPT fittings SUCK from a fatigue standpoint, for several reasons. The mechanical function of tightening the joint, and the sealing function (such as it is, see answer 2) above) are not separated, and so if the joint fails mechanically in ANY way, it also leaks, not good with fuel. But the threads are also for shit, with sharp roots. True AN fittings have a special thread form and tighter tolerances than the nearly identical JIC 37 degree flare fittings, which are already way better than the NPT threads on hardware store fittings.
4) Even in the smaller 1/8 inch nominal diameter, the brass hardware store fittings are heavy compared to the aluminum AN-6 fittings - I haven't checked yet, but they may actually be heavier.

Nevertheless, I'm going to carry on with this plan, at least conceptually, for the following reasons:
1) A VW sucks less fuel than a Corvair. AN-6 is overkill at 4 GPM max.
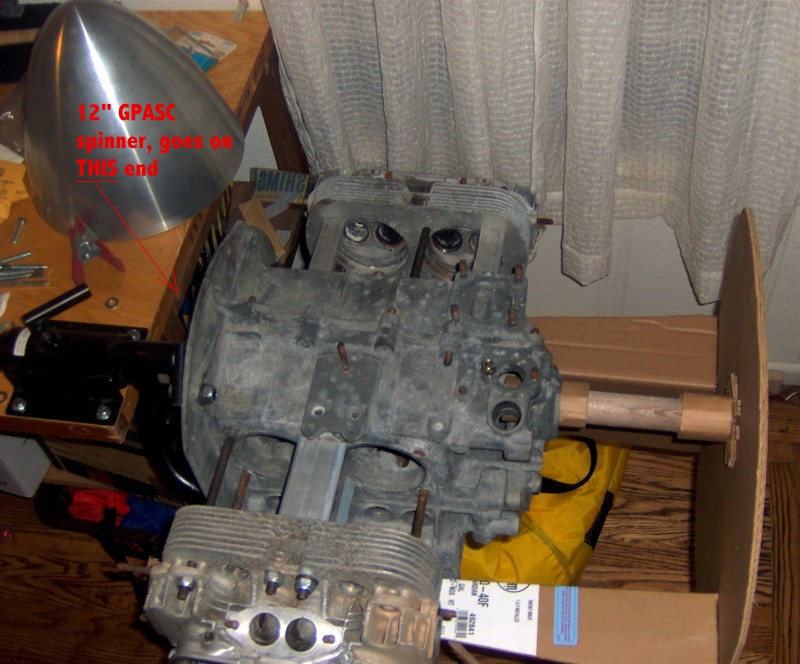
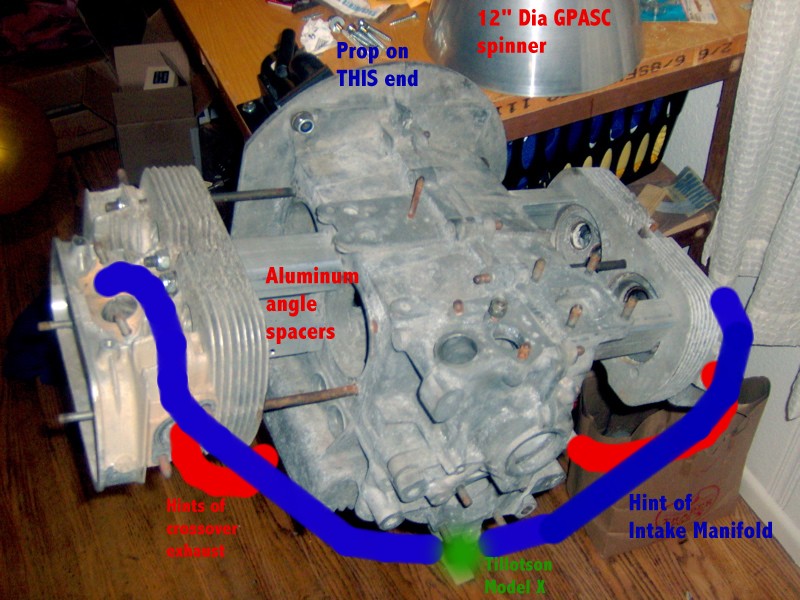
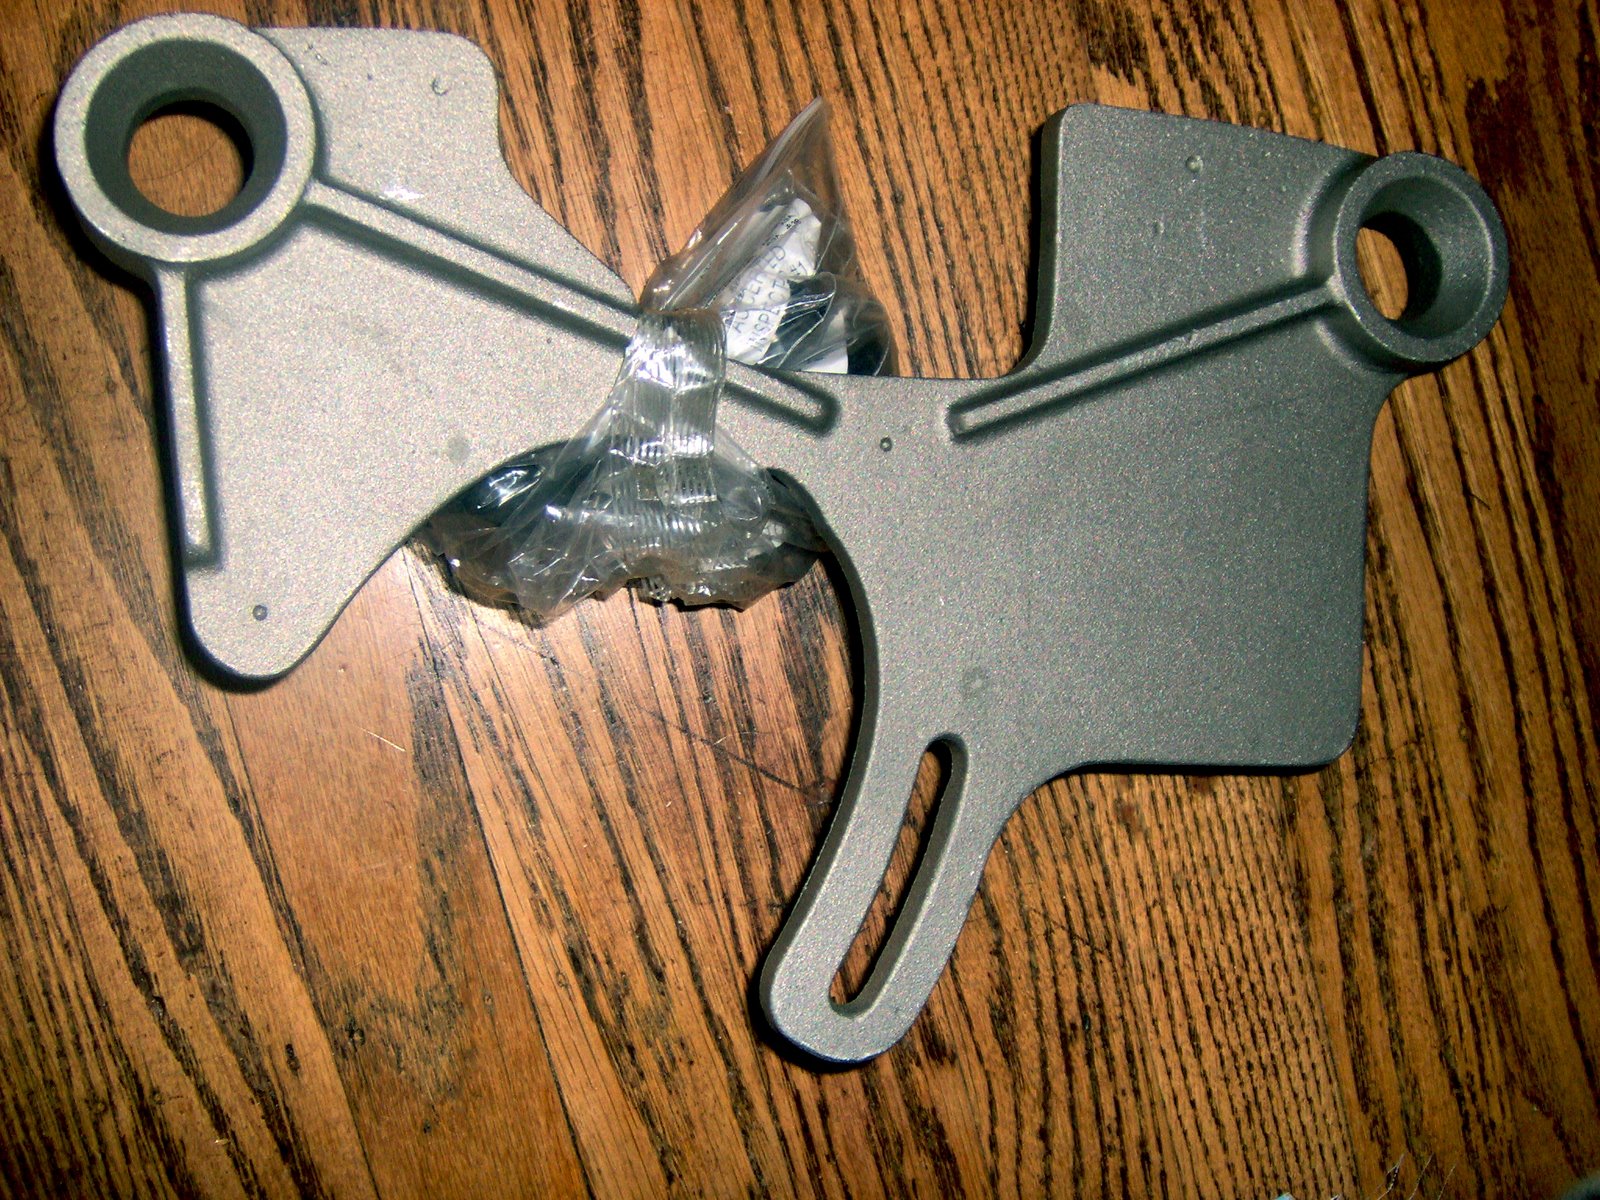
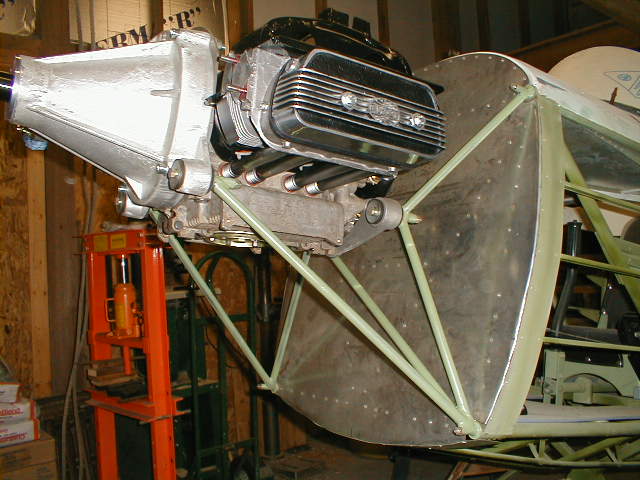
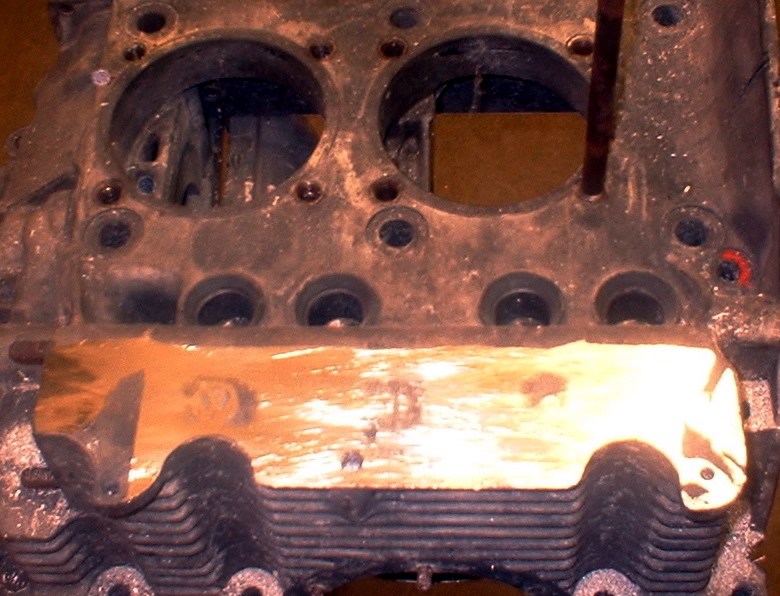
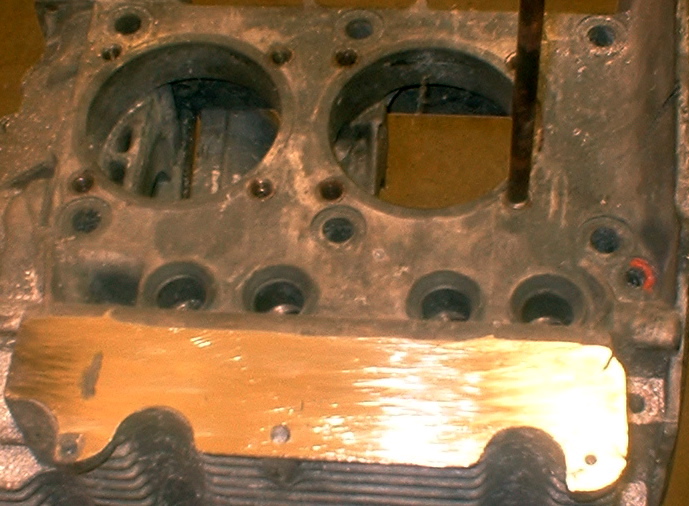
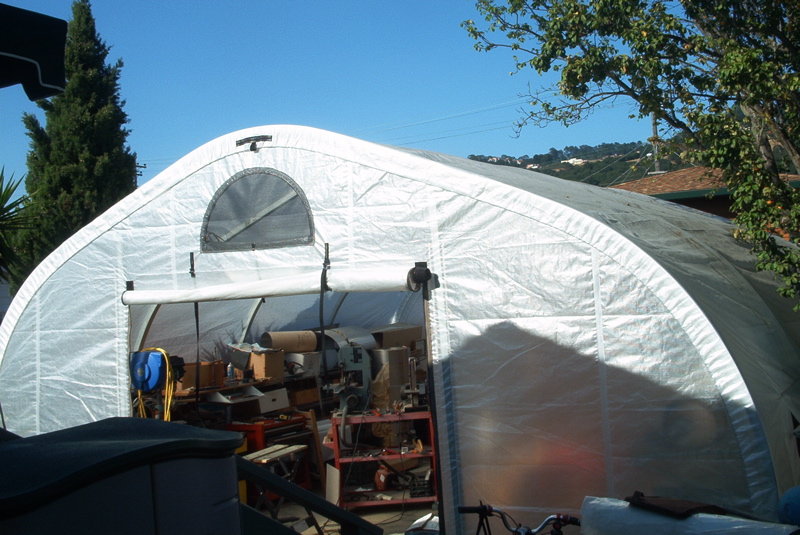
2) I suspect I'll have to do a lot of experimentation to get my fuel system to fit, see the adjacent view of my firewall. I don't have a lot of real estate, and I may have to run the fuel pumps along the engine mount beds.
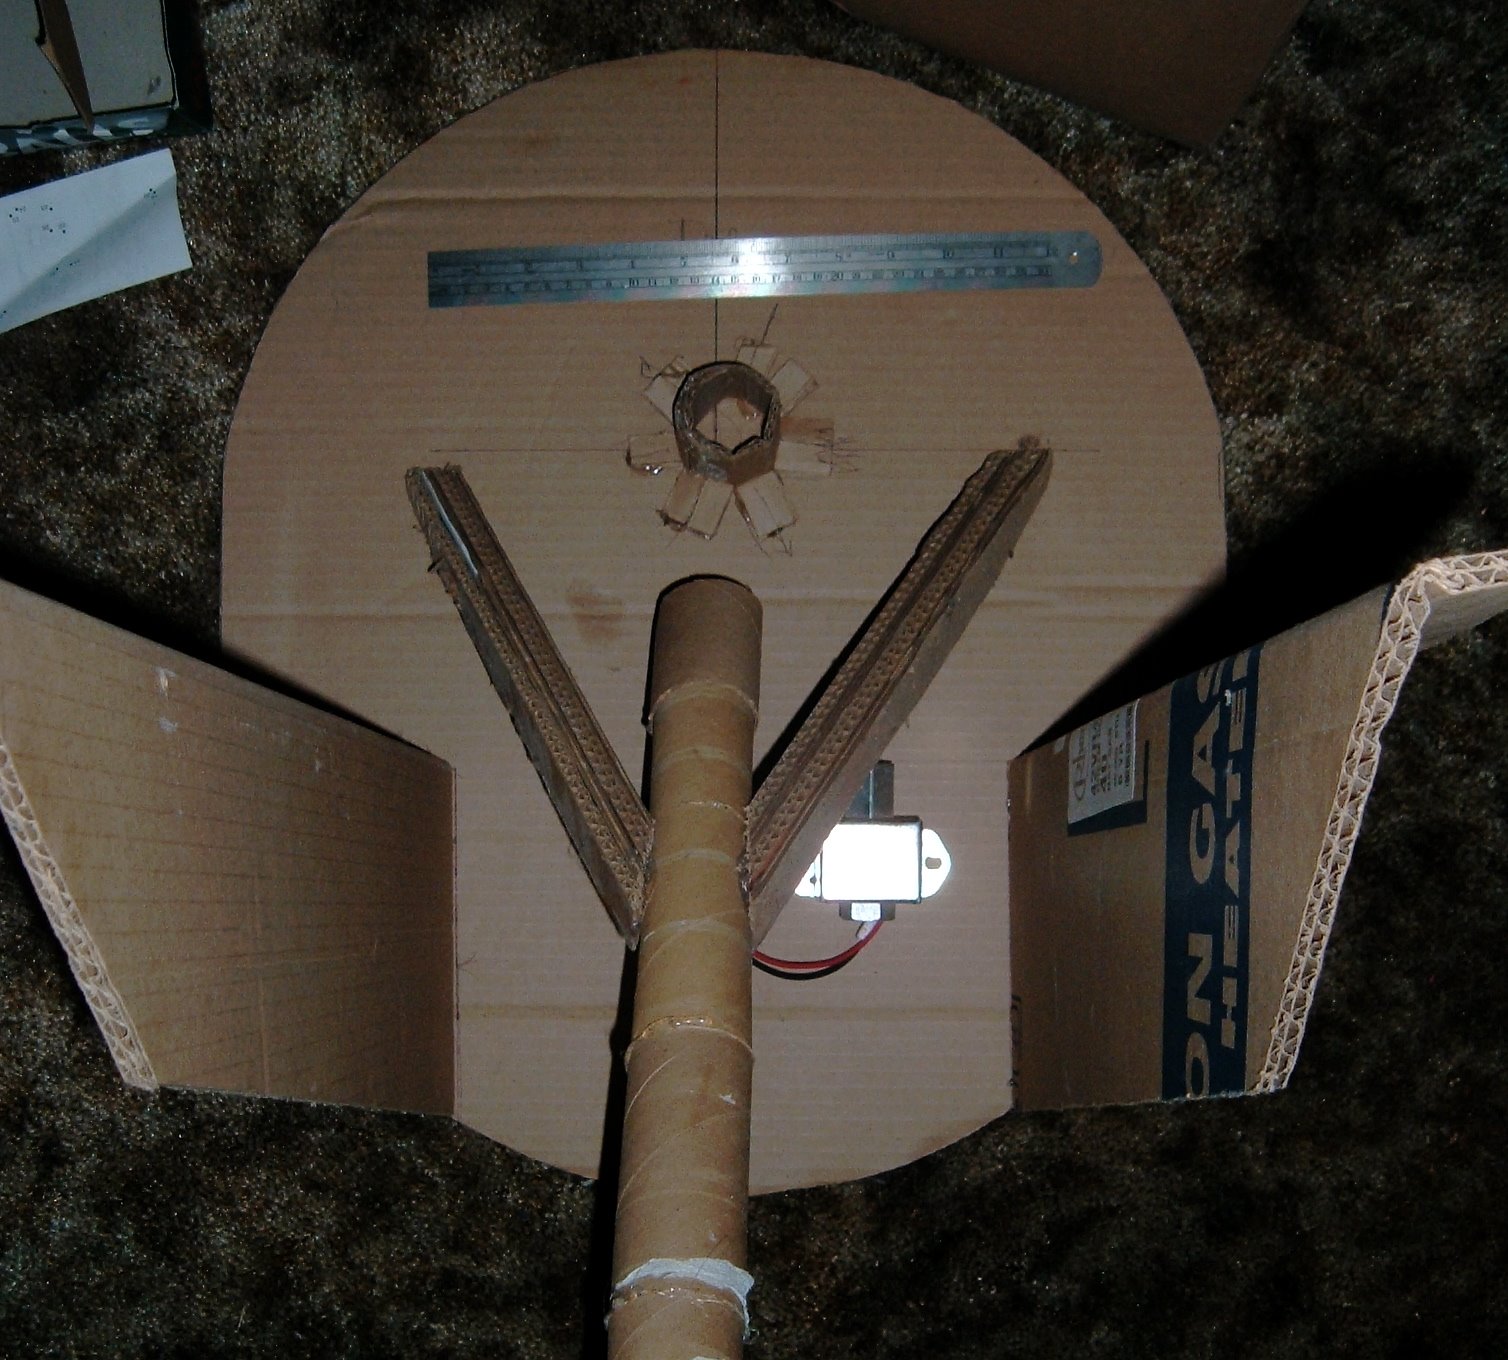
It will sure be a lot easier to mod the system if I can pedal my bike to the hardware store instead of going online to ASC or Wicks to get parts to play with.
3) The disadvantages of NPT fittings can be mitigated by NOT relying on them to support the gascolator, and by using Loctite Pipe Sealant.

So, my system, assume the same geometric layout, will require a 1/4" NPT bulkhead fitting, used in boat fuel systems, a 90 deg male-to-male elbow, a 1/4" female-to-female union, a 1/4" hex nipple, a Great Plain gascolator (the gascolator will be supported by a bracket, and NOT the NPT threads), another male-to-male elbow, another union, a reducing bushing, a 1/8" hex nipple, the first fuel pump, a 1/8" hex nipple, union, nipple, fuel pump, then off to the carb.

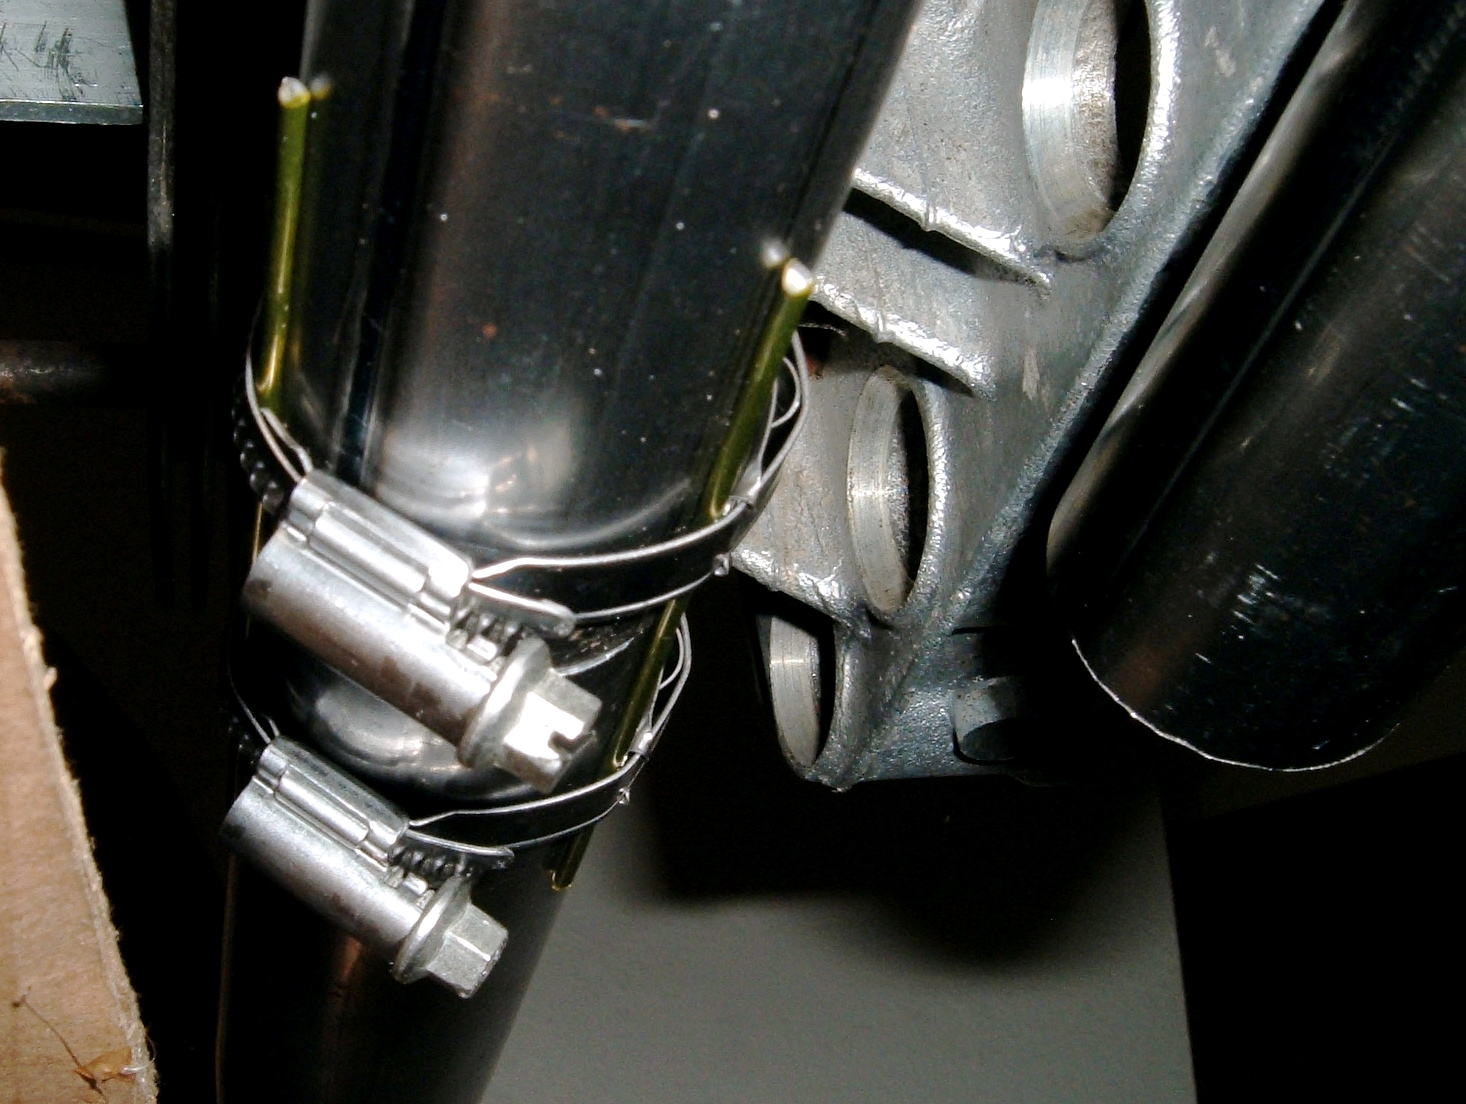
This fuel pump to carb transition bears examination. William Wynne uses an Earls AN-6 fitting with a 120 degree bend, connecting to HOSE, to deal with the vibration between engine and firewall. Nothing like this exists for 1/8" NPT, so I think I'll have to form something up using a NPT to 45 degree flare fitting, a suitable length ALUMINUM tubing with hose slipped over the ends of this and double clamped. Before you sneer, the HIGH pressure (70+ psi) fuel lines on our Volvo 164 used hose over straight pipe without a barb or a bead.

What I see as the VITAL points of William Wynne's system for a low wing aircraft, what I'm trying to retain: redundant fuel pumps, and no pressurized fuel in the cockpit.

UPDATE: The proceeding discussion can be viewed as an example of my thought process, or perhaps of the sort of mental masturbation first time builders with too much time on their hands, but not enough energy to go out to the shop, and, you know, BUILD anything, go through. The comment posters have convinced me AN fittings are the Way and the Light; the scales have fallen from my eye, and I BELIEVE. Amen.

Labels: ,

Saturday, May 03, 2008

Carb Cleaner is not for long term storage

About two weeks ago, I pulled my Tillotson cores out of the tub of toxic methyl chloride carb cleaner. They'd been sitting in there since, oh, last May.

Lots of parts were ruined. Both floats at the very least.

The pot metal pieces looked OK, but the brass parts seemed to have dissociated.

So, yes, let the stuff do it's work, but a month is probably as long as you should let carb parts sit in this witches brew.

UPDATE, October

I closely examined the pot metal upper and lower main castings, and decided they are junk. They look like they've been sandblasted. And the Carburator Refactory didn't have any Tillotsons for Model A's, only Bendix boat anchors.

So I'm giving up on the Tillotson X project. I don't want to fart around with them anymore, unless someone GIVES ME a NOS or completely rebuilt one before I can buy a Zenith 1821 from Great Plains.

IF you do find a nice core and want to try this carb, DO get the Master Rebuild kit, AND the book, and DON'T soak the pieces for longer than a couple of days before fishing them out, drilling out the plugs, reaming the passages, and finishing the rebuild using new gaskets.

ANOTHER UPDATE, later in October


I was cruising E-Bay and found a rebuilt, test run Tillotson X for $150 shipped. Bought it. Half the price of the new Zenith. And I have rebuild kits and a Grose Jet to spare!

Labels: ,

Sunday, August 12, 2007

More Progress On Exhaust System

Initial try, wood block represented the (theoretical) cross section of the carb heat stove.
Unfortunately I forgot to account for the pushrod tubes. So the carb heat stove had to get substantially slimmer, and the the 180 degree bends got "clocked" vis-a-vis the exhaust flanges a little bit. I'm using hot melt to hold the bends to the exhaust flanges. It works great, it holds securely enough to get everything jigged up, and breaks lose if you make a boo-boo (the oil on the tubing helps this).

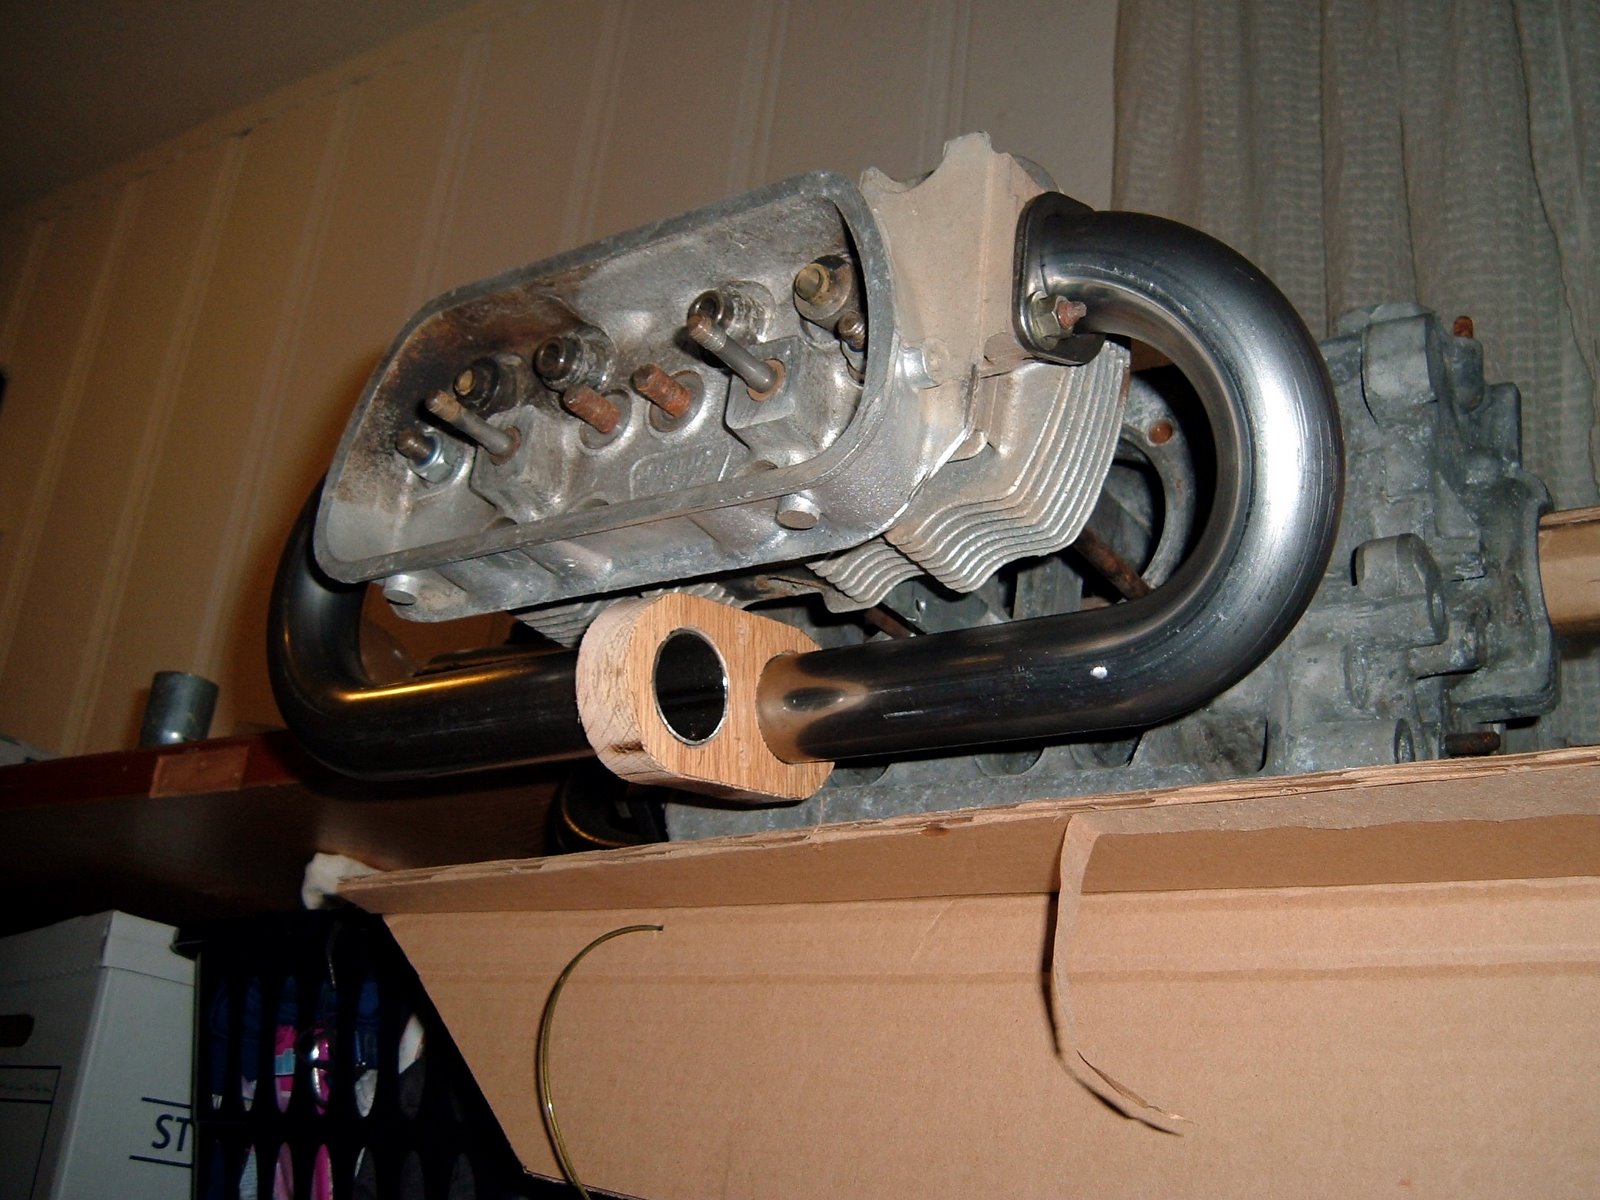
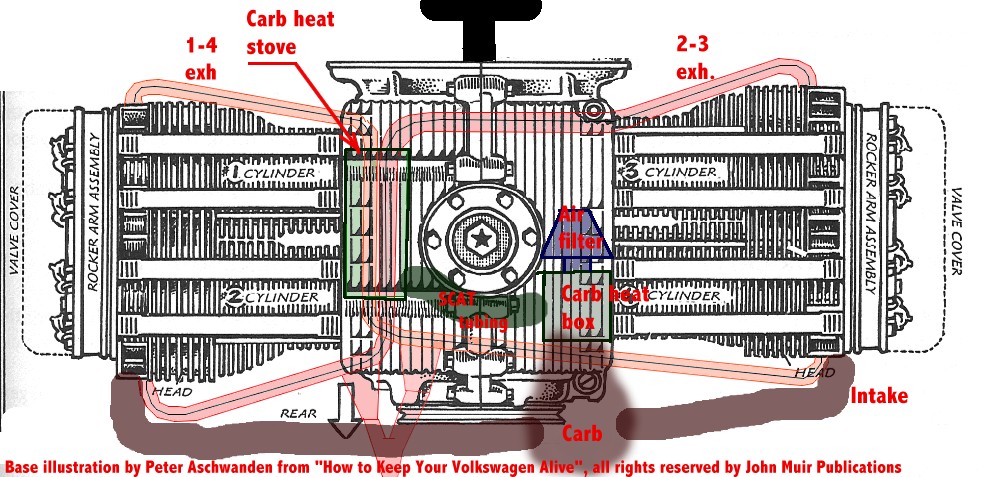
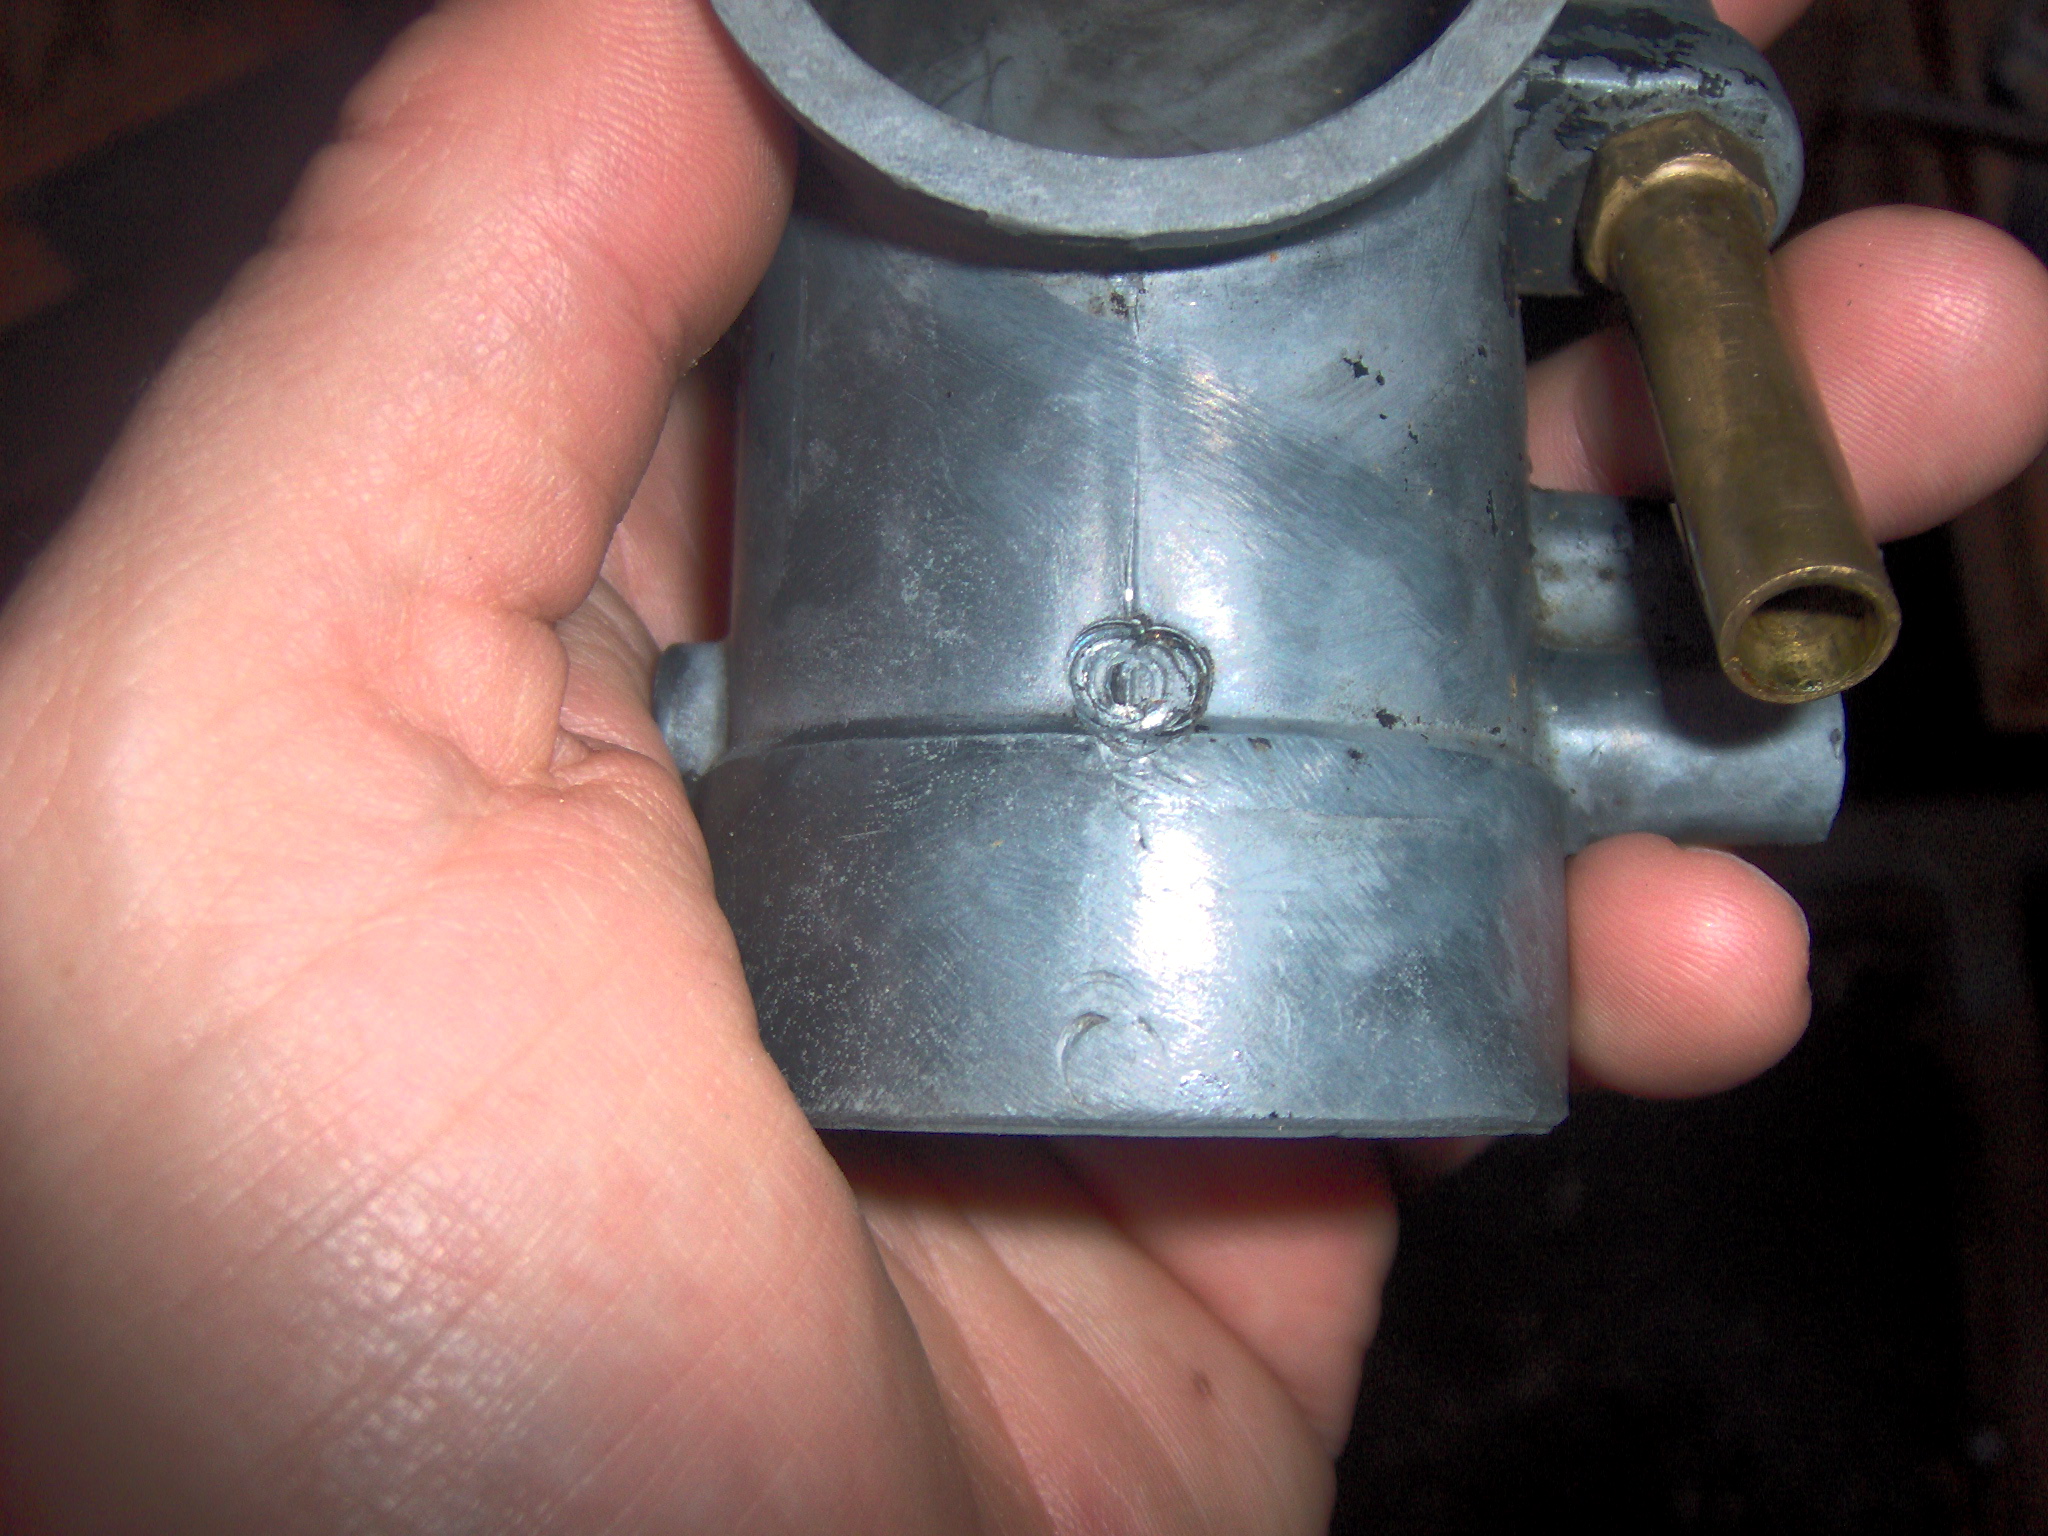
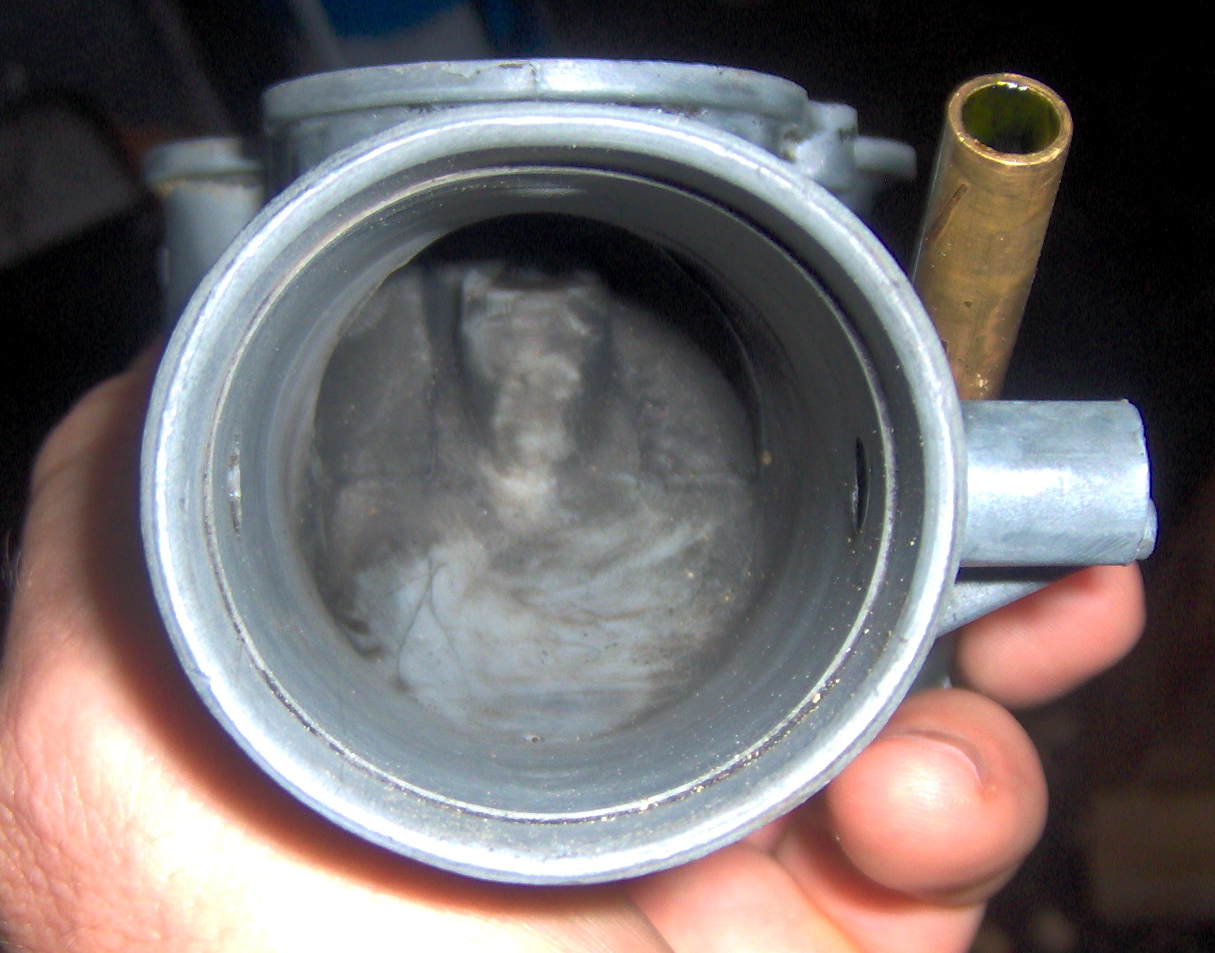
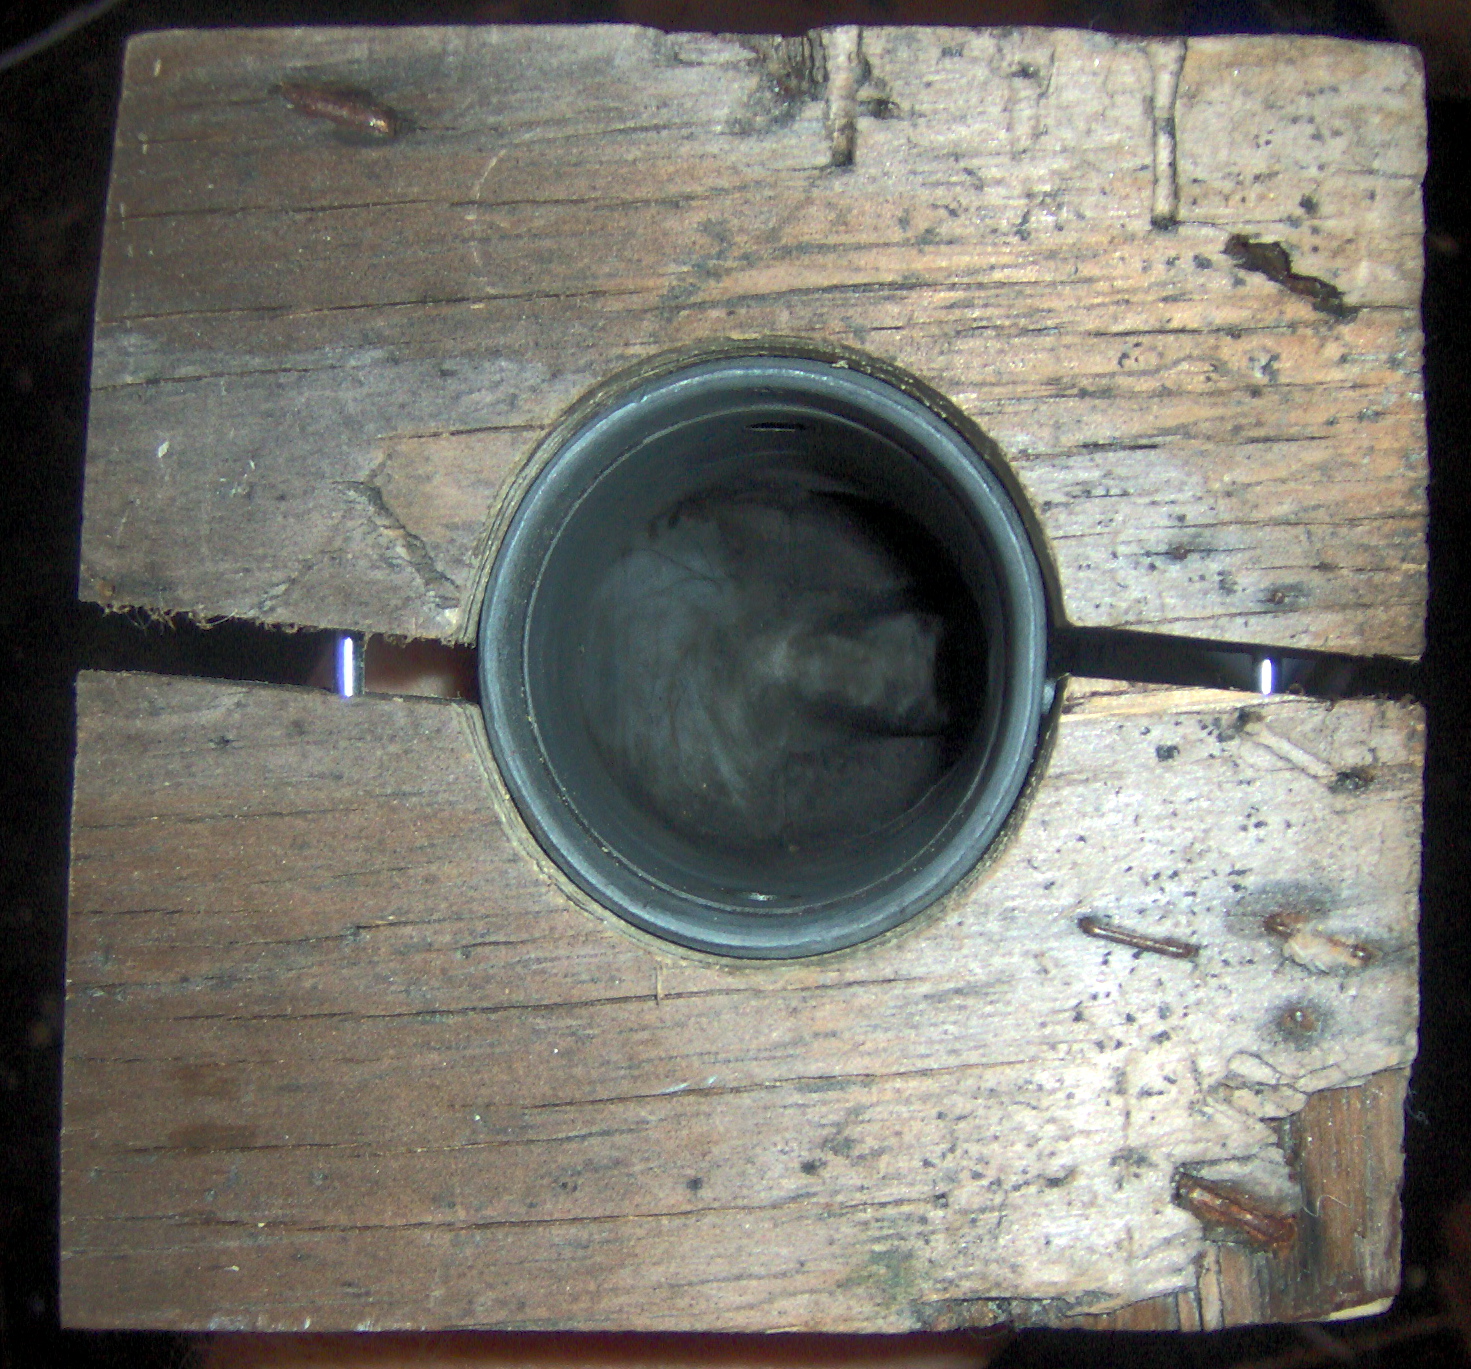
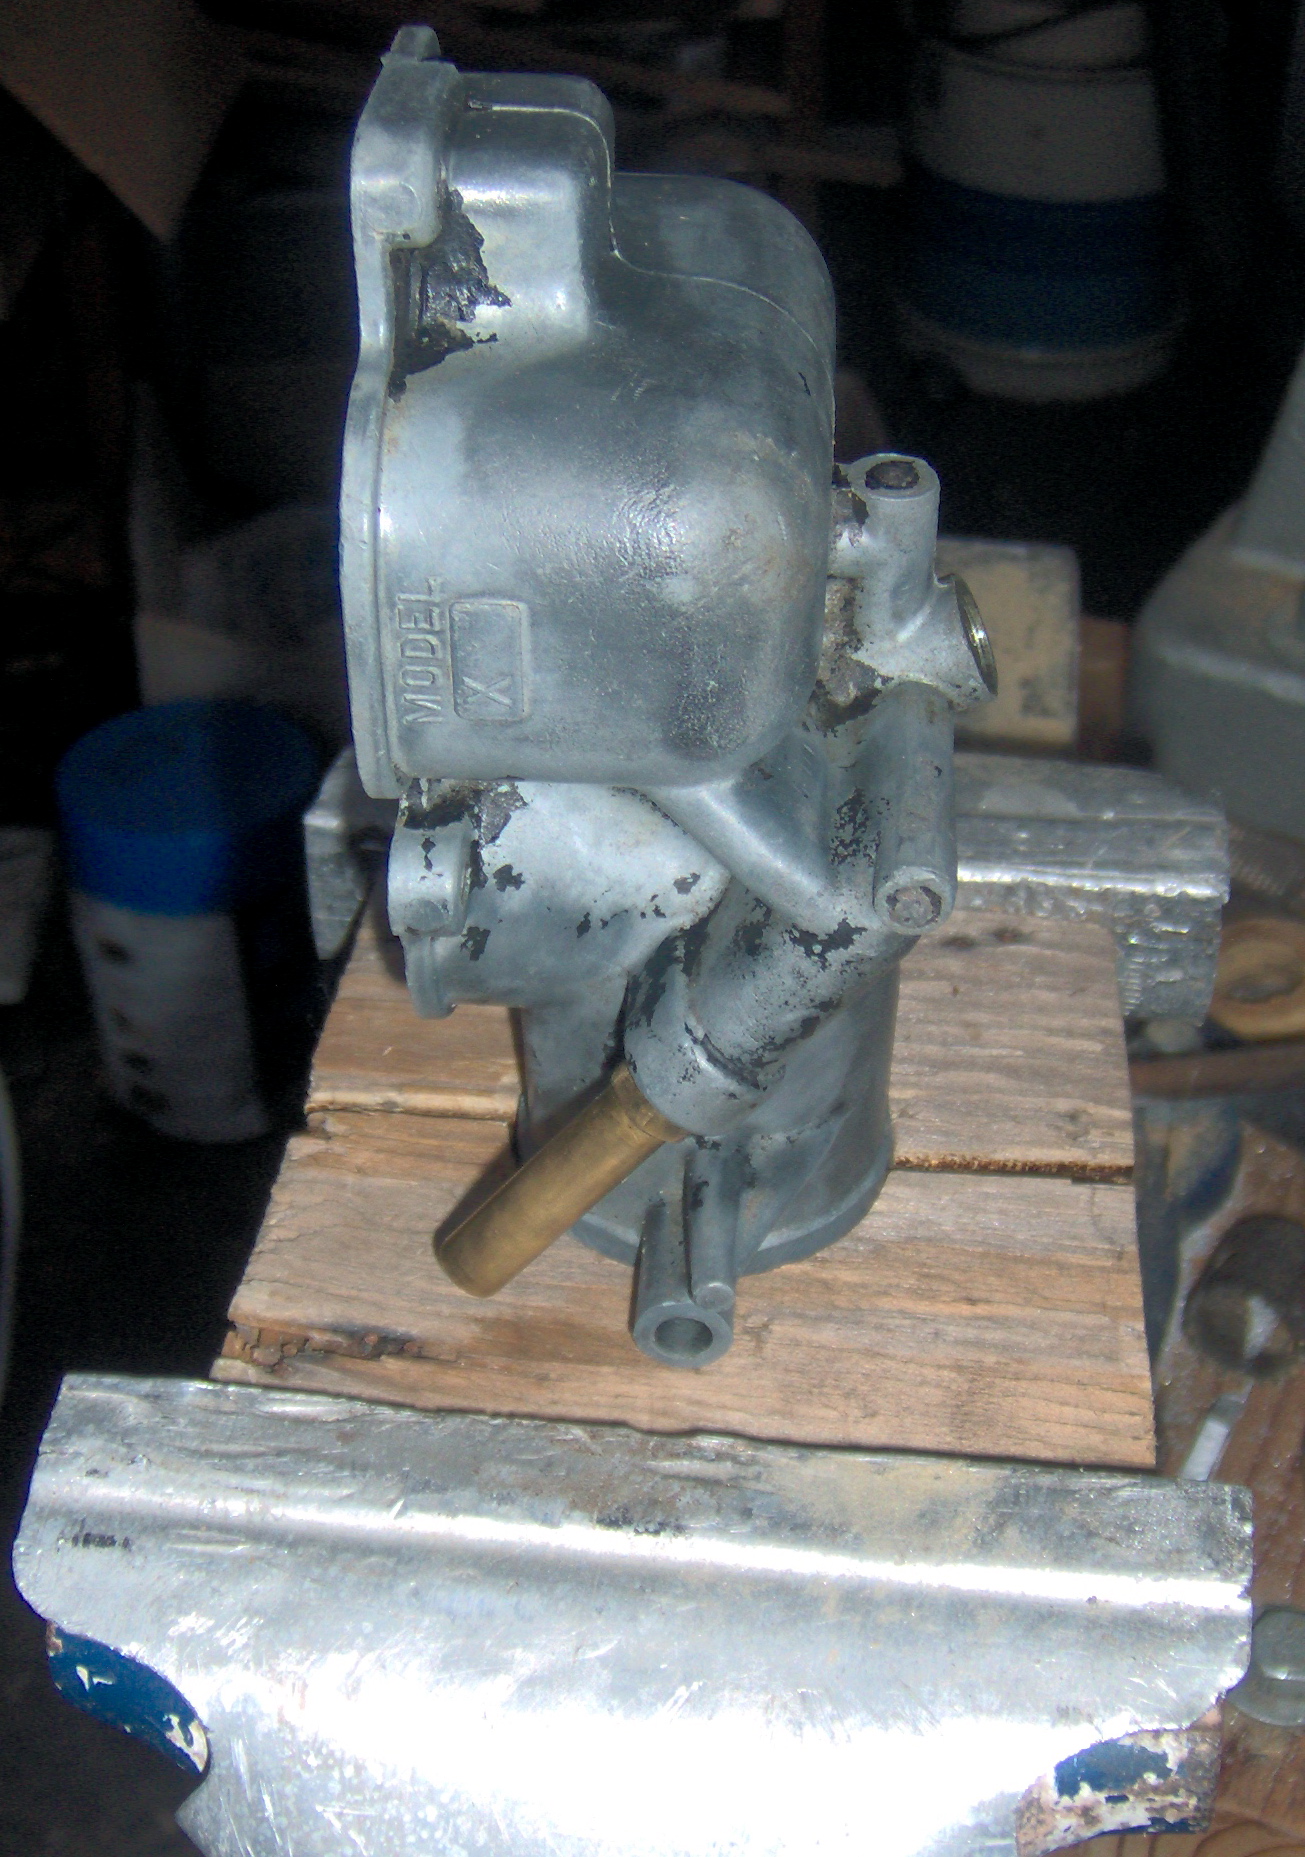
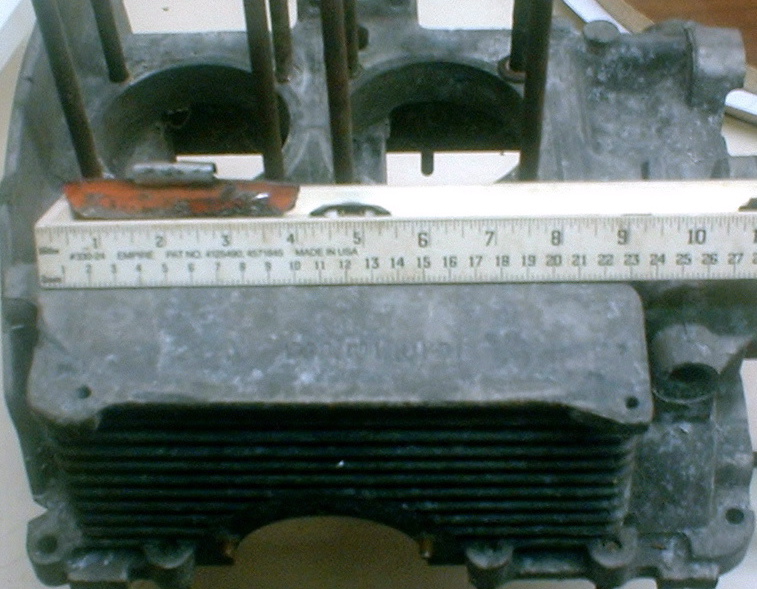
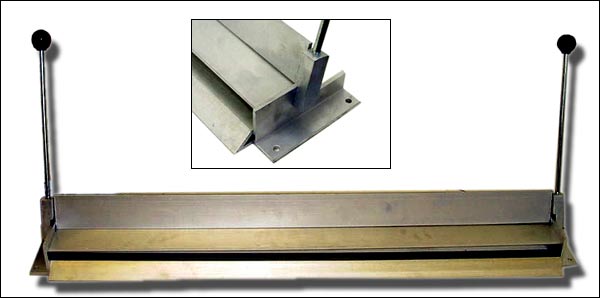
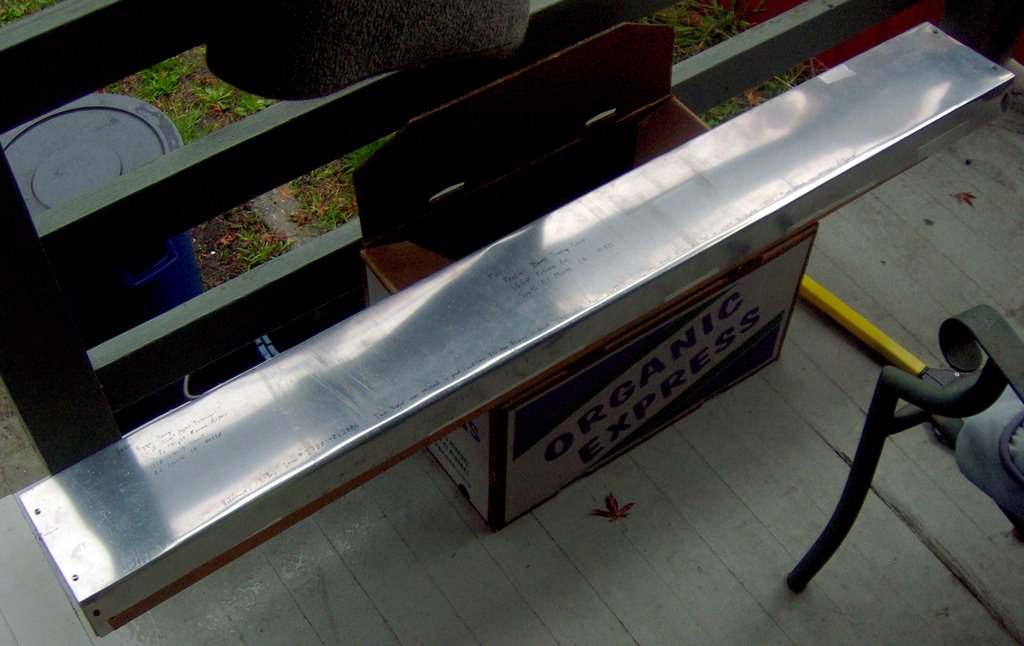
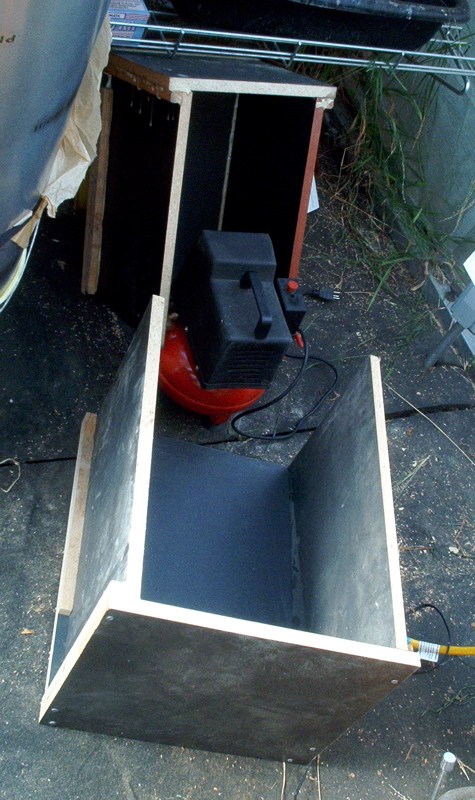
I forget where I stole this idea but it works great! The welder (not me, I'm not currently set up for it) can tack the butts in between the 3 coat hanger wires.

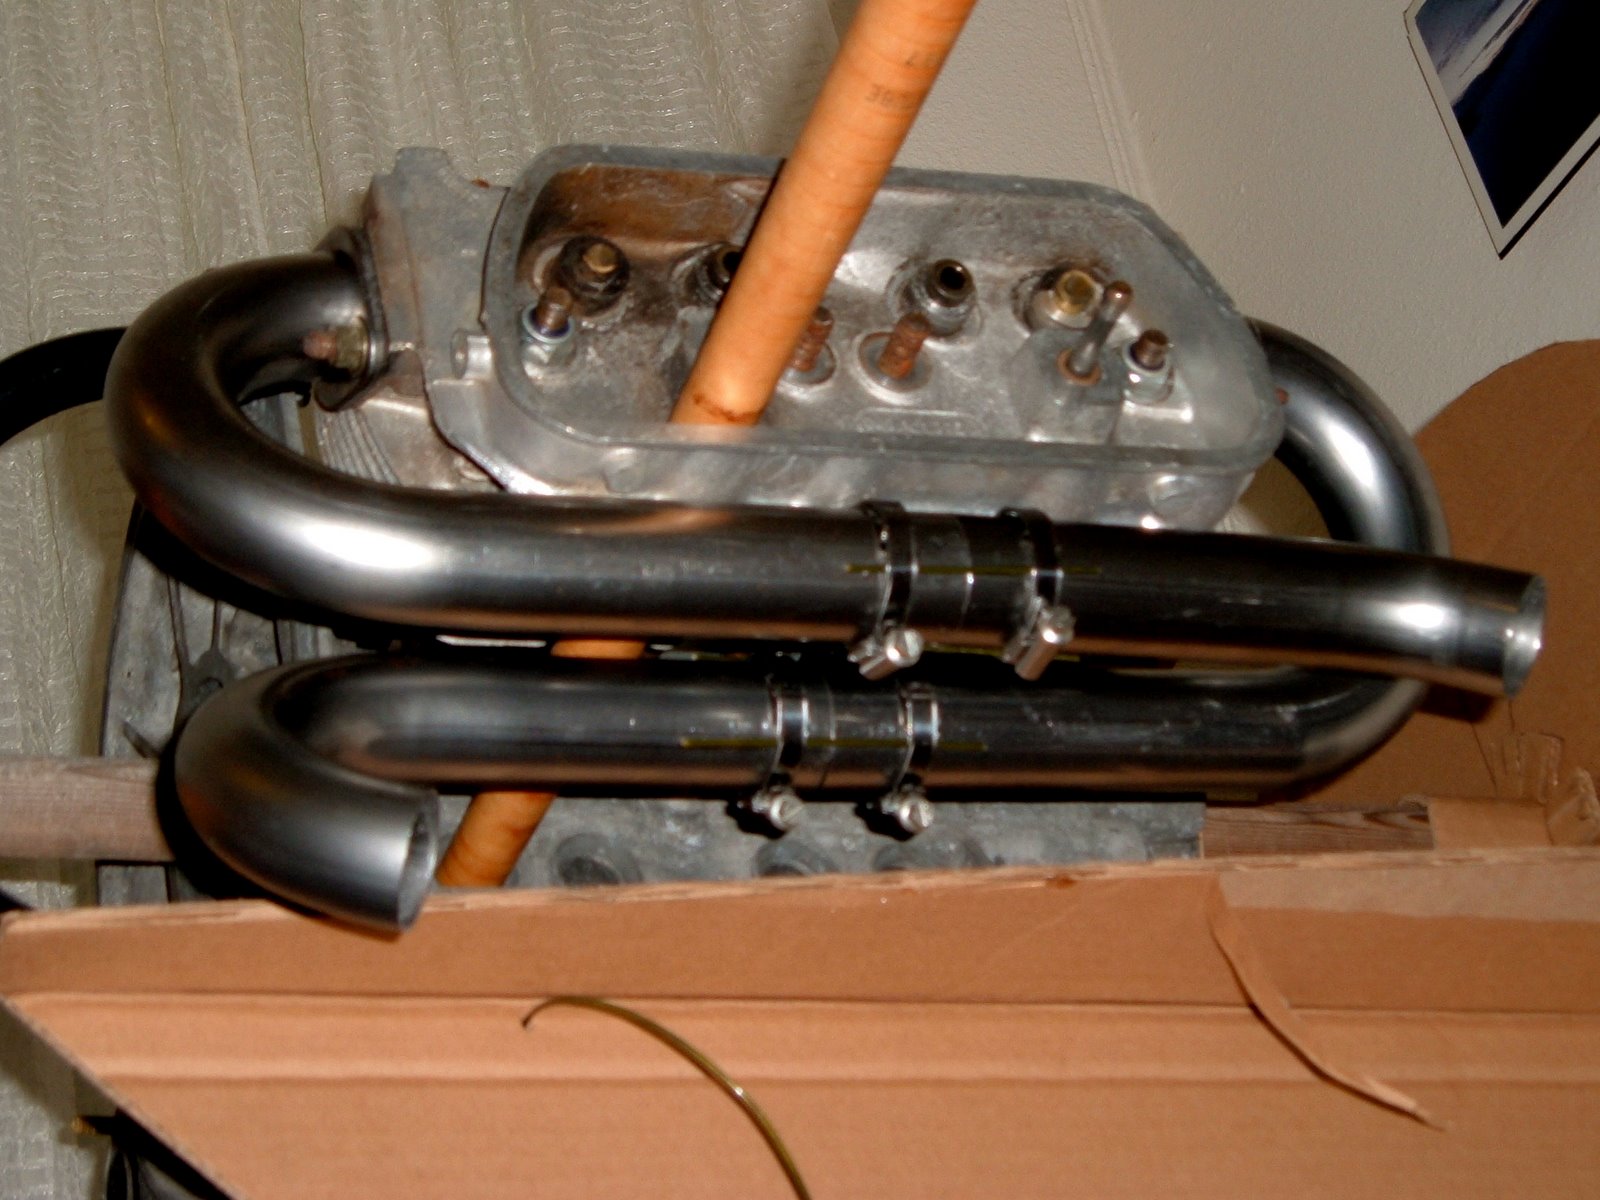
Ready to send to the welder.
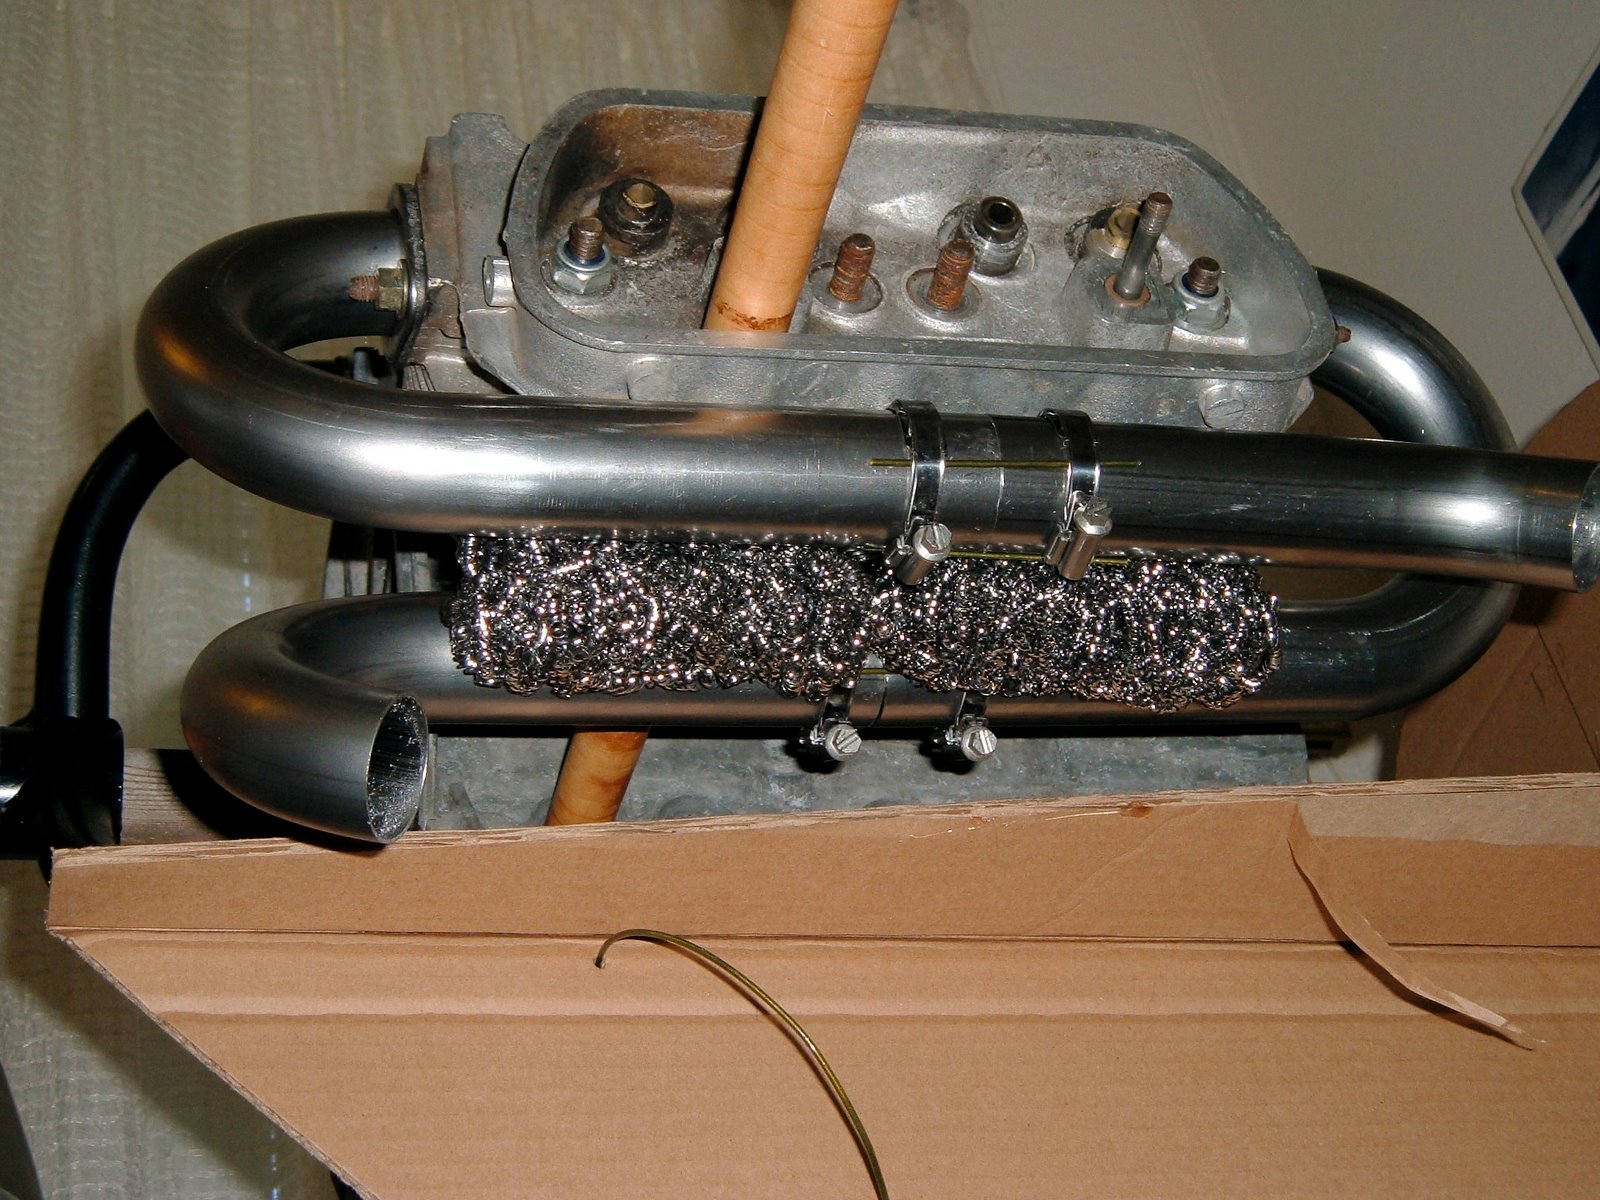
Note the stainless steel pot scrubbers to add heat transfer surface.
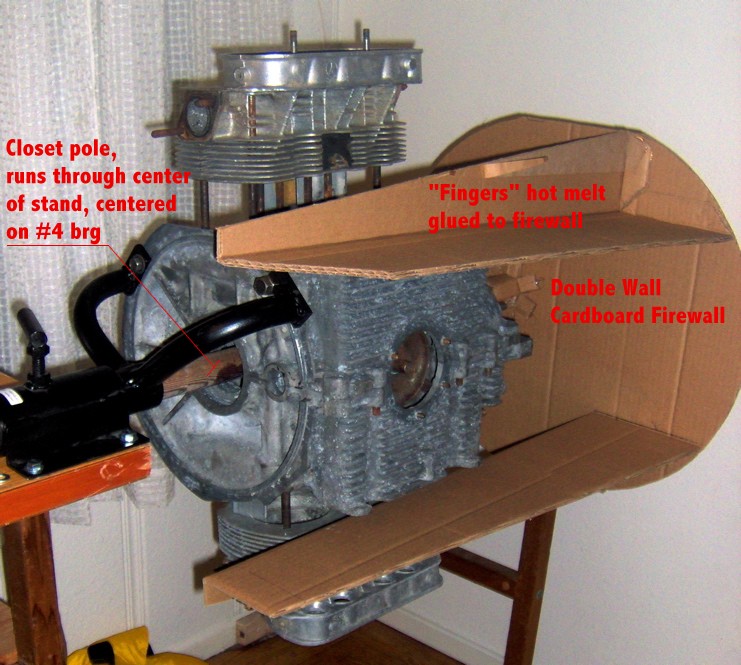
 This entire mess gets wrapped with aluminum sheet, with a flanged connection for the duct to the heat box. Not shown in any of these views is the solid aluminum spacer that gets clamped in between the pipes to hold everything nice and solid. I didn't like how the pipes were cantilevered off the exhaust flanges.

This was a pretty easy and satisfying project. I made all the tubing cuts with a hacksaw, cleaning them up with my disk sander.

The next question is whether to make the other side identical to this, or to go as simple/light as possible, or to join the pipes to facilitate a muffler. I've flipped the engine over in the stand, and I'll stare at it for a few weeks - something will come to me. Also, the plumbing of the hot air to the carb heat box is a little unclear. The bed mounts REALLY get in the way of where I'd like to route this tubing. Hopefully once the intake starts coming together that will be a little clearer

Labels: , ,

Sunday, June 10, 2007

More with the Firewall Forward Mockup


With a double wall cardboard box from the local recycling center, and some hot melt, the spatial relationships of the engine to the front of my fuselage are getting clearer. This design uses a "bed mount". The sides of the case are flattened, and aluminum angles are bolted through the walls of the case. Resilient "Barry Mounts" then bolt up to these "fingers, built up of extrusions and sheet. The reason I chose this airframe is that these mounting scheme doesn't care which way the flywheel faces. The prop hub on this airframe will be mounted on the flywheel end, the left in this image.


Some of the details. Hot melt glue is a great thing for this sort of quick and dirty assemblage.


The pole is centered on the #4 bearing with a cardboard "bushing". Nothing is glued to the pole, allowing it to be taken apart in a pretty tight space here in the corner of my front hall/workshop, and to position the engine relative to the airframe.


It's not too clear in this view, but most of the engine outboard of the case hangs out in the breeze in this design.

Now it's time to start playing around with the tubing bends, and seeing how it will all fit together, if it will.

Labels: , ,

Friday, June 08, 2007

VW Aero Engine Mockup


In order to work out the intake and exhaust, I've built a mockup out of a junk case, 2 junk heads, and some aluminum spacers. I've got it mounted to my engine stand, so I can flip it all around with relative ease. Below is my first cut at what the plumbing will look like:


Symmetry is the hobgoblin of the unimaginative. The objectives here were a crossover 4 into 2 into 1 exhaust, take carb heat off at least 2 cylinders, and have the sump accessible for oil changes. To save weight, the intakes will be fabricated out of aluminum bends from Burns Stainless, the exhaust will be mild steel, starting from a Great Plains U-Build kit, ceramic coated.

Update: I've decided I don't like the 1-4 exhaust running that close to the carb, so I'm going to try to run it in front of the intake.

Another Update: NONE of the exhaust scheme presented here worked at all, given the bed mount of my fuselage, so I've radically simplified the arrangement, so later posts.

Labels: , ,

Tuesday, May 29, 2007

Notes on overhauling a Tillotson Model X Carburator

A Tillotson Model X Stripped Bare

Why bother farting around with a carb that's been out of production for at least 30 years? Well, some think that it's still an excellent choice for a flying VW engine. It's simple, robust, and does a pretty good job, for this size engine, of supplying the right fuel-air mixture over the entire speed range of use, which is about 800 to maybe 3600 RPM max, and that would be pushing it.

I bought a couple of cores, and recently set to work overhauling them. While there is a lot on the web about overhauling Zenith Model A carbs, there is bugger-all on the Tillotsons, which were/are MUCH lighter (Zeniths are CAST IRON), cheaper, and in some ways better.

First, a note about cores. It's best to examine them, or at least get good pictures, with the top cover off. One of my cores looks to be unsalvageable, as the boss for the main jet is broken, right in the throat where it all happens, mixture wise. I might be able to fix this with some JB weld, but for now, it's paperweight. And neither core I bought online had a choke/mixture driver. Not essential for my aviation application - I'll be using a primer to cold start the engine - but if you're building up a car, you'll want one. The OTHER core I bought had it's own problem, it looked like The Jolly Green Giant had stepped on the intake, more no that anon.

Another issue is the overhaul kits. Some are MUCH more complete than others. The $75 kits have damn near everything, including new choke and throttle shafts and butterflies. My $15 kit has the gaskets, jets, float valve, the several needle valves, and not much else. But it's sufficient, with my cores, although I would like to have the smaller passage plugs to be able to clean out EVERYTHING.

Finally, the 13/32 inch wrench you'll need to get the Gas Adjusting Needle Housing out is a rare beast indeed, get a cheap 10mm open end wrench and file it to fit.

Disassembly is pretty self explanatory. If something doesn't want to come apart, soak the whole deal in carb cleaner a day or so before trying it again. You can use a LITTLE heat on the housings, but not much, or you'll have a shiny puddle on the shop floor. Rust is not a problem with Tillotson's, but old dried up gas is pretty effective locking compound. So, back in the dip tank.

Here is the problem I had with my "best" core. What's wrong with these pictures:

Notice the circular crater in the center of the intake horn? (this is the top of the lower casting by the way) Some Brain Donor in the past honked down on the grub screw holding the Air Maze on so hard it ovalized the intake horn itself. It was a lot worse before I took these pictures, I've already pressed it almost back into shape.


Here you can see the bottom of that crater protruding into the ID of the "kirksite" casting, also called "pot metal", a low melting point mixture of zinc and aluminum that is a pretty great material for this sort of casting, as long as you keep it away from salt water. The choke shaft and butterfly plate goes in here, the main jet is way up in there, and the Gas Adjusting Needle Housing is still in this core, it's the brass tube on the right side. I'll use my fancy tooling to get this horn close(r) to round again.
Here's the fancy tooling, a 1 inch thick piece of (hardwood?) plywood scavenged out of an old couch. The idea is to press it back into shape, without putting too much of a point load on the rather brittle casting. Note the "tooling pins", other wise known as common nails with the heads cut off. I use a lot of them. Thanks, R.S Hoover.
Proceed slowly and cautiously please. I only have one good lower casting, and this is more of "Nice To Have" action, as the carb heat box I'm planning to make up soon will be able to accomodate the out-of-roundness that's left at this point.

Most homebuilt carb heat boxes use the nice spun aluminum flanged fittings you can get from Aircraft Spruce. But the Tillotson throat doesn't match any of the available sizes exactly, so I've been scratching my head, and consulting my reference books for a way to custom fabricate such a thing without welding or machine tools. Found it, look at this:
This flanged fitting is two pieces of sheet metal. The inner tube penetrates the wall of the box, presumably into a tight, flycut hole. The outer tube has the flange. It looks like there is a bit of spooj sealing it all up. I can make THAT. The rest of this guy's engine installation looks really good, check it out. And while you're at it, read a little about R.S. Hoover's approach to carb heat boxes, and William Wynne's personal experience on why you need one.

Labels: , ,

Saturday, May 12, 2007

Engine, Alternator mounts for Flywheel Drive VW Aeroengines

Some of us believe the proper way to mount the prop to a VW engine is via the Flywheel end of the engine. Great Plains Aircraft Supply has some around to this way of thinking, and now supplies pieces to make this happen. They have not, as yet, posted very good pictures of the stuff, so I'm stepping in to give out some clues. R.S. Hoover, in the Chuggers and AirVW Yahoo groups, has posted some pictures of the flywheel end piece, and the spool prop extension. On my Hummel Ultracruiser Plus variant, I thought I would be able to use a belt drive to a Kubota/John Deere PM alternator, so I bought one of Steve Bennet's combined alternator/motor mounts.

This side faces the engine. Those little bosses at the top of the image get drilled to clear 8mm fasteners that tap into the existing bosses on the case itelf. The two big holes service conical shock mount bushings, with interface with a bed-type engine mount.

Similarly, this face gets drilled for the pivot point for the alternator, and another fastener to the case. The holes are nicely located, with a cast in "Center Punch".

Unfortunately, this part will NOT work on my fuselage, as the extensions of the forward fuselage that form form the the engine mounts on this design don't leave enough width for this dealy. Steve took it back with no questions.

This piece was designed to be part of the Great Plains Rear Drive System, which involves an outboard thrust/radial bearing, which the Flywheel Drive setup DOES NOT use. The casting Steve devised for this setup has similar conical bushing bosses cast in. Here is a picture of such an installation on Hal Hadaller's airplane:

The mount mounted. Note the tight clearance to the oil pump outlet.


Hal ended up with the alternator in a different place, so he cut off the arm for adjusting it from the mount.

Here's the whole RDS deal installed on the firewall:

Compare/Contrast to this Flywheel Drive setup on a Sonerai:

R.S. Hoover is one advocate of Flywheel drive, having flown several planes with it, and Chad Stenson is another, with airplanes flying using it. You can find R.S. Hoover via various Yahoo groups, and Chad via Sonerai.Net. I haven't flown this hardware, but I'm building such an engine right now.

Labels: , ,

Engine Mounts for Hummels

Hummel Aviation uses a rather unique method of mounting either a half or a full VW engine in their designs. Rather than the usual "Conical" mount (usually via an accessory case), they bolt a couple of aluminum angles to the sides of the oil sump, and work shock mounts from there.
It's a bit of a chore to do this accurately. Scott Casler, the Hummel Engines guy suggests using a belt sander. Not having one, I used a vixen file, and a lot of swearing.

Here we begin.

Notice the "sugary" surface is getting brighter and brighter.


I used prussian blue and a section of aluminum plate as a surface plate to keep the surface flat, getting there.

I think it's time to declare victory. This is a junk case I use for experimenting, by the way.

This is what the inside of the case looks like. The bolt heads (AN4) have to fit down in those cavities, which are not exactly flat. I'd love to spotface in that area, but it's a PITA, and the sump walls are only about .200 in thick, so you don't want to carve away too much meat.

The solution, as far as I'm concerned, is a clever little dealie called a Stat-o-Seal. It's an aluminum (and therefore deformable) washer, with an o-ring bonded to the ID.
Between the O-ring, and the crush washer, we should achieve a good mecanical connection, and a seal the oil in the case. The aluminum angles will get a coat of whatever case sealer my engine builder likes. Self locking nuts go on the outside.

Labels: , ,

Friday, December 08, 2006

Bang, Bang Rufus' Dead Blow Hammer

An update to my last post:

I splurged and bought a nice dead blow hammer. For this sort of work, I think you need to Go Big. A 3# hammer is a nice compromise between getting the job done and irritating my tender shoulder.

And the E-Bay vendor I bought the brake I found inadequate refunded my money. Life is good, my trust in Human Nature still largely intact.

Labels: ,

Sunday, November 26, 2006

Long bends for Scratch Builders of sheet metal airplanes

You may recall I was working on an "Amateur Folder" per Michel Columban, the French designer of the Cri-Cri. But I was stretching the limits, again. I need to bend stuff up to about 4 feet long, at least, substantially longer than the Prototype was designed for. To make a LONG story short, it didn't work when bending the 2219-T8 I have in abundance. So, I'd noticed what looked like a suitable brake on E-Bay, and I threw money at the problem.

Brake found on E-Bay

My heart fell when it was delivered - it's all out of aluminum. The forces involved in bending build up pretty quickly, and even though it was advertised is being capable of bending "14 gauge metal" (? steel? Aluminum? Copper? - 14 gauge's about .080", depending on the metal), it too failed at bending a mere .020" 2219-T8 about 2-1/2 feet long. The bending leaf visibly deflected as soon as I put some muscle into it. I can't recommend anyone buy one of these. Maybe if I was using 2024-T3, like I should be it would work, but I'm skeptical it's good for anything other than mild steel, annealed, or dead soft aluminum.

So, I need to send the damn thing back, and get it out of my shop, even though it's not clear the Seller will refund my money, and there is NO way I'm getting my shipping charges back. How to box it up so that it will get to South El Monte? I threw the original box away as soon as I opened it up, well before I actually tried it out - Doh!

Well, since I've got plenty of .020" 2219-T8....


The end caps are particle board scavenged from discarded IKEA furniture discarded by apartment dwellers in my neighborhood. A few sheet metal screws hold them in. The top is held on with 600 MPH tape and the aforementioned sheet metal screws at the ends.

The main body is a channel I bent using a technique I learned from Dave Thatcher, the CX4 guy, and therein lies the bulk of this tale. I got a DVD of him from another builder bending up an aileron at Sun and Fun using little more than a forum-issue folding table, a 2 X 4, a rubber mallet, and the real secret, a piece of 1/4" plywood.

I'd bent stuff by clamping it and hammering it before, but in thin aluminum, I've never been pleased with the "free" edge of the resulting part. The mallet blows stretch the metal rather unevenly, leading to a lot of ripple. Not much of a problem when a channel spar is riveted to a skin, as in tailfeathers, but a big problem for longerons, as used in the tailcone of various Hummel avias.

Let me cut to the chase: using a piece of plywood to distribute the blows makes it possible to make incredibly straight bends with bupkus for tooling. You still have to tightly clamp the sheet stock between two fairly rigid bars of something (Dave advocates an 8 ft long section of 3 X 3 inch or bigger STEEL angle, fastened to the front of your bench, level with the top), and you're limited by the throat depth of your C-clamps to how wide a flange you can throw, but I bent up the channel that forms the "box" above in pretty short order. Some pictures:


Notice in this setup, I'm able to clamp from the back. If you're clamping from the front, just periodically use the mallet to swing the clamps from side to side, the get the whole length of the bend uniformly bent. It has to be plywood, solid wood of comparable thickness with split to splinters in 2-3 blows.

Here is Your Author, in his Industrial Jammies (no heat in the shop, it may be California, but 50 degrees and raining hard is still 50 degrees), workin' it. Note: this process is Loud. Girlfriend was wearing my earmuffs while I wailed on this mutha. This is not something you can do late at night in a shop with 6 mil plastic walls.


So, the "failure" of both the "Amateur Bender" and the E-bay Cheap Chinese Junk lead to some learning. I was reluctant to try Dave's technique, and was thinking of building yet another bending device, probably this one from the www.ch601.org website, since it doesn't require any welding. And I still may do, but having tried this technique, on a project that didn't require Flight Hardware, I may not need to. Having a non-critical project to learn on is a really good way to teach yourself the skills you need to build an airplane from scratch, when you can't have a kindly A&P standing at your shoulder at all times, teaching you the ropes he learned from Donald Douglas Senior Back In The Day.

Labels: ,

Cleaning your heads

Air cooled VW heads are aluminum; if you "hot tank" them, all you'll be left with will be the studs, valve guides, and seats. You need to cold tank them. Shops around here charge $40 just to cold tank the heads.

Radiator Specialty Company, the makers of GUNK, sell a suitable "digester", that eats anything carbonaceous, and leaves the metal untouched. There is at least one other brand, with different chemistry. The problem is getting anybody in California to sell you any, particularly since your head won't fit in the little dip tank. You need at least 2 gallons, and container that's at least 13 X 10 X 8 Inches, with NO plastic anywhere.

I bought the last gallon of GUNK Carburetor Cleaner the local Kragen had on the shelf, then went back to get another, and not only didn't they have it, they claimed to be unable to get it. Radiator Specialties also makes a product called Hydro Seal II, which is available in useful larger quantities, but it apparently cannot be retailed in California at all.

Girlfriend's enameled Canner served as the Cold Tank, and was able to score the second gallon at a DIFFERENT Kragens (total cost for parts cleaner = over $40 - should have Paid The Man - Oh Well). Still wasn't enough to cover the heads, so I filled some tall glass jars with water to displace some volume, and then added a little more mineral spirits. This toxic brew lives under the porch, WITH THE LID ON, the shade keeping it from getting too hot, and sending Volatile Organic Compounds skyward.

In a month or two, I'll fish out the first head, and put the second one in. Then we'll inspect them, and start rebuilding them, if they are worthy.

UPDATE 11/08
The heads were junk, not worth rebuilding, but they live on in the engine mockup.

Labels: ,

Wednesday, October 04, 2006

Bending and Scraping Aluminum

The current infrastructure project is a "Amateur Folder", or bending brake, per Michel Columban, the designer of the Cri-Cri/Cricket and the Ban-Bi. Part of making it involves putting a fairly small radius on some aluminum bars. I do this by SCRAPING the metal, an operation not much used anymore, but a very handy one at times.

Think of a scraper as a file with but one tooth. In this case, I took an old, dead, saw blade, drilled a hole of the suitable RADIUS in it, ground out a notch to expose the 1/4 round radius I needed, and started drawing this improvised tool along the aluminum bar.

I hit upon this method by noticing that the radius gauges I'd made in this manner actually worked pretty good at removing metal. I'd used scrapers in woodworker, and was also aware of their use in metal working from various volumes sold by Lindsay Publications. DO NOT deburr the hole you drill - the sharp burr is part of your cutting edge.

If you've found your way here, and you think you need one of these, go make one, you'll learn more by doing than anything else I could tell you about making or using on of these.

Labels: ,

Tuesday, September 12, 2006

E-Bay Ain't Necessarily Cheaper - Alternative Ways to Shop While Buck Naked

You may recall my futzing about with a small air compressor. Well, just when I finished the enclosure for it, to cut down the sound, I turned it on, and it leaked air out of the controller. A long,boring, and horrible disassembly resulted in the determination that it was un-salvageable. The enclosure was SOOOOO tight, no other compressor would fit in it, and I didn't want to throw it out, after the time and money I'd invested in it.

I bought the original compressor on E-Bay, so I went looking there. Vendors still offered it, although not the one I bought mine from. But I never managed to win one at what I thought it was worth. Plus, shipping for something as heavy as this is high.

I have a Kragen Auto Parts (used to be Grand Auto, a locally based regional change, but they went belly up...). I'd noticed they carried air compressors, although the shop I'd checked (in person) hadn't had any like what I needed. But online, they did! And I could pick it up locally, so FREE SHIPPING.

The unit I got from them is actually higher in quality than my original version, for what amounted to less money.

One of the things I like about shopping on the Internet, whether E-Bay or otherwise, is that I can do it late in the evening when I don't have the energy to do anything else - on my project or otherwise. But the shipping eats away at any savings, and E-Bay auctions are anymore not such a bargain. I've been trying to catch a good deal on a backpacking stove, and most of the auctions, especially after shipping, have been coming in at my local retail price or MORE.

So for me, this Online Shopping/Local Delivery works well. I don't have to drive to someplace, usually on a weekend, when places like auto parts stores are a zoo, only to find that what I want is not in stock. I can order, and be SURE I can pick it up within 1-2 business days - faster than shipping, at no charge. Sears has a similar deal. Come to think of it, when Sears had a big catalog operation, back when I was a kid in the 1960's and '70's, my mom used to order from the catalog for delivery to a special catalog outlet that was closer to our home in a developing suburb than any Sears retail store and I think shipping was free then too. Recreation Equipment Inc. has this option as well.

So give it a shot.

Anyway, I got the compressor into it's enclosure, piped up the way I want it, and I used it to drive my rivet gun for the first time tonight. Pictures by the weekend.

Labels: ,

Sunday, August 13, 2006

Wrestling with the infrastructure

With my son off at his moms, I had a grownup day, and I was all set to make some parts, make some progress on the plane. Instead, along with doing the laundary and ironing labels in the Wee Bairn's clothes, I wrestled with the Infrastructure.

I like overhead cord reels to manage the power in my shop, and I've got two of them. One of them is a US made job that hangs from the ceiling, is all metal, and costs a lot. In an idle moment, I bought another one from Harbor Freight, plastic, half the price, but I actually liked it better, at first, because it came with a longer "short cord" (the one you plug into the wall) and it had a better wall mount bracket.

Well, last week, it wouldn't retract. Harbor Freight doesn't fix ANYTHING, and it was out of warranty. I had the manual, with an exploded diagram, and it looked tricky - like it would fly apart as soon as I opened the cover. But I woke up this morning determined to fix this thing, and it wasn't THAT hard. Here was the problem, and the solution:

It's a bad design, frankly. The walls of the inner hex are molded plastic, about .060 in, if that, and they retain a formed steel hex, which in turn engages the spring that recoils the cord. A few hearty pulls, and the steel hex garps out the plastic hex, and you're all done. I had some fresh cookies of particle board from another project, so I bandsawed them into wedges, and jammed them in there. I used some urethane glue on the first few, then realized NOTHING sticks to polypropylene, and just wedged them in place dry. It was a little dodgey getting the reel, with the springs, the ratchet dog, etc., all back together, about 5.7, but we flailed only slightly.

It works now, and it only absorbed about an hour I would have preferred to spend building airplane parts.

The next challenge of the day was putting the foam on the air compressor enclosure. They sure shipped fast. I bought 3 linear feet of 4 feet wide 3/4" thick foam, with the adhesive back, and wished for more. I ended using a couple of acoustic panels salvaged from a Cubicle Farm, and piecing together scraps to finish the job.

My joinery was a bit off, and I had to rebuild the outer box, and it's still a bit tighter than I might like. If you do this, measure the machinery all around, add 3/4 inch clearance all around, add the thickness of the absorbtive material you plan to use - that's sum is now the INSIDE dimensions of your innermost box. Add the thickness of the box, the OUTSIDE layer of foam, 3/4 inches of clearance all around, the foam INSIDE the OUTSIDE box - now you've got the INSIDE dimensions of the OUTSIDE box.

You may recall we started at at 83 dB 6 feet away. Enclosing this puppy brought it down to 72dB, and adding the absorptive foam, inside and outside of the inner box, and inside the outer box, brought it down to about 63 dB. Now I just have to finish plumbing the thing....I'm using copper tubing and compression fittings. If it's good enough for water pressure (typically 80 psi around here) it should be good for 100 psi air. I know the tubing is good for it; we'll see about the fittings.

That sucked up the rest of the day. Girlfriend came over. It was time to cook dinner and/or make out, but I was in a nasty funk, having worked hard all day on nothing I WANTED to be working on. Then I burned the eggplant I was baking.

We went out to eat, again. I'm better now. Really. And I've got Sunday to get something done.

Labels:

Sunday, August 06, 2006

My Shop and Welcome To It

I'm building my airplane project in what amounts to a greenhouse. I started in a 2-car garage in my old house in Oakland. When I bought my present house in El Cerrito, it didn't have a garage. I had to move my shop and all my tools to a rented shop in the basement of a warehouse in Oakland. It was OK in some ways, after I paid to run more power into it, but I never got down there. When I bought this place, I consoled myself on the loss of the garage by toying, in my mind, with the idea of putting a temporary structure in the back yard. I cooled my jets on that idea, and started to explore raising the house to put another story under it:

I put a lot of hours into designing it, then figured out what it would cost, then started looking for another house, then got discouraged with what it cost to buy a tiny house WITH a garage, since prices had gone up substantially in my neighborhood since I bought my tiny house WITHOUT a garage. What was that idea about a tent again?

I found the tent of my dreams. I mocked it up in my back yard (which it fills, I ordered a 20 X 20 tent, and my lot is 25 ft wide, and about 30 feet from my back porch to the back fence), and invited all my neighbors to say "NO" to it. None did, which is a good thing, since it's at least twice as large as the code in my town allows for "temporary" structures. I didn't want to pour a slab, but I didn't want a dirt floor, so I put rubber stall mats over a compacted dirt and sand base.

So here we are, the widest view I could get:


Yes, it's a mess - I'm in the middle of about 3 different projects at once here:

But I can hop out my back door and get to work, any time I'm home.


  • Either don't use any sand, or put black plastic down on top of it; the floor is becoming a giant ant farm, and they are hillocking it up in weird places. Spend more time leveling it before the stall mats go down.
  • Run more power, with more outlets. I've got two 15 amp circuits, and two boxes, but more would have been better.
  • Get it in white. It's too damn hot, and the translucent plastic doesn't cut down the UV - everything fades in the sunlight, and you have to wear a hat and sunglasses to work out there in the summertime.
  • The Harbor Freight retractable power cord is a piece of shit - the spring return crapped out almost immediately.

Labels:

Finally Making some parts

Finally working on the Mongrel Dog (my hybrid airplane, a mix of Hummel Ultracruiser Plus empennage and somewhat modified fuselage, and wings that are updated, lengthened Teenie Two planform) a little bit. I fabricated and riveted the little angle brackets that stiffen up the flanges in the bulkheads, and started working on the firewall, in preparation for hanging the bulkheads on the building beam, which was built nearly 2 years ago back in the old shop in Oakland.

I didn't like that the plans used aluminum for the firewall, so I substituted galvanized mild steel, and made the forms myself. I bought bulkheads B, D, E and F from Hummel Aviation, they were very cool about just selling me the ones I wanted, and didn't insist on selling me the whole set. Since my wing has a shorter chord than used on a "true" Ultracruiser Plus, I need to shorten up the fuselage in the cockpit area, since bulkhead C has to fasten to the rear spar of the wing. I later (after I built the building beam) figured out another way to manage the fuselage, but with the shorter chord wing, with a lower Clmax (it's also a thinner section), I probably don't need as much tail moment anyway.

Links to pictures:

Labels: ,

Silencing the Air Compressor

I've got a little pancake compressor for blowing a little bit of paint using my Harbor Freight airbrush, for pulling rivets using my Harbor Freight "Pop" rivet pullers (also good for dimpling using the pop rivet dimple dies), and for driving AN rivets using my 3X rivet gun.

It try to hold to a self-imposed limit of 10 PM for power tool use. Although this is NOT an oil-less compressor (those are even noisier), it's pretty loud, 83 dB at 6 feet, too loud to use even before 10 PM in a residential neighborhood in a shop with NO sound attenuation.

Dan Checkoway inspired me to do something about the noise, but my research shows that plywood doesn't do much to STOP noise, it tends to reverberate it like the back of a guitar. You need something stiffer, heavier. Mass helps in this application. Soundboard, Homosote, or MDF are good. Fine grain particle board from abandoned IKEA shelves is what I found in my neighborhood for free.

This cool soundproofing site has both information and materials to do the job.

Here is the result so far:

Air compresser and the nesting boxes that enclose it

Even though I haven't installed the foam yet, and I'm only using two nesting boxes instead of 3, I've already cut the noise from 83 dB to 72dB at 6 feet. Tune in for the results with the foam installed.

Labels:

Tuesday, December 27, 2005

Picking up some loose ends

I found a peanut free hazelnut spread at Trader Joe's that the Bairn will tolerate.

The bike with the nice generator setup on it got stolen, so I tried to put a similar setup on my teeny front wheel Bike-E, which worked for a little while, then failed, for reasons unknown. I still like generator lights, and my NEW commuting bike has a Union setup.

I'm still with the Girlfriend I'm Not Supposed To Blog About.

I don't blog very often, it's true. I'm not sure why. I post comments pretty frequently on the blog of an acquaintance, and I still love to read, think, ponder, etc. But putting my thoughts down seems rather a chore.

The airplane project is sitting un-touched for the last 7 months or so, since I moved it to my backyard shop from it's tomb-like former home in an Oakland warehouse.

Labels: , , ,

Monday, January 17, 2005

Silicone Lubes

Wet Platinum Premium Body Glide is really great stuff for semi-permanently lubricating Zefal Mini Double Shot telescoping bicycle pumps. I like it for other things too, but those who don't like to take petrochemicals into their bodies may object to it.

Labels: , ,

Wednesday, January 12, 2005

Riveted Aluminum Fuel Tanks

index
IMHO, this is the way ALL fuel tanks for homebuilts should be made. This web page also a good introduction to basic fabrication. Faster, easier, cheaper and cleaner than making a tank out of fiberglass. Less skill and equipment dependent than a welded tank. Forget about a soldered galvanized tank (Teenie Two spec), you cannot get the flux or the solder Calvin (may his memory be for a blessing, he died about a week ago) Parker used Back In The Day.

Labels: ,

Tuesday, December 07, 2004

Time to make some junk

One of the biggest hurdles to starting a homebuilt airplane project is the mindset that every part you make must be "flight hardware".

That attitude MUST DIE if you are to make any progress at all. So, your task begins with making some JUNK. Say you start your scratch built all-metal airplane by beating out some ribs (which is a very good place to start). Before you waste your good material, get some stuff that you don't really care about, if you can.

Some caveats. Scratches are OK when Making Junk, but big dents and bashes make the sheet harder to work than it needs to be, hard enough that learning will be impeded. And cheap aluminum (like flashing) generally works differently than the real goods. In particular, flashing is dead soft, and take a lot less beating over the form block than say 2024-t3.

Where do you get cheap crap to experiment with? Well, I get some of it by dumpster diving, but then I work at an industrial facility. Flashing is available at Home Improvement big box stores everywhere. It comes in various thickness, from about .010 inch to about .032 inch, and is generally 3003 aluminum, but is sometimes dead soft 1001 pure aluminum. I suggest the 3003, as thick as you can find it. If there is a scrap dealer in your neighborhood, they might have odd lots of sheets, but watch your mill marks carefully, you can end up with some strange alloys and tempers. Ask me how I know....I thought surplus 2019 would be fine, but it turns out it was -T8, fully hard, and a bitch to form. 3003, 6061, 6063, and 5005 sheet is all relatively cheap, and may be available at your local sheet metal, or heating/ventilation/air conditioning shop. And who says you have to use alumium? Mild steel sheet, galvanized or not, is pretty readily available, and forms about like tempered alumium if you drop the thickness a little bit. It's actually a bit more forgiving of error, and doesn't need as much spring-back allowance, but still, it forms, and it's cheap.

Some sources to check out for cheapo aluminum can be found at Aluminum Sources

In making junk, you seek to make as many mistakes as possible. The caveat here is, again, if you're using flashing, it's not as sensitive to things like sharp internal corners as 2024. But bust it up. When you're done, toss it in the recycling bin.

There are a lot of web sites that show/describe forming a rib. Search for Zenith or Sonex sites. I'll probably go into a laborious descrpition in a later post, the purpose of this post is to get you off your ass and out into the shop.

Labels: